Saturday, January 31, 2015

love.....


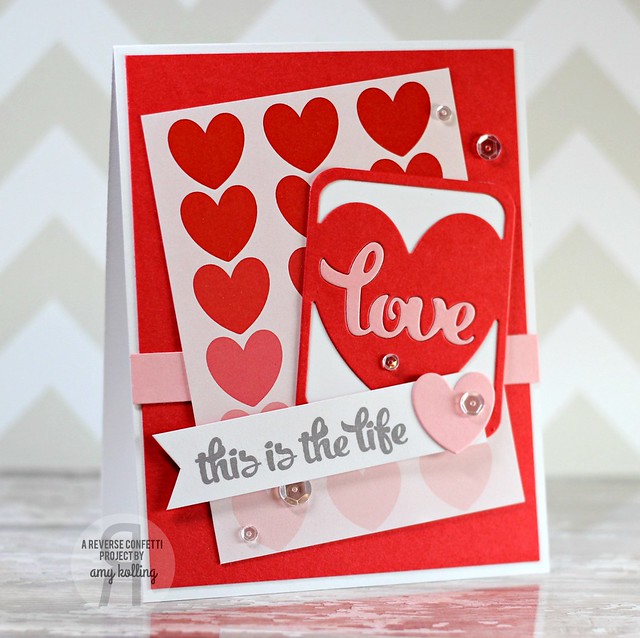
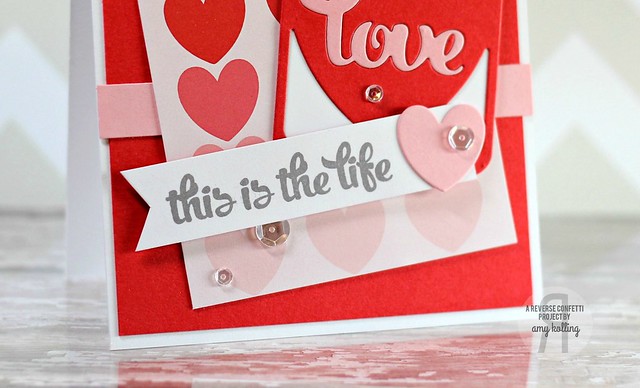
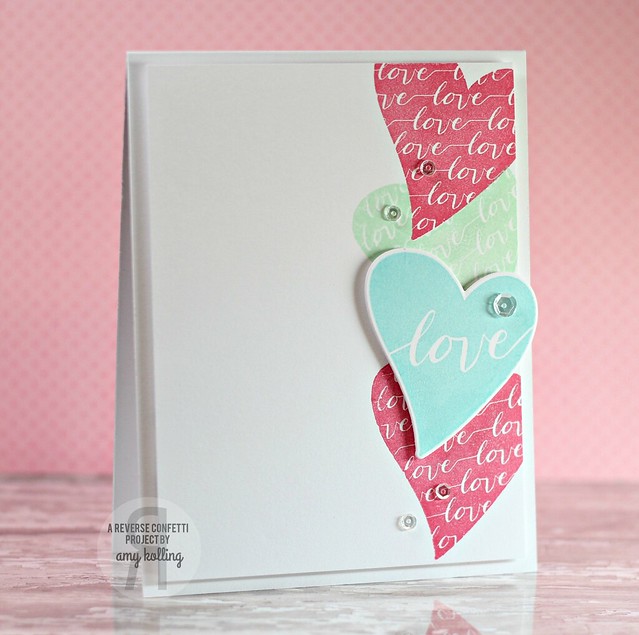
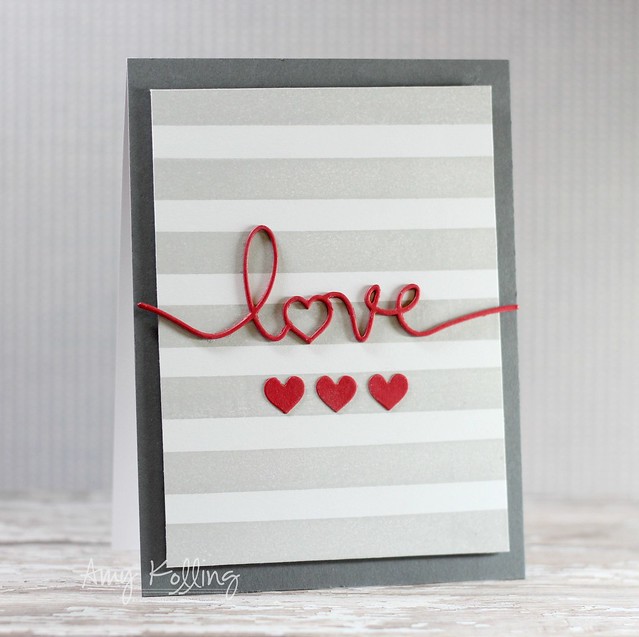
Hello!  I have a quick card to share today using ONE die.......a word die.  I love word dies.........the scripty font of this "love" die is just so beautiful!

This die is from Frantic Stamper is one of my favorites.  I started my card by stamping gray stripes from Set of 3 Lines cling stamps onto a trimmed piece of cardstock.  The sentiment was diecut multiple times and glued all together for dimension!  When diecutting, always remember to keep even the tiniest things to be used later.  On my card, I've used the 3 hearts that were dicut from the center of the Handwritten Love die to add some interest below my sentiment!


Scripty Love


Thanks for sharing a part of your day with me!

Thursday, January 29, 2015

My sweet


The sentiment.  I'm probably the only one who would put this on a card.  I say it.....to my kids.  They love me......or tolerate me (LOL)!  

I have a fun watercolor background using some Distress Inks and Frantic Stamper exclusive dies!  I love how soft the colors came out and how they "run" down the card.  

My Sweet1

I've actually used THREE dies for this card:  Sweet word die, Accessory Words die, and Diagonal Card Sketcher die.  The stamped hearts are actually the tiny heart dies that come with the Diagonal Card Sketcher die!  I diecut them with fun foam and simply used them to stamp with!  I stamped the hearts in the same colors of Distress Inks as the watercolored background except they were stamped directly....no watering down.

I wanted to "ground" my word "sweet" so I applied a band of gold glitter tape to the bottom of my card.  Love the effect!

My Sweet2


Thanks for sharing a part of your day with me!

Wednesday, January 28, 2015

Bee Mine


Hello!  We are enjoying the spring-like weather here but I know some of my friends on the East Coast is having to dig out from all the snow.  Today is one of those times where I'm glad I live in Kansas!  :)

I've been excited to finally share this post on my blog.  This card was one of my blog posts this month over on the Taylored Expressions blog.  

When the Little Bits Bumble Bee was released, I had to use it with the Punny Love sentiment set for a cute Valentine card.  The catch?  Of course, I had to make the card a little more "involved" but still CAS.  

BumbleBee1

For my hexagon "heart", I used the Hexagon Cutting Plate to first make an impression into a piece of vellum.  This gave me a place to be able to piece in all the red hexagons.  Once all the pieces were pieced onto the vellum, the panel was die cut with a large heart die from my stash.

Bumble Bee2


Thanks so much for spending a part of your day with me!

Monday, January 26, 2015

SFYTT with Reverse Confetti


Reverse Confetti has an awesome sketch every month called A Sketch for You to Try (SFYTT)

I started my card using one of the Quick Card Panels that released this month.  These offer a FABULOUS starting point for cards!  This one was perfect for this sketch! 

SFYTTJan

After diecutting several Heart Love Pretty Panels (pink and red), I pieced them together and layered it over a white rectangle die from Class Act.  A stamped sentiment from Here's the Story was stamped in gray ink onto a handcut banner and embellished with a die cut heart from Love Note.

SFYTTJan2


SFYTT20_Jan15


Now the best part is.......there is always a winner every month!  Here are the details:

The winner will receive a $20 gift certificate to the Reverse Confetti store and claim the title of ‘Fetti Fave. The winner of SFYTT will be posted on the Reverse Confetti blog on the 30th of each month.
Check out the SFYTT post......HERE.

So let's see your Reverse Confetti creations this month.....you still have time to get it done!

Thanks for sharing a part of your day with me!


Saturday, January 24, 2015

showCASe your style #7


Hello!  I'm posting today as my last post as part of the Clearly Whimsy DT.  :(
What I am excited about is being able to play along with the challenge as a non-DT member!  It's a fabulous challenge!  

I've used the Up, Up, and Away set from Clearly Whimsy.  I stamped and fussy cut the balloon and layered it with some Stitched Clouds from the Stitched Cloud Die set.  For my hill, I used the Stitched Border Trio die.

AmyBalloonChallenge


Here is the inspiration photo my card is based off of!!


Thanks for sharing a part of your day with me!!

Thursday, January 22, 2015

CAS(E) this Sketch!


Hello friends!  Warmer temps have invaded us and I love it!  I want to keep chasing the snow and cold temps away!

Let's start by saying......a sketch is a great place to start when you need a kick start for creating.  There are so many fantastic challenge blogs out there to choose from.  CAS(E) this Sketch is one of my favorites.  This week's sketch spoke to the CAS side of me........so I ran with it in my "own way".  :)

I love this set from Reverse Confetti called Heart to Heart.  (bonus.....it has coordinating Confetti Cuts too!)  I've used the hearts and masked them as I stamped them down the side to mimic the layout of the sketch.  I kept this simple but with a few layers and embellishments!

CAS(E) your sketch


Thanks for sharing a part of your day with me!

Wednesday, January 21, 2015

Curtain Call Inspiration Challenge: Soft Scarf


I have another card for the current Curtain Call Challenge:  Soft Scarf.  This challenge sponsor is the amazing Hero Arts.  

I had some fun inking up the Be Happy Today set from Hero Arts.  I stamped and white embossed  my images onto a background I created with several Distress Inks.  If you haven't noticed lately, I have been having tons of fun making my own backgrounds with my beloved Distress Inks!  Lastly, a sprinkling of sequins in Aquamarine, Pink Peonies, and Pink Blush from Pretty Pink Posh.


AmyHeroArtsCurtainCall4


Stop by the Curtain Call Inspiration Challenge for the challenge details and to play along with us!


Thanks for sharing a part of your day with me!

Hello with Lil' Inker Designs!


Hello!  Did you all have a chance to see the Lil' Inker Designs new release last week?  It was fabulous.  FABULOUS.  There were products for Valentine's Day, everyday, and kids!  Make sure to click on the "Latest Release" tab for everything that was released last week,

One of my favorite products was this new Cover Up Die: Center Point Chevron.  I started out by running several colors of cardstock through my Big Shot with the Center Point Chevron die.  After diecutting one time, I used the negative as a "template" to piece my colored chevron pieces back in and then removed the "template".  

AmyCenterPointChevron

For my sentiment, I've used the Hello word die and layered it over some vellum and added some pink Heidi Swapp star embellishments.

AmyCenterPointChevron2


Thanks for sharing a part of your day with me!!

Tuesday, January 20, 2015

Love!


Hi everyone!  We've been enjoying some wonderful January weather the past few days here in Kansas.  It's been fun hearing my kids playing basketball outside and drawing with sidewalk chalk.  Just enjoying the sunshine and fresh air!!!

I have a fun valentine to share today (it was also featured over on the Frantic Stamper blog last week) using a new die from Frantic Stamper called Rose Heart.  But sneaky me, I didn't use this die in the traditional way!  I love to get extra miles from my dies and this die is one of those!  

This die actually cuts 2 parts......this skinny heart outline and an inner heart with a rose cutout (see image below).  After making this card, I have plenty hearts to make some elegant valentines later!  I just love the effect of all the hearts lined up!  Very easy to do!

Love

All the cardstocks used are from PTI and the word "love" is a die from Frantic Stamper called Handwritten "love you".  I knew I wanted to add some shine to this so using gold for the sentiment and a few mini sequins (Pretty Pink Posh) was just what I had envisioned.

Love2


Thanks for sharing a part of your day with me!


Related Posts with Thumbnails