Sunday, September 30, 2018

Technique Tuesday / Countdown to Release Day 2

HappyThanksgiving
Hello and Welcome!  
Today starts the countdown to the Technique Tuesday October release!  
There are fun stamps and dies this month to get you started thinking about Christmas!

Make sure to check out the Technique Tuesday blog for all the products featured today and full list of inspiration from the rest of the Design Team!  All products will be available for purchase starting on October 1.  


Love these little icons from the Happy Thanksgiving set!  All images colored with Copics and hand trimmed out.  I added them with foam adhesive to an ink blended background through a framed diecut.  To finish, I added a raised border.

HappyThanksgiving2


Saturday, September 29, 2018

Technique Tuesday / Countdown to Release Day 1

StringofLights 

Hello and Welcome!  
Today starts the countdown to the Technique Tuesday October release!  
There are fun stamps and dies this month to get you started thinking about Christmas!

Make sure to check out the Technique Tuesday blog for all the products featured today and full list of inspiration from the rest of the Design Team!  All products will be available for purchase starting on October 1.  


This card was so fun to make!  I stamped the string of lights in a frame-like fashion (masking the right/left sides).  All the lights were Copic colored and then each one was covered in Glossy Accents.  I could not capture the amazing shine of the lights in my photo.  Just take my word for it!  ☺

StringofLights2


Thursday, September 27, 2018

Lil' Inker Designs / Stitched Bats

Amy_Stitched Bat Dies

Hello!  Sharing a card from the last Lil' Inker Designs release using the ever so cute Stitched Bats Dies.

I thought it would be fun to share the "dual stitching" of these dies.  A card this like, the extra outside stitching adds another level to this otherwise CAS card.  I die cut Halloween colors of cardstock with the smallest bat.  And then pieced them back into a white die cut panel.  I only adhered them in place with their bodies so I could lift their wings up revealing the black cardstock underneat.  These bats were just screaming to have googly eyes!  I rounded this out with some stamped sentiments and spiders from Boo Balloons stamps.

Amy_Stitched Bat Dies2


Hello Sweetums / Sparkle Bright

Hello!  
Today I am here with a card using a new (to me) company called Hello Sweetums!  Seriously, isn't the name cute?!  

I had fun coloring up this cute unicorn from Sparkle Bright in rainbow colors of course!  For my background, I ink blended Broken China Distress Ink over a piece of Bristol Smooth cardstock and flicked on some water droplets.

Magical Day

My sentiment was white heat embossed onto a strip of black cardstock and cut at an angle.  I added my unicorn with foam adhesive and some die cut clouds.  Once I had all my elements added to my card, I added some Silver Gems from Studio Katia.

Magical Day2

Tuesday, September 25, 2018

Reverse Confetti / Color Throwdown

CTD512

Hello!  Today is my last post as a guest for the Color Throwdown Challenge!  
These colors are so tranquil.  I pulled out an older but awesome Confetti Cut from Reverse Confetti called Sand Dollar.

My background was created by loosely watercoloring Peeled Paint and Peacock Feathers Distress Inks over Tim Holtz watercolor paper.  I also added some flicks of the same color.  I die cut the Sand Dollar in white cardstock and blended in Pumice Stone Distress Ink at the edges.  

I stamped my sentiment, from Hanging Blooms, in black ink and added some pearls for accents.  As a final touch, I added my panel with foam adhesive to a scored panel (every 1/4") of Iced Aqua cardstock.

CTD512#2 


Please join me along with the entire Color Throwdown DT with this week's colors and create!


Avery Elle / Merry Merry


Hello!  I'm here with a CAS card that uses some non-traditional colors---purple, turquoise, pink, and green.  This would be a perfect card to make multiples of for the holidays!

I've paired Merry Merry, from Avery Elle,  up with probably my favorite set of this past release--Quirky Christmas.  I stamped one of the trees in a row using Sugar Plum, Aquamarine, Magenta, and Celery pigment inks from Avery Elle.  I did use my mini Misti to get my alignment just right and to double stamp my trees for a darker look.

Merry Merry

Once my trees were stamped, I stamped the 'Merry and bright' sentiment over the top using Versafine Clair Nocturne ink.  I wanted that bold black sentiment to stand out over the bright, fun trees!  I added my trimmed panel, with opposite corners rounded, to a notecard and added some pink gems.  If you were doing multiples to send, I would most likely leave off the gems for easier mailing!

Merry Merry3 

Supplies:


Monday, September 24, 2018

Hello Bluebird / Frosty Friends

Hello!  Some of my favorite images for "wintertime" are snowmen.  I am sharing a cozy winter card using Frosty Friends from Hello Bluebird.  This set has snowmen and adorable penguins too!

I created my background using the Country Gingham Background using purple ink.  I love the unexpected color for a winter sky.  I created a frame for my scene using the Gallery Frame Die #1 done in white cardstock.  I created hills using the Spooky Scene Die and partially cut only the hills from scraps.  To finish my scene, I added some birch trees using the Birch Trees Die.  I arranged my scene behind my frame and added touches of glitter with a glue pen along the hills and trees.  

Frosty Friends

To complete my scene, it needed these adorable snowmen!  I added colors of purple using V12, V15, V17 Copic markers.  To finish, I added my snowmen and two speech bubbles to the scene with pops of foam adhesive.

Frosty Friends2


Queen & Co. / Holiday Wishes Kit

Merry and Bright 

Hello!  Ornaments are a classic, holiday icon.  The Queen & Co. Holiday Wishes Kit which features 6 different ornament shaker die shapes, loads of adorable shaker toppings, festive paper pad, and stamp set filled with sentiments.

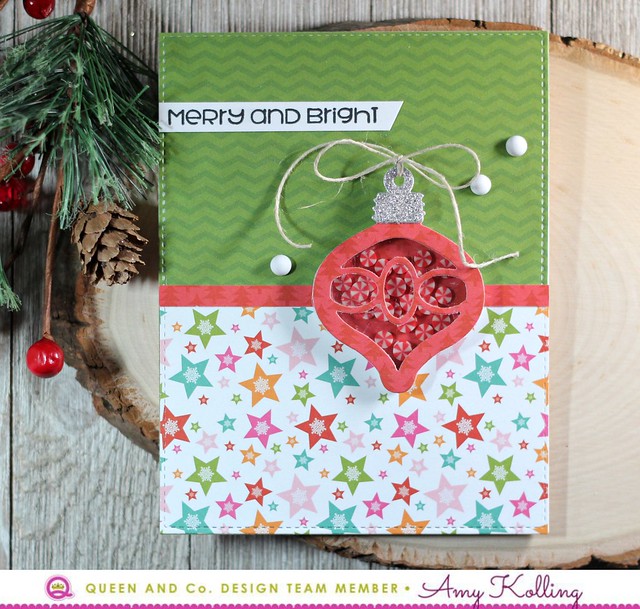
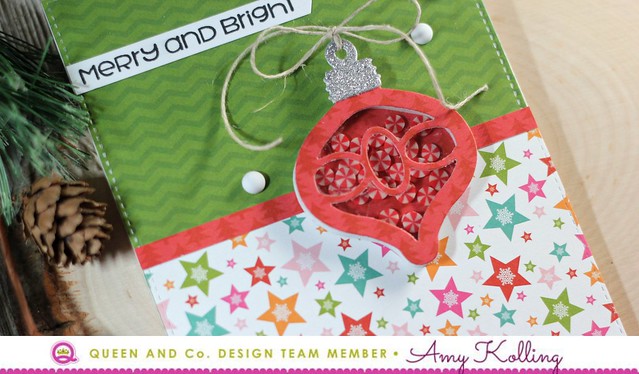
My first card uses 3 pattern papers from the Merry & Bright 6x6 paper pad.  They were layered over a white notecard.  My ornament shaker was created with adding the red/white candy toppings from the kit and finishing it off with a silver topper and twine bow.

Merry and Bright2

The stamp set included in the kit has many sentiments that can be stamped for a sentiment banner.  This is one of my favorite ways to add a sentiment!  To embellish, a few white Rubber Bubbles were added.

Supplies:

**************************************

Jingle all the Way

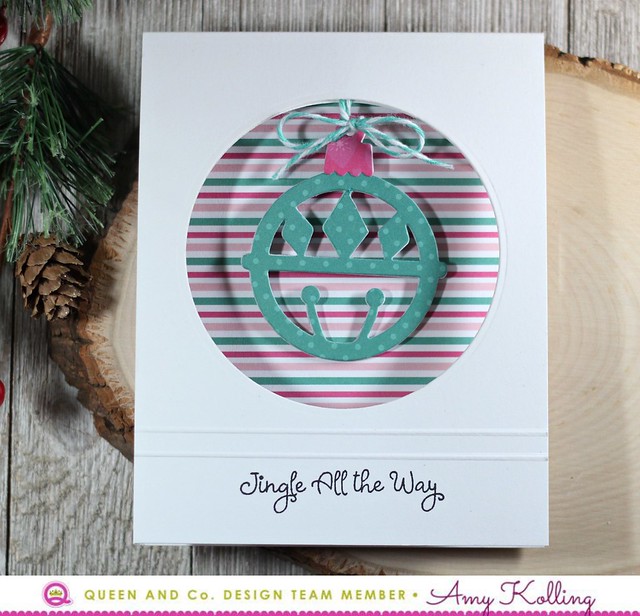
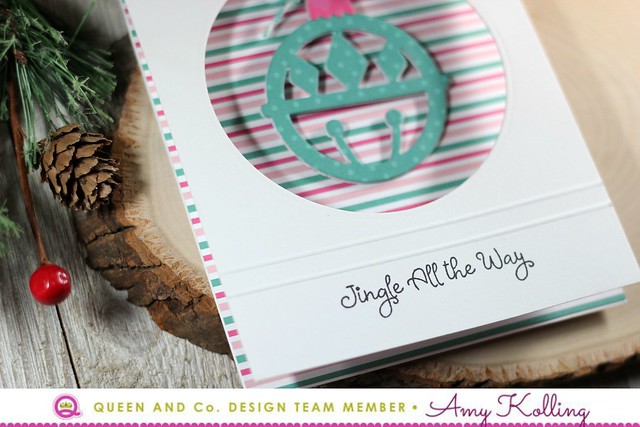
My second card is more interactive and features a "hanging" ornament through an opening in the front of the card.  I created my ornament with pattern paper from the Merry & Bright 6x6 paper pad so that when the card opens, both sides are "finished".  The ornament is more of a chipboard type element.  I die cut many ornaments and glued them together.

Jingle all the Way2

To create the notecard, a standard circle was die cut from both a white panel and the notecard itself.  This way I could string the ornament from the top and sandwich the ends between the layers for a finished look.  After adding a few score lines and a stamped sentiment, I lined the inside of the card with the fun retro striped paper.

Supplies:

Sunday, September 23, 2018

Spellbinders / Tricks or Treats

Halloween minis

Hello!  I wanted to share some mini Halloween cards I recently made using the Spellbinders Large Die of the Month for September called Tricks or Treats.  

Spellbinders

Have you checked out the clubs Spellbinders offer?  They are an amazing value!  Here is a little about this month's Large Die of the Month:

This month's Tricks or Treats large die set is perfect for making Halloween and Fall themed cards, decor, and more.

Membership Includes:
  • Exclusive Larger Set of Versatile Dies that cut, emboss, deboss and stencil. Double the size of the Small Die Set!
  • Project Inspiration: Each kit will feature project ideas with at least one detailed how-to instruction tutorial each month.
  • Member Benefits & Savings: Receive exclusive member pricing in the Spellbinders store. Plus receive access to deals, savings, and gifts - only available to members.
Large Die of the Month Membership
**************************************

These dies come where you can simply nest the square "insert" die into the center of the square die that is included with the set.  Making it "one and done"!  I simply layered the die cut square over a die cut square.  I added each one to a 3x3 mini card.  DONE!  My kids are growing up so these will be perfect as I'm sure they will appreciate these over cutesy!  

Halloween minis2

Saturday, September 22, 2018

Studio Katia / September 2018 Release Blog Hop / Giveaway

Monster Bash 

Hello!  
I am excited to be sharing a card as a guest for the Fall 2018 Studio Katia new release blog hop!  Their fall release is fabulous and a little spooky!  You should have arrived from Emily Midgett's blog and Isha Gupta's blog is your next stop. If you get lost you can find the full hop list below or visit Studio Katia Blog!

The Studio Katia September 2018 release includes 7 new Clear Stamp Sets and 6 sets of Coordinating Dies, 5 new stand alone Creative Dies, 2 new Stencils and 7 new Embellishments!


Monster Bash has seven fun (and adorable) monster images.  I chose two of the monsters and added color with Copics.  For my background, I ink blended Pumice Stone Distress Ink over the Spider Web Stencil onto a panel of Bristol Smooth cardstock.

The eyes are the perfect size for some googly eyes!  I added my monsters with foam adhesive to my stenciled panel and two hand trimmed banners done in Halloween colors.  To finish, I added some May Crystals.

Monster Bash2 

SKS005_STENCIL_SPIDERWEB.pngSTKS063_MONSTERBASHSTAMP.png
STK088_COORDINATINGDIES_MONSTERBASH.png

***GIVEAWAY***

Studio Katia is giving away TWO $50 CAD gift certificates on each day of the Hop, winners will be chosen from the comments left on all blogs of the Hop! Comments must be left before 11:59 PM EST on Friday September 28th and winners will be announced on September 30th, 2018.

AND

I have a $25 gift certificate to give away from MY BLOG!  Winner will be random and comments will close for my winner on Tuesday, September 26 at 7am CST.

Here's the complete list for today's blog hop!

Friday, September 21, 2018

SugarPea Designs / Sweet 2 Repeat Blog Hop

Over the Moon

Hello!  
It’s time again for the Sweet2Repeat Blog Hop witih Sugar Pea Designs!  Now that so many of you have the August Product Release in your hot little hands, the design team has geared up to inspire you with even MORE creative possibilities featuring the newest and hottest products!


I adore this sweet image from To the Moon & Back (Sweet Incentive set this release).  I created a galaxy background for my image with Distress Inks. My sun and moon image was Copic colored and hand trimmed.  I added it to my card along with a sentiment banner and gems.  

Over the Moon2


Place an order* of $60 or more (excluding discounts and shipping) and you will receive To The Moon & Back stamp set, FREE WHILE SUPPLIES LAST!!
*This Sweet Incentive promotion began Friday, August 24th at 6 PM EST. This promotion will not be applied to any orders placed prior to and only while supplies last. It is not necessary to add the Sweet Incentive promotional item to your cart or enter a coupon code, it will be automatically included on all qualifying orders!
***********************************

Would you like to WIN a $20 gift certificate to spend on some SugarPea Designs of your own?  Please visit with each of our design team members and leave a comment for your chance to win!  Check the SugarPea Designs blog for the complete blog hop list!


Related Posts with Thumbnails