Wednesday, December 18, 2019

Avery Elle / Thanks Thanks

Hello!  
I am here with a card for the upcoming holidays.  We all have so much to be thankful for during the holidays.  I already have someone in mind for this card!

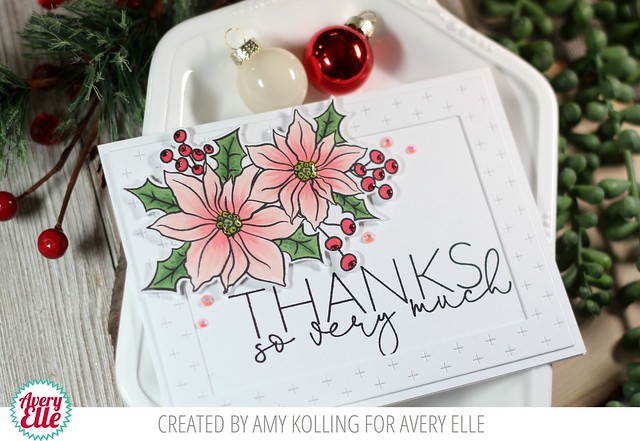
Using the Holiday Bouquet set from Avery Elle a few years ago, the large poinsettia image was Copic colored with light pink color.  Glossy accents were added to the flower centers and the tiny tips of the berries.

Thanks Thanks


My holiday flower was added with foam adhesive to a side folding note card that was stamped with the sentiment from Thanks, Thanks in bold black ink.  I surrounded the sentiment with the frame from Plus Frame Elle-ments in white.  As a final touch, I added a few pink gems.

Thanks Thanks2


Supplies:

Friday, December 13, 2019

Reverse Confetti / Warm Wishes

Warm Wishes2 

Hello!  I am sharing inspiration using the Snowflakes stamp and Snowflakes Confetti Cuts that were released earlier this week.  

I am smitten with snowflakes......I love that no two are alike.  These snowflakes are bold and whimsical at the same time.  I used a strip of pattern paper from Winter Solstice as my color inspiration.  I was going to use turquoise embossing powder but instead turned my focus to using red!  Why not??!

I lined a white notecard with a 2 inch strip of paper from Winter Solstice.  After red heat embossing the snowflakes, they were die cut and added as a border to the pattern paper.  One of the sentiments was stamped onto a sentiment strip and added across the center snowflake with foam adhesive.  As a final touch, red gems were scattered across my snowflake border.

Warm Wishes 


Thanks for sharing a part of your day with me!

SugarPea Designs / Release Day / Giveaway

XOXO2 Hello!!
 I hope you have enjoyed the projects I've been sharing for the brand new release from SugarPea Designs!   All the NEW products that will be available for purchase starting tonight, December 13th at 6PM EST in the SPD Store

If you want to shop, remember this link:  SugarPea Designs.


I just had to pair the adorable Love Machine bots with the last stamp set of the release......Heart Prints.

I started by die cutting layers of cardstock with Card Front Element Builder SugarCut and the Postage Stamp SugarCut.  With the Postage Stamp layer, I added stamped hearts from Heart Prints.  Six hearts fits the inside perfectly!  This was added to a notecard with foam adhesive.  To finish this off, the robot holding the balloon was Copic colored, die cut, and added with foam adhesive.

XOXO


Would you like to winAll you need to do is leave a comment on the SPD blog posts.  It's really that easy!  
Winners during our Product Release will be announced on Monday, December 16th.


Thursday, December 12, 2019

SugarPea Designs / Sneak Peek Day 4 / Giveaway

Just a Love Machine2

Hello!!
 I am excited to share some of the projects I've been working on for the brand new release from SugarPea Designs!  Each day this week, we will be sharing inspiration using the new release.  You are all going to love this release!!!  

I hope you'll join me here over the next 2 days as I share Sweet Peeks for the all the NEW products that will be available for purchase starting this Friday, December 13th at 6PM EST in the SPD Store

If you want to shop, remember this link:  SugarPea Designs.


I started by creating my background using the new English Bond Brick Wall Stencil with Broken China Distress Ink and my blending brush.  I did an ombre look with the darker color at the bottom where the robots were going to stand.  I added a thin dark gray cardstock strip to ground the images and stamped my sentiment below.  The adorable robots from Love Machine were Copic colored, die cut, and added with foam adhesive over a heart die cut

Just a Love Machine


Would you like to winAll you need to do is leave a comment on the SPD blog posts.  It's really that easy!  
Winners during our Product Release will be announced on Monday, December16th.


Wednesday, December 11, 2019

Avery Elle / Thanks


Hello!  I'm here sharing a colorful THANKS card that was super quick to make using the amazing pigment inks from Avery Elle!  These inks stamp so amazing on bold images including the sentiments from the new stamp set....Hooray.

Magenta
Aquamarine
Lemon Grass
Fizz
Orchid
Pixie
Mimosa
Strawberry

Thanks

The 'thanks' stamp, from Hooray, was stamped repeatedly down a panel of white cardstock, moving the paper up 3/4" each time in my Misti.  This panel was adhered to white note card that was lined on the left side with a strip of black/white striped paper from The Neutral Collection.

To finish, the sentiments from Hooray were stamped onto Simple Sentiment Elle-ments and adhered with foam adhesive.

Thanks2

Supplies:
The Neutral Collection paper pad (retired)

SugarPea Designs / Sneak Peek Day 3 / Giveaway

Valentine2

Hello!!
 I am excited to share some of the projects I've been working on for the brand new release from SugarPea Designs!  Each day this week, we will be sharing inspiration using the new release.  You are all going to love this release!!!  

I hope you'll join me here over the next 3 days as I share Sweet Peeks for the all the NEW products that will be available for purchase starting this Friday, December 13th at 6PM EST in the SPD Store

If you want to shop, remember this link:  SugarPea Designs.


I created my window card using the Dangle Hearts SugarCut Die in a monochromatic color scheme of pinks!  They were popped up with foam adhesive onto a panel of polka dotted vellum.  I added the circle frame with foam adhesive as well.......the scallop and stitched layers were done using the Card Front Element Builder SugarCut.  The Valentine SugarCut was done using some chunky hot pink glitter cardstock.  To keep it simple, the sentiment, from Sentiments of Love, was stamped in bold black ink.

Valentine


Would you like to winAll you need to do is leave a comment on the SPD blog posts.  It's really that easy!  
Winners during our Product Release will be announced on Monday, December 16th.


Tuesday, December 10, 2019

SugarPea Designs / Sneak Peek Day 2 / Giveaway

Pugs and Kisses2
Hello!!
 I am excited to share some of the  projects I've been working on for the brand new release from SugarPea Designs!  Each day this week, we will be sharing inspiration using the new release.  You are all going to love this release!!!  

I hope you'll join me here over the next 4 days as I share Sweet Peeks for the all the NEW products that will be available for purchase starting this Friday, December 13th at 6PM EST in the SPD Store

If you want to shop, remember this link:  SugarPea Designs.


Today we are sharing For Pugs Sake and the new Envelope Liner Die (along with a NEW assortment of colors of envelopes!).  
I've paired these new products with some of my favorite "older" products!

I started with stamping my Buffalo Check Background both on card stock and on printer paper (for my Envelope Liner).  I ink blended Broken China Distress Ink onto a die cut panel.  A Heart Border SugarCut was added to the bottom along with the stamped sentiment.  I colored my pug and balloon with Copics, hand trimmed out, and added with foam adhesive.  A few die cut clouds from Whatever the Weather SugarCut were added with a few tiny hearts (leftover from the border die cut) along with some Glossy Accents to the center of the hearts.  I love that the envelope matches the card by using the new Envelope Liner!!!

Pugs and Kisses


Would you like to winAll you need to do is leave a comment on the SPD blog posts.  It's really that easy!  
Winners during our Product Release will be announced on Monday, December 16th.


Related Posts with Thumbnails