Thursday, November 29, 2018

Reverse Confetti / Confetti Camera

Hello Reverse Confetti friends!  Today it is my turn to host the Confetti Camera over on the Reverse Confetti blog.  The theme is: For a Friend.  It's so much fun to add a homemade touch to a gift for a friend!


I have been wanting to try a stitching project using Reverse Confetti dies for a while so I created this mini hoop and card gift duo.  I love how it turned out!  Here is a sneak peek but make sure to go visit the Reverse Confetti blog for all the details on my project!!

Confetti Camera5

Queen & Co. / New word dies!

Sending Smiles 

Hello!  I'm here with two totally different cards but ones I wanted to share to show the versatility of these new word dies from Queen & Co.  

My first card uses the yellow gingham paper from Happy Harvest.  A trimmed portion of the yellow gingham was adhered to a kraft notecard.  

I created my shaker using Wood Toppings and Diamonds Prime.  Because I used the scallop circle shape, I finished off my card with some hand cut leaves and the die cut sentiment "Sending Smiles".  

Sending Smiles2 

Supplies:
Circle Shaped Shaker
Happy Harvest 6x6 Paper Pad
Wood Toppings
Diamonds Prime

********************************

Merry Christmas 

My second card is all holiday!  Using paper from Merry & Bright, I added a panel to a white notecard and a die cut 'Merry Christmas' done in black cardstock.

I created my star shaker using Tiny Bubbles as the toppings!  I love the look of these!  To keep this as simple as can be, I added my star shaker.  

Merry Christmas2

Supplies:
Merry & Bright
Tiny Bubbles
Star Die

Wednesday, November 28, 2018

Erin Lee Creative / Launch Blog Hop / Giveaway

Koko Girl Snowman 

Hello!  I am so excited to help celebrate the launch of Erin Lee Creative!  Erin has been a crafty friend for many years and I'm so thrilled for her and her new company!  I had the opportunity to play around with her designs prior to release and just wait!  She has so many fun things to come!


I ADORE snowman images and this one is adorable with it's carrot nose!  Since #rainbowallthethings has become fashionable, I gave my snowman, from Koko Girl Snowman, a rainbow scarf colored with Copics.  After diecutting my snowman, the image was layered over a snowy hill and ink blended sky (done with Salty Ocean Distress Oxide Ink).  I added a panel cut with a standard circle die over the top of my snowman to create my scene.  As final touches, I added lots of Crystal Stickles as "snow".

Koko Girl Snowman2

****************************

Koko Girl Couch

This kitten, from Koko Girl Couch Stamp Set, was just too cute not to use!  The rug and kitten were Copic colored and die cut using coordinating dies.  White accents were done with a fine tip paint pen.  To a white cardstock notecard, the Wreath Stencil was sponged on using Worn Lipstick Distress Oxide Ink.  I added my images with foam adhesive and rounded the corners of my notecard.

Koko Girl Couch2 

SUPPLIES:

*************************************************

To celebrate the launch of Erin Lee Creative we are giving away one stamp set each to three lucky winners chosen from comments left across all of the blogs participating in this hop. Please leave a comment on any participating blog by December 5th, 2018. Three winners will be announced the following week on the Erin Lee Creative Blog. The more you comment, the more chances to win!

Amy Kolling--you are here!


Wednesday, November 21, 2018

Avery Elle / Embellished Heart

Hello!  I'm so excited to be creating for the new year and all things "not" Christmas.  Valentine's is one of my favorite holidays to craft for.

My card features the new Embellished Heart Elle-ments.  It features this large heart cut out with the cut decoration on the outside.  

Embellished Heart

I started by die cutting the Embellished Heart into a white panel of cardstock.  Then I ink blended Peacock Feathers, Scattered Straw, and Worn Lipstick Distress Inks onto Bristol Smooth cardstock.  I concentrated colors so that my heart would have the 3 color variation.  I added my heart panel over the to of my ink blended background with foam adhesive.  

I added some cute Copic colored images from Party Pals.  These little pigs are just adorable and "in love".  The banner in the corner of the heart was added with foam adhesive as well as the pigs and heart.  

Embellished Heart2

Supplies:


Tuesday, November 20, 2018

Nuvember 2018 Day 20 / Tonic Studios

Hello and welcome to Nuvember with Tonic Studios and The Hedgehog Hollow!  A celebration of all things Nuvo and today I am sharing some of their embossing powders!


Tonic Studios embossing powders are just gorgeous.  They add shimmer and shine to any stamped image.  

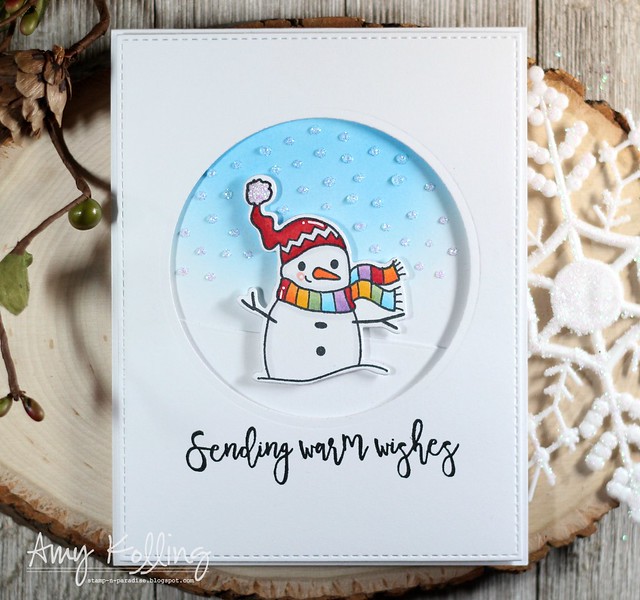
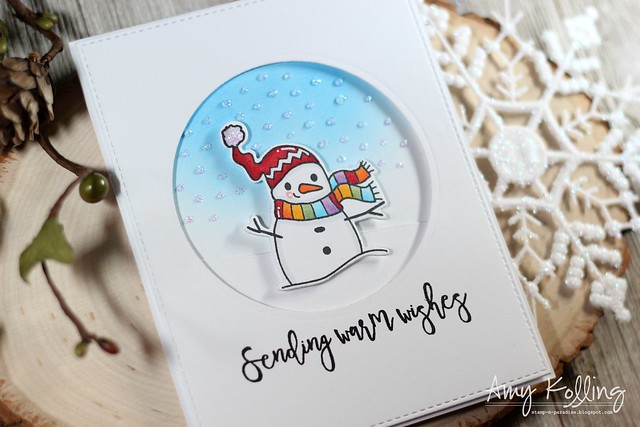
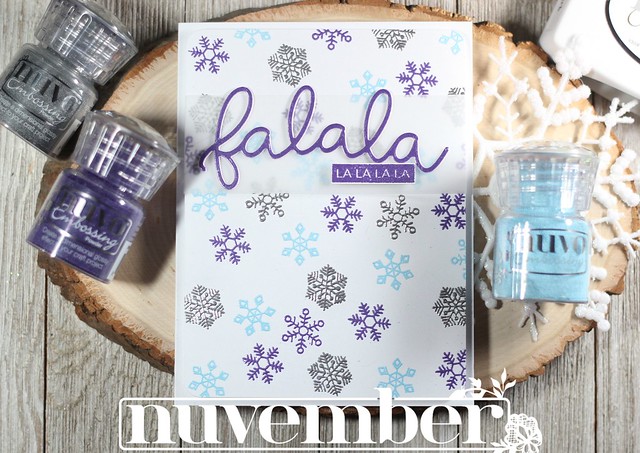
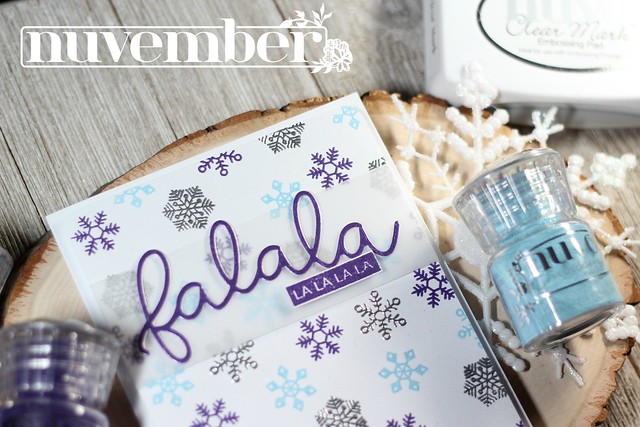
Using some small snowflake stamps (Hellow Bluebird stamps), I stamped them randomly across a white panel with the Nuvo Clear Mark Embossing Pad but heat embossing them in between adding colors.  The colors I used are Classic Silver, Purple Haze, and Serenity Blue.  

Nuvember

For my sentiment, I wanted it to match my embossing.  Using the Nuvo Clear Mark Embossing Pad, I swiped it across a strip of cardstock until it was covered.  Then, I generously added Purple Haze Embossing Powder and heat set.  Using a word die (from Hello Bluebird stamps), I ran this across my embossed strip using my Big Shot.  To ground my sentiment, I added it over a strip of vellum paper.  LOVE how it ties the whole card together since it is embossed as well!  (same for the small coordinating sentiment too!)  

Nuvember2

Hope you have a wonderful day and thanks for stopping by!

Sunday, November 18, 2018

Spellbinders / Holiday Die D-Lites / GIVEAWAY


Snowman3


Spellbinders released these amazing Holiday Die D-Lites dies with the snowman, santa, and reindeer.  (See below for links to shop!)

These dies are just fun to piece together.  Just pick your colors, die cut, and assemble!  I ADORE snowmen.  This has impressed areas to the face for the eyes and nose for easy placement.  I assembled my snowman and added it to a panel of snow pattern paper from Lawn Fawn.  A simple sentiment from Tiny Words Christmas from Simon Says Stamp was stamped onto a black banner.  


Snowman2

Supplies:
Holiday D-Lites
Really Rainbow Christmas 6x6 Paper Pad
Tiny Words Christmas


****GIVEAWAY****

I have ONE extra Snowman Die D-Lite that I would love to send to someone!  Please leave a comment over on my INSTAGRAM post and I'll choose a winner on Wednesday, November 23rd!  US addresses only, sorry.

Instagram:  amykolling

Die D-Lites Snowman Etched Dies 2018 Holiday

Wednesday, November 14, 2018

SugarPea Designs / Mix It Up Challenge #49

MIU challenge 

Hello!  I am here sharing a card using the November Mix it Up Challenge from SugarPea Designs over at the SugarPea Designs blog.
  Make sure to check out the blog for all the details!


For this month's challenge, I used the inspiration portion of the Mix It Up Challenge but specifically the color scheme.  (see graphic below).

I could not get over the colors of the thread in the inspiration photo, so I pulled out one of the cutest stamp sets called Knit Wit.  My images were Copic colored in shades of purple and blues to match the inspiration photo.  The images were layered over a purple die cut stitched heart from the Postage Stamp SugarCut.  The main panel was adhered with foam adhesive to purple polka dot paper from the Spots & Stripes Pastels.  As a finishing touch after stamping my sentiment, was to add a few lavendar gems.

MIU challenge2


Tuesday, November 13, 2018

Technique Tuesday / 25 Days of Christmas Tags

25 Christmas Tags 

Hello and Welcome to the 25 Days of Christmas Tags with Tracey McNeely.  
I am so fortunate to have Tracey as a friend and am excited to help her celebrate the 8th year of the 25 Days of Christmas Tags!  

You can find out all the details over on her blog HERE---
I am sharing a tag using some new goodies from Technique Tuesday!  

Don't have a tag die?  Create your own tag!  I cut my own tag and added a hole with a standard hole punch.  Next, I paper pieced this amazing Bow on the Border Crafting Die to my tag, stamped my sentiment from Perfect Poinsettia, added some silver gems, and some twine.

25 Christmas Tags2

Remember there are TONS of sponsors of this event!  Make sure to visit Tracey's blog link above for all the details!

Sunday, November 11, 2018

Reverse Confetti / Stock Your Stash (Holiday & Winter)

Retro Trees 

Hello!  I am sharing a card for the Reverse Confetti.......Stock Your Stash Challenge!  
Every month will be a new theme and this month we are showcasing Holiday and Winter!


No automatic alt text available.

I hope you are not tired of cards using Triangle Trees because I have another one to share!!  Seriously LOVE this set!

Using Reverse Confetti Dye Inks and my Misti, I stamped a panel of trees using some colors that remind me of retro holiday ornaments.  I added detail patterns using black ink over the tops of a few trees.  I stamped a sentiment and added tree "trunks" with a fine tip sharpie.

Retro Trees3

Visit the Reverse Confetti blog for all the details on the Stock Your Stash Challenge!

Thursday, November 8, 2018

Avery Elle / Winter Release Blog Hop + Giveaway

Stuck on You1

Hello and Welcome to the Avery Elle Winter Release!  If you are a fan of creating for "heart" day or love or just because, these sets will have you covered!  


I began my card with an ink blended panel of Worn Lipstick and Shaded Lilac Distress Inks.  I trimmed this down to 4x4 so it can be layered behind the Tons of Hearts Frame Elle-ments done in white.  After diecutting, I saved a few of the mini heart confetti, colored them in, and added them to my card.  My cute cacti images were Copic colored and added to my scene with foam adhesive.  A speech bubble from Photo Mat Elle-ments was used for the sentiment.

Stuck on You
Supplies:
Photo Mat Elle-ments

****************************************

To celebrate our Winter 2018 Release Blog Hop, Avery Elle is giving away a $25 Gift Certificate to one random winner.  


To enter to win just comment on this post.  There is no purchase necessary and you must be 18 years of age or older to enter.  This giveaway is void where prohibited.  You can also do options 2, 3, 4, 5 or all 6 of the following to increase your chances of winning. You have until midnight Sunday, Novebmer 11th to enter.  The winner will be announced on the Avery Elle Blog on Monday, November 12th .  All products are available for purchase in the Avery Elle store right now.

To enter to win you can do 1, 2, 3, 4, 5 or all 6 of the following to increase your chances:

  1. Comment on any of the design team's posts and/or here on the Avery Elle Blog
  2. Follow us on Twitter and tweet the contest (we are @averyellestamps )
  3. Follow us on Facebook (we are www.facebook.com/AveryElle ) and share us with your friends - make sure they tell us you sent them.
  4. Follow us on Pinterest
  5. Become a blog follower through email (comment on the Avery Elle blog if you already follow us)
  6. Join our Flickr group (comment on the Avery Elle blog if you already belong)

Thanks for stopping by to take a peek. Have a great day!


Queen & Co. / Hooray and Dream Big

Dream Big 

Hello!  I'm here sharing some birthday cards using the newest WORD dies from Queen & Co.  

Using a past shaker kit called Shaped Shaker Kit Balloons, two of the balloon images were die cut using paper from Merry & Bright 6x6 paper pad.  I decided to use the die cut as is and not as a shaker.  

I adhered a white panel to a white notecard that was layered with pattern paper from Merry & Bright.  To pull in the colors, the balloons were added and the sentiment "sending smiles" was done in paper from Merry & Bright as well.  To finish, the sentiment (layered 3 times for dimension) was added along with a few Bubbles embellishments.

Dream Big2 

Supplies:
Bubbles

*******************************

Hooray

My second card uses pattern paper from Happy Harvest along with Pretty Presents Shaker Kit.  To tone down the pattern, I added a stripe of vellum over the top and adhered the die cut words.  

Assembling these shakers are so easy!  I assembled two presents and added toppings from the Pretty Presents Shaker Kit.  To finish, a few clear Bubbles were added to the presents and background.

Hooray2 


Related Posts with Thumbnails