Showing posts with label Gallery Idol. Show all posts

Monday, June 2, 2014

Gallery Idol 2014--Round 3


Hi everyone!  
I'm back because I made it to the Top 15 in the Paper Crafts Gallery Idol 2014 card contest!!  I wouldn't be here if it weren't for all the votes for my card last week.  That I am truly grateful!!!
You can see the Paper Crafts post HERE!  You can vote using the link on my side bar!!!


This contest works just like American Idol and we rely on votes to make it to the next round.  Today starts Round 3.  The theme for Round 3 is all about using STENCILS.  
You can check out all the details on the Contest page HERE.

My card uses TWO stencils in TWO different ways.  I've used a stencil to apply the Distress Ink onto my paper and then another stencil to apply Heidi Swap Color Shine to add a pattern.  All the supplies are listed at the bottom of my post.

To start, I applied my stencil to my cardstock with Painter's Tape and then using Distress Inks started at the top right corner with a balloon stenciled in with Mustard Seed Distress Ink.  Without taking my balloon stencil off, I applied my striped stencil over the top with more Painter's Tape.  At this point, I did need to add some copy paper to "cover up" the rest of my white cardstock because then I applied Heidi Swapp Color Shine Mustard over the striped stencil.  (I spritzed about 3 times so that the color would show over the balloon image.  I use a small box and lay my project in it and spritz away!)

Each time I stenciled the balloon and then did the stripes working across my cardstock panel in various colors.  To do this, I did have to mask off each balloon.  I did this using one of the matching Balloon Dies to diecut a mask that I used.  
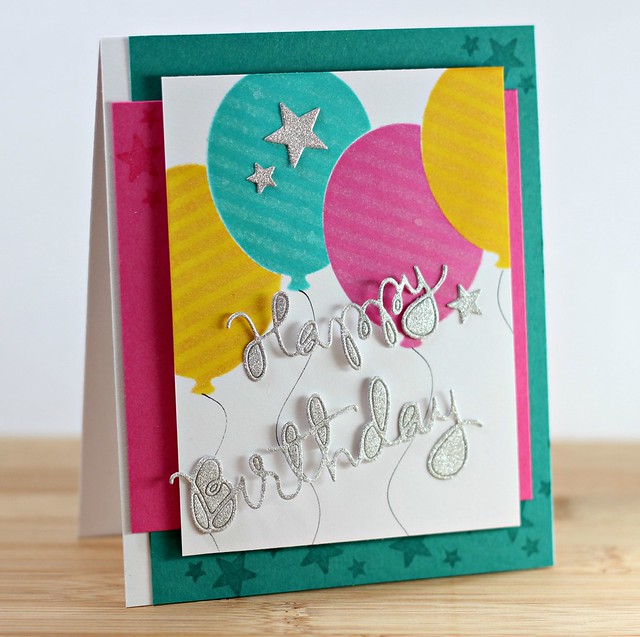
Amyblog1

My sentiment and star accents were diecut using Glitzy Glitter cardstock in silver.  This paper is by FAR the best glitter cardstock out there!  To add some interest, I left all the little "pieces" in the word dies which with this glitter cardstock is easy!
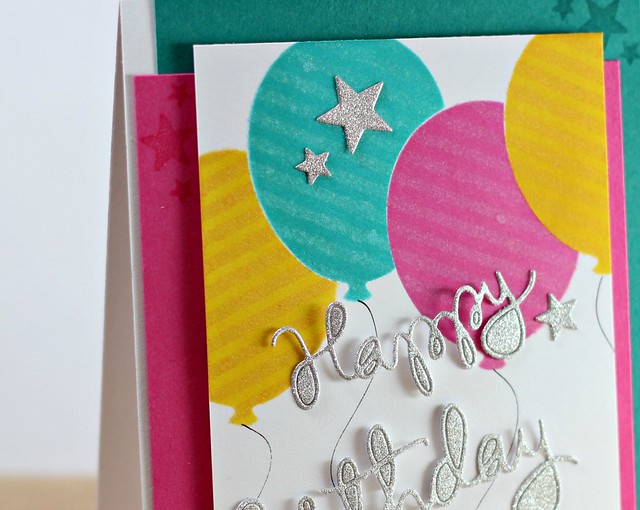
Amyblog2


Here is a look at my stencil set up:


And there's my version of using STENCILS!  I hope I've shared enough to sway your vote! 
You can vote......HERE.

Thanks so much for sharing a part of your day with me and for taking the time to VOTE!  :)

{Happy Birthday}
Stamps:  Birthday Balloons (Simon Says Stamp)
Paper:  White, Raspberry Fizz, Tropical Teal (PTI), Glitzy Glitter Stack (DCWV)
Dies:  Balloon Dies, Mini Stars (Simon Says Stamp)
Stencils:  Balloons and Patterns (Simon Says Stamp)
Misc:  Foam Adhesive, Fine Tip Pigma Micron Pen

Monday, May 26, 2014

Gallery Idol 2014--Round 2


Hi everyone!  I am so excited to share my exciting news........... 
I made the Top 20 in Paper Crafts Gallery Idol 2014 card contest!
I'm so excited for this journey again!  You need to check out all of the talent in this years group!  Amazing!
You can see the Paper Crafts post HERE!  You can vote using the link on my side bar!!!


This contest works just like American Idol and we rely on votes to make it to the next round.  Today starts Round 2.  The theme for Round 2 is all about DIECUTS.  
You can check out all the details on the Contest page HERE.

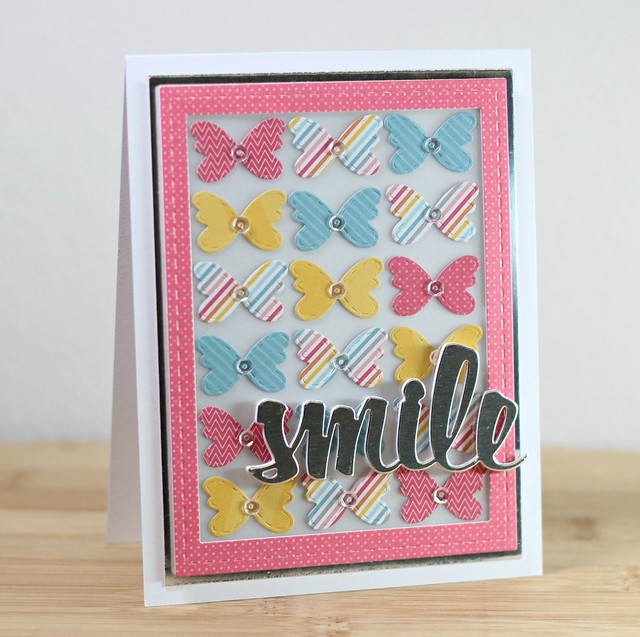
I've used "diecuts" for the focal point, as a frame, and for the sentiment.  This card has LOTS of dimension that was hard to capture with these photos.  

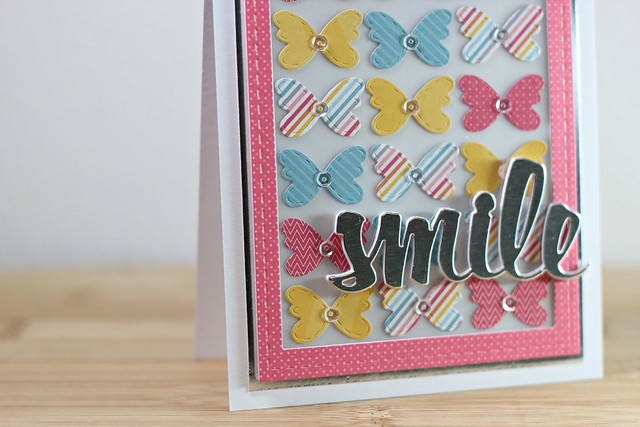
I diecut two Stitched Mats: Rectangles:  one in vellum and one in clear cardstock.   After diecutting all my Stitched Butterflies in various patterns from my FAVORITE 6x6 paper pad this spring, I arranged and adhered them to the vellum.  Adhering some Sparkling Clear sequins to the centers of the butterflies, I let the glue dry on that panel.   With this same stitched rectangle and one size smaller, I diecut a "frame" and backed it with that clear cardstock rectangle panel.  Once the glue was dry, I layered my "frame" over the top of the vellum butterfly panel.  This whole panel was then added with foam adhesive over a silver foil mat.  I was going for a shadowbox idea by using the clear cardstock.

AmyBlog#3

For even more dimension, my sentiment was diecut 5 times with white cardstock and once with silver foil.  After glueing all the diecuts together, the silver foiled sentiment was adhered slightly to the right on my frame.

AmyBlog


And there's my version of using DIECUTS!  I hope I've shared enough to sway your vote! 
You can vote......HERE.

Thanks so much for all the FB posts, texts, and emails about my news!  They all meant so much to me! 

{Smile}
Cardstock:  White, Clear, Vellum (PTI), Silver Foil (DCWV)
Pattern Paper:  Hello Sunshine (Lawn Fawn)
Dies:  Stitched Butterflies, Stitched Mats: Rectangles, Smile (Lil' Inker Designs)
Sequins:  4mm Sparkling Clear (Pretty Pink Posh)
Misc:  Foam Adhesive

Tuesday, May 20, 2014

Washi Tape and Gallery Idol!!!


I thought since I've thrown my hat in for the Gallery Idol contest this year, that I should show you what I've made and uploaded to the Flickr Gallery.  This years open audition round was creative uses of Washi Tape or Decorative Tape.  


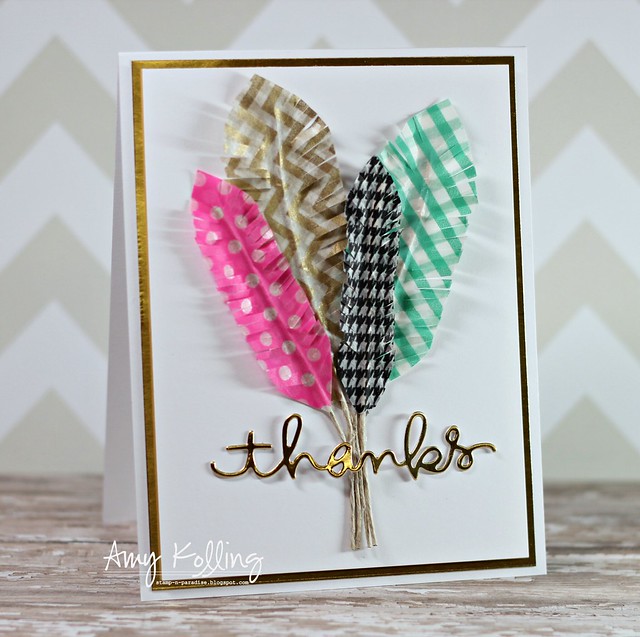
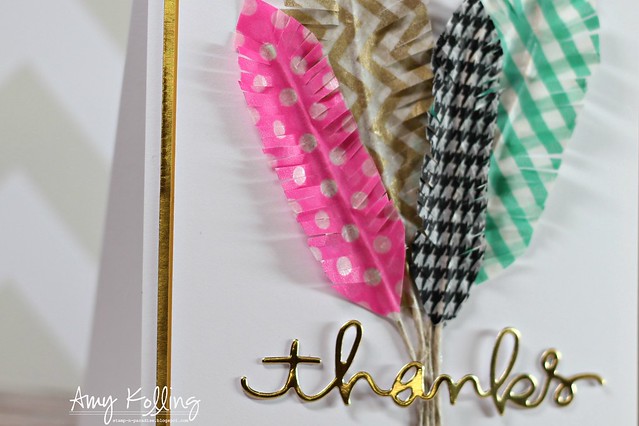
The inspiration for my embellishments on my first card came from a make 'n take I did at Winter CHA in January.  I made some Washi Feathers at the Glitz Design booth and fell in love with how easy they were to make!  So THANK YOU Glitz for inspiring me with this one!

I have no idea what brands of Washi I used but I knew I wanted to use this wide Gold Chevron Washi for one of my feathers and pair it with some vibrant color.  I used the Thanks word die from Simon Says Stamp and die cut it with the Foiled Cardstock Stack from DCWV.  "Thanks" was adhered using Tombo Multi Mono glue in just a few little places so that it would have dimension layered over the feathers.  

WashiFeathers

To tie the whole thing together, my Washi panel was layered onto a Gold Foil panel with foam adhesive.  

WashiFeathers2


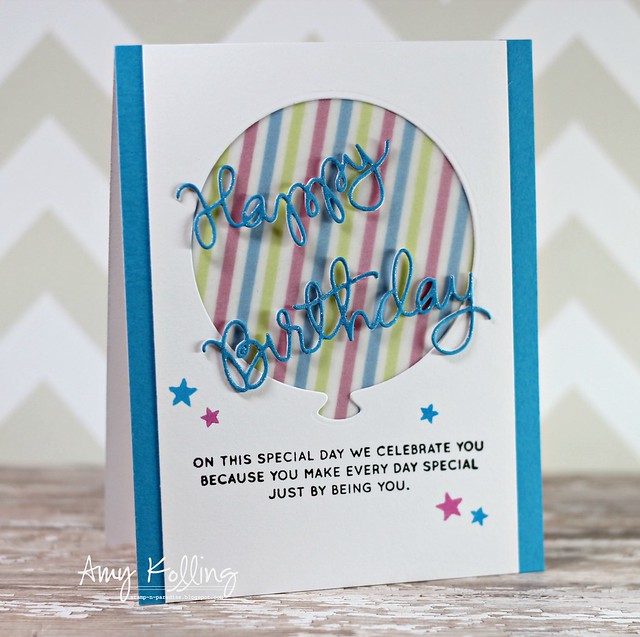
My next card uses Washi Tape as a background "paper" behind the Balloon cutout.  These are just fabulous Balloon dies from Simon Says Stamp.  The Happy Birthday die layer just perfect over my vellum topped Washi tape!!!  Sentiment is from Birthday Balloons.  All ink is the Simon Says Stamp Premium Dye Ink.

WashiBackground


Thanks so much for stopping by and enjoying my Washi cards!!  Good luck to everyone that entered!!!!

Monday, June 24, 2013

Gallery Idol 2013--Round 5

 
Hi everyone!  I am just thrilled that I made the Top 5 in Paper Crafts Gallery Idol 2013 card contest!  Wow!!!  The last round was full of cards using EXACTLY 10 embellishments!  That was a difficult challenge round!!  Thank you all SOO much for your votes!!!
You can see the Paper Crafts post HERE! 
If you'd like to vote for the FINAL round, you can vote using the link on my side bar!!!


Well everyone.......this is the week where you all vote on the challenge we worked on.  The challenge this round is to make four color-coordinated cards in four different styles!!!  Here we go with my versions of this challenge.....I hope you like them!
 
The first thing I did when preparing for this challenge was to choose a color palette.  This was not easy but I kept going back to one that I used recently that I thought would be perfect.  This however, proved to make designing each of these cards a bit difficult. 
 
The 4 styles I chose to work with are:
Classy and Elegant
Clean and Graphic
Fun and Cute
Freestyle Collage
 
Gallery Idol
 
CARD #1 uses the Classy & Elegant style.  I wanted to stamp a background that would be eye catching with bits of color and adding some simple elegance with pearls.  The sentiment was heat embossed with white Filigree embossing powder.
 
Amyblog#2  
 
CARD #2 uses the Clean and Graphic style.  This is right up my alley and I love this stamp set from Papertrey Ink.....and Maile Belles!  This set screams graphic and I am embracing the "tilted" once again! 
 
Amyblog#3#2  
 
CARD #3 uses the Fun and Cute style.  There really is no explaining this style.  Just see for yourself.  I made a window card for my little scene adding in some texture with the woodgrain impression plate on the front panel. 
 
Amyblog#1  
 
CARD #4 uses the Freestyle Collage style.  This style is new to me so this is my first attempt!  I decided on bringing my color coordinating papers into the background and using a wooden tag for the focal point of my collage.  Adding in some flair, Washi tape, enamel dots, colored burlap, twine, and a tiny sentiment flag rounded out my collage.
 
Amyblog#4 
 
Here are the chevrons in action......I had a really hard time getting a photo of these that weren't blurry or an optical illusion....ha!
 
Amyblog#4#4
 
Check out the close-up of the collage feature I created:
 
Amyblog#4#2  
 
There you have my FOUR color-coordinated cards in four different styles.  This was definitely a challenge this week but I had such a fun time creating these cards!  I hope my versions of the four styles I chose are enough to get your vote.  Thanks soo much!!!!
 
 
{To you. From me. With love.}
Stamps:  Round Repeats, Mini Blooms (PTI)
Paper:  White. Guidelines II  (PTI),  Island Indigo (SU)
Ink:  Orange, Ocean, Grass (AMuse), Versamark
Misc:  Filigree white embossing powder, Pearls, Foam Adhesive, Corner Chomper
 
{Hello My Friend}
Stamps:  Sketched Shapes (PTI)
Paper:  White (PTI), Island Indigo (SU)
Ink:  Orange, Ocean, Grass (AMuse), Versafine Onyx Black
Misc:  Enamel dots (MME)
 
{We Belong Together)
Stamps:  Paired Up (Clearly Besotted)
Paper;  White, Orange Zest (PTI)
Ink:  Grass, Ocean (AMuse), Kraft (PTI), Versafine Onyx Black
Dies:  Circles (Spellbinders)
Misc:  Aqua Blue Twine (Timeless Twine by Bella Creationz), Foam Adhesive
 
{Hey girl, Happy Birthday}
Stamps:  Sign Language (PTI)
Paper:  White, Orange Zest, Simply Chartreuse (PTI), Island Indigo (SU)
Ink:  Orange (AMuse)
Dies:  Cover up die--Pieced Chevrons (Lil' Inker Designs), Cosmic Star Set (Memory Box)
Misc:  Wood Tag (Maya Road), Flair (Bossy Joscie), Enamel Dots (MME), Washi Tape (Freckled Fawn), Memo Pin (Tim Holtz), Girl Wood Veneer (Studio Calico), Colored burlap, Twine


Monday, June 17, 2013

Gallery Idol 2013--Round 4

 
****For my Lil' Inker Designs Release Day 1 post.........click HERE or scroll down**** 
 
 
Hi everyone!  I am very excited that I made the Top 10 in Paper Crafts Gallery Idol 2013 card contest!  Wahoo!
It was an amazing round of fabulous STAMPED BACKGROUND cards.  Thank you all SOO much for your votes!!!
You can see the Paper Crafts post HERE! 
If you'd like to vote for this round, you can vote using the link on my side bar!!!


This contest works just like American Idol and we rely on votes to make it to the next round.  Today starts Round 4.  The theme for Round 4 is to use EXACTLY 10 embellishments! 
 
When I sat down to work on my card, lots of ideas came to mind anything from trendy to freestyle collage to make this challenge work.  As much as I wanted to, I couldn't make something that I liked.  In the end, my card may not be trendy but as I said to a friend.......I stayed true to ME! 

I started with white cardstock that was embossed with a Chevron embossing folder and then scored 4 lines above it (to cover up where the embossing folder left an impression) with my Scor-Pal.  I chose to do an all white card as I wanted my chosen embellishments to really stand out!
 
Amy blog #1 
 
I then started to piece together my embellishments........I made my roses using the Rolled Roses Dienamics.  These are just awesome dies to have!!
 
Now for this little thing called the challenge...........use exactly 10 embellishments?  This proved to be a very hard task!  The Gallery Idol group had quite a discussion on what was considered embellishments and what would be counted as embellishments. 
 
Here are my 10 embellishments and a close-up photo:
3--felt flowers/leaves
1--twine bow
4--clear gems
2--silver spiral paper clips
 
Amy blog #2
 
And there's my version of using 10 embellishments!  I hope I've shared enough to sway your vote! 
Thank you all for the support and sweet comments the past few weeks!!!!
 
 
{Just a Note}
Paper:  White (PTI)
Ink:  Versafine Onyx Black
Dies:  Rolled Rose and Mini Rolled Roses Dienamics (MFT), Reflections-Leaves (Paper Smooches)
Misc:  Clear Gems (Martha Stewart), Baker's Twine, Silver Spiral Paper Clips, Corner Chomper, Felt (PTI), Foam Adhesive
Embossing Folder:  Chevron (Cuttlebug)
 

Monday, June 10, 2013

Gallery Idol 2013--Round 3

 
Hi everyone!  I am very excited that I made the Top 15 in Paper Crafts Gallery Idol 2013 card contest! 
It was an amazing round of fabulous DAD inspired cards. 
You can see the Paper Crafts post HERE! 
If you'd like to vote for this round, you can vote using the link on my side bar!!!


This contest works just like American Idol and we rely on votes to make it to the next round.  Today starts Round 3.  The theme for Round 3 is Stamped Backgrounds.
 
I wanted to stamp a background that stood out and was bold.......so I went with a bright floral motif using the new set from Wplus9 called Fresh Cut Florals.  However when I was done, I didn't want to cover any part of that background, so I die cut a mini polaroid frame and layered my stamped vellum sentiment behind it!


Amyblog#1  
 
You should have seen how many blocks and inks I had out on my desk to create this!!!  I had each stamp on a block to make this go faster.  I did sneak in the small trio of flowers (stamped in latte ink) from the PTI set Garden Variety.  To add some interest, I used a fine tip black pen and added in trios of dots throughout my stamped panel.  Here you can see it better:
 
Amyblog#2  
 
 
And there's my version of a stamped background!  I hope I've shared enough to sway your vote! 
You can vote......HERE.
 
{Hello}
Stamps:  Fresh Cut Florals (Wplus9), Garden Variety (PTI), Candy Stripe BG (Market Street Stamps)
Paper:  White, Pure Poppy, Berry Sorbet (PTI), Vellum
Ink:  Berry Sorbet, Ripe Avocado, Pure Poppy (PTI), Orange, Latte, Fern, Papaya, Lemon Whip (Amuse), Jet Black Stazon, Onyx Black Versafine
Dies:  Fresh Cut Florals Dies (Wplus9), Framed Out #12 Die (PTI), Pinking Edge Die (PTI)
Misc:  Black Fine Tip pen, Foam Adhesive


Monday, June 3, 2013

Gallery Idol 2013--Round 2


Hi everyone!  I am so excited to share my exciting news........... 
I'm still in shock but so excited for this journey!  You need to check out all the talent in this group!  Amazing!
You can see the Paper Crafts post HERE!  You can vote using the link on my side bar!!!


This contest works just like American Idol and we rely on votes to make it to the next round.  Today starts Round 2.  The theme for Round 2 is Defining Dad.

Some of you know that I spent a wonderful weekend with some crafty friends (waving to Jen, Laurie, and Suzanne!).  Well, I did get some cards made but just couldn't get something solid in my head for the Defining Dad theme but the one thing that kept coming back to me was Baseball.  So as I drove home from my weekend, I thought more about what I could do.  My husband's favorite pastime is Baseball......I'm not even kidding when I say that when the Royals are playing, the TV and radio have to be on!  (and may I mention that my son's name just *might* be Brett?)  But here's where I get sappy........This card will be going to my husband because I DO think he's an All Star Dad!  He is one of the coaches for our son's baseball team this year......he loves it and has so much patience!

 Amyblog#1

The one element I knew I wanted to add was hand "baseball" stitching.  This was made easy by using my Scor-Bug Embosser!  It made the most perfect placement for stitching!  (remember us talking about this fun little tool this past weekend girls?......it came in handy and yes Suzanne.....you need one! :) )

I also knew that I wanted to add a little vintagy look to my card.  That's where all the stamped baseball bats came in.  Each of the bats were stamped off once (using Kraft ink) and then stamped onto my panel.


Amyblog#2 

And there's my version of Defining Dad!  I hope I've shared enough to sway your vote! 
You can vote......HERE.

Thanks so much for all the FB posts, texts, and emails about my news!  They all meant so much to me! 

{All Star DAD}
Stamps:  Super Star (Wplus9), All-Star Team and 7th Inning Stretch (PTI)
Paper:  Basic Gray (SU), White (PTI)
Ink:  Kraft, Pure Poppy (PTI), Slate (Amuse)
Dies:  Small Folded Banner (Simon Says Stamp)
Misc:  Scor-Bug Embosser, Star Veneers, Red Embroidery Thread, Foam Adhesive

Thursday, February 14, 2013

Made with Love Blog Hop!


Welcome welcome!!  What a fun post this is going to be!  I'm joining the rest of the 2012 Paper Crafts Gallery Idol girls on a very special Made with Love Blog Hop!  We are celebrating Valentine's Day today!  You should have arrived from Jennifer Ingle's blog!
You can see the entire list of participants HERE on our Facebook Event page!


Each of us has created a fun Valentine project to share with you and then you have the fun of hopping along the hop!  Guess what?  There are PRIZES......Lots and lots of prizes!  We have some AMAZING sponsors!!!

My project features goodies from both of the sponsors highlighted below.......Lil' Inker Designs and Timeless Twine!  I've used the Of the Heart Dies, Stitched Mats: Rectangles, and Strawberry Cupcake twine!  I know you are probably getting tired of me using these Stitched Mats as a frame but sorry......not going to stop!!  :)


BEMINE


One sponsor today is Lil' Inker Designs!  I am very blessed to be on this fabulous DT.....Laura is the sweetest person and someone I call a friend.  I truly LOVE her products and she has wonderful customer service!!  She is offering up TWO (2) $10 Gift Certificates AND a stamp prize pack!  So that means......THREE (3) of you will be winners from my blog!


Another sponsor is Timeless Twine!  I just recently joined the team over at Twineology as a Twine-ista and it's been soo much fun!  Twine galore and gorgeous beautiful twine colors!  Stacy is offering up a FULL spool of her Valentine twine:  Strawberry Cupcake just like what I used on my project today!


So to win, I would ♥♥♥ it if you became a follower of my blog!  However, I'm not requiring it....so you can just leave a comment below.  There is no word verification, etc.  :)  You have until 11:59 EST on Feb. 21st to enter!!

Here is the list of all the sponsors of the Made with Love Blog Hop!  Thank you so much to these companies....make sure to thank them!!
 
 
 Your next stop is Agnieszka Malyszek's blog! 
Thanks so much for stopping by today!

{BE MINE}
Stamps:  Lots of Love (Avery Elle)
Paper:  White, Pure Poppy, Hibiscus Burst (PTI)
Ink:  Pure Poppy (PTI)
Dies:  Of the Heart, Stitched Mats: Rectangles (Lil' Inker Designs)
Twine:  Strawberry Cupcake (Timeless Twine)
Misc:  Foam Adhesive, Small Circle Punch

Monday, June 25, 2012

Gallery Idol--Round 5 (Final Round)

OMG!  I am so excited to be here today!  If you hadn't heard, the Top 5 were announced on Friday morning for the Paper Crafts Gallery Idol competition and I was ONE of them!  Check out the post HERE for all the details and the other awesome gals whom I share this spotlight with.  Thank you so much for all of your support and I am so very touched by all of this.  You have no idea!


So this is it.......the FINAL ROUND.  This rounds challenge was to create an "INTERACTIVE BIRTHDAY" card.  When the post went up with the challenge, I immediately had an idea.  I've wanted to make a "scratch off" card for some time and thought this was the perfect opportunity! 
I'm sure most of us have had the chance to scratch off a lottery ticket or a game piece somewhere and let's face it......it is fun!

AmyBlog1


First, I decided to use the Movers and Shakers: Sliders dies from PTI.  I've used these dies with some new paper from Echo Park: So Happy Together.  These papers coordinate beautifully!  My focal piece is a new die from Taylored Expressions:  Petal Pop-ups 2.  Wow....I love love this floral die!  This die can be layered or left alone.....here I layered 2 of the blooms and added a button center.

AmyBlog2


Ok, now do you see it?  Once you pull the tab, the slider comes out and reveals my "scratch off" areas!  For my card here, the sentiment is fully unveiled when the recipient scratches off the 3 circles!  So the entire sentiment reads, "Wishing you love, laughter, smiles on your birthday!"
Like last week, my sentiment is computer generated to say exactly what I wanted!

AmyBlog3

Here you see some of the revealed sentiment.....smiles.  I just love how easy this was to do!  I used the directions found HERE.  Simply, I used a mixture of metallic acrylic paint and dishwashing soap and painted it on the non-paper side of ConTact paper.  Once I had several coats done and were completely dry, I punched out 3/4" circles from this.  Then all I had to do was peel off the paper backing and place over my sentiment words that were to be hidden! 

AmyBlog4


I am quite sure that the recipient will not only love to use the slider part but also the scratch off too!
I know I had fun making this card and I hope you find my idea creative enough to give me your vote.  This has been such an exciting competition.  The challenges have certainly taken me out of my comfort zone and it's been so fun to try new things!  Thank you and don't forget to vote HERE!  ;)

{Wishing you love laughter smiles on your birthday!}
Stamps:  Movers and Shakers Sentiments (PTI)
Sentiment:  Milk and Cereal (http://www.kevinandamanda.com/fonts/)
Paper:  SS White (PTI)
Pattern Paper:  So Happy Together (Echo Park)
Dies:  Movers and Shakers: Sliders (PTI), Petal Pop-Ups 2 (Taylored Expressions), Limitless Layers Ovals (PTI)
Ink:  True Black (PTI)
Misc:  Metallic Acrylic Paint, Dishwashing Soap, Small Flat Paintbrush, ConTact Paper, Foam Adhesive, Harvest Gold Button (PTI), Lemon Tart Grograin Ribbon (PTI), Janome Sew Mini, Scor-Tape, 3/4" Circle Punch (EK Success)
Related Posts with Thumbnails