Monday, July 31, 2017

Lil' Inker Designs / August Release

Amy_HelloDino_DecoEdgeBorder

Hello!  We are starting off Day 1 of the Lil' Inker Designs August Release!  This release is FULL of amazing dies and stamps.......are you ready?  You should have arrived from Angelica Suarez's blog (link below).  Guess what??  The whole new release is now available and can be found HERE!!!  


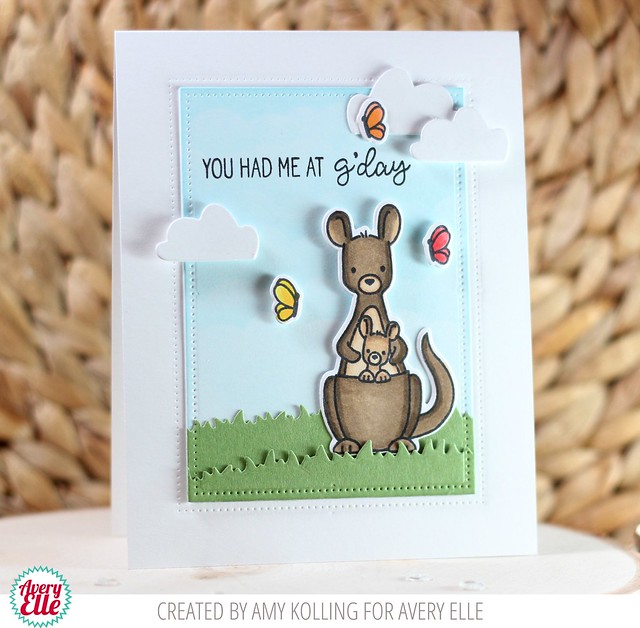
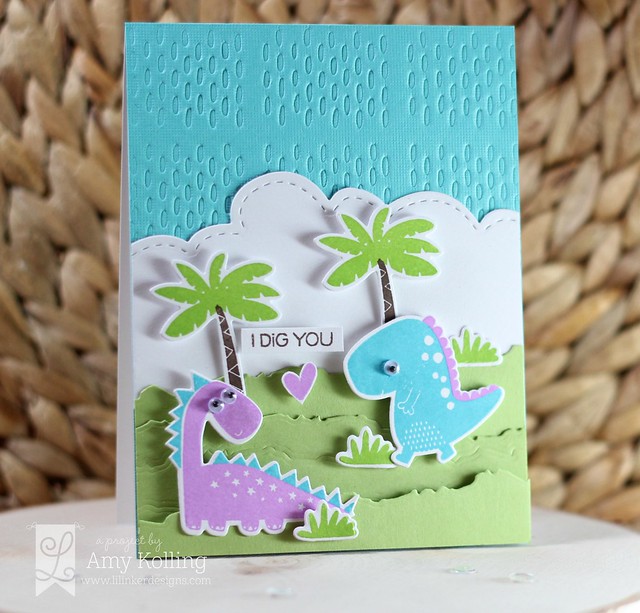
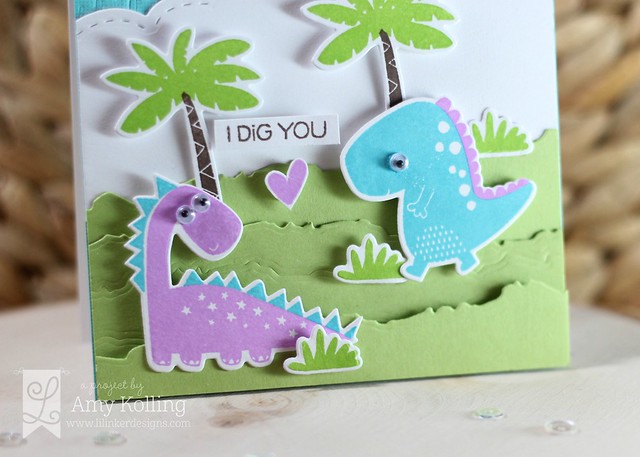
I thought I would start off this release with the adorable new set called Hello Dino and coordinating Hello Dino Dies.  I started creating my scene by using the new Hello Beautiful Cover Up Die to impress the pattern into some thin textured turquoise cardstock for the sky.  Next, I layered some "clouds" using the Border Builders Die Set.  Then came the "ground" for the dinosaurs.......it was made using the new Deco Edge Border Dies.  I've actually die cut some and impressed some for dimension!  Next, I stamped, diecut, and added some googly eyes to my cute dinos and adhered with foam adhesive.  The little shrubs and palm trees were also added with some dimension too.  

***What I love about this set is that it is a solid image set and I got to use the awesome dye inks from Catherine Pooler!  I encourage you to go try them!  These images were stamped only ONCE to get this impression and these stamps were NEW!!!!  I LOVE LOVE these inks!  If you would like to purchase them, click HERE!!***

Amy_HelloDino_DecoEdgeBorder2 


Now for the fun part!  There is a HUGE giveaway for one lucky commenter......the ENTIRE release!!!

Angelica Suarez--special guest


Saturday, July 29, 2017

Pretty Pink Posh / CASology

CASology

Hello!  I wanted to play along with the team over at the CASology blog because they are celebrating 5 years!!!  It's one of my favorite challenges to play along with!  Congrats CASology!
Grab our badge!
The challenge was to create a CAS balloon themed card.  I decided to use the Fly Away Friends stamps and pair them with a sentiment from Fly a Kite.  My scene was framed using the Scallop Hexagons.  My sky background was done using the Mini Cloud Stencil from My Favorite Things (I love this thing!).  

CASology2

Thanks for sharing a part of your day with me!

Friday, July 28, 2017

Pink & Main / Aloha Pineaple

Aloha Pineapple 

Hello! Pineapples are are the rage especially with my 'tween' so Aloha Pineapple was calling my name!  It's a new set from the Pink & Main summer release!  I am so excited to be sharing a few cards as a guest!  Thanks Michelle for inviting me!!


Both cards use simple layouts that are quick and easy!  I've used Aloha Pineapple, Congrats, and the fabulous 6x6 paper pad called Beach Babe.

My first card I just had to stamp some PINK pineapples.  I used some Catherine Pooler inks for these because the ink is just AMAZING and vibrant!  If you haven't checked them out, you must!  Anyway, the pineapples have a separate stamp to layer the fun pattern with a different color of ink.  I cut them out using the coordinating Aloha Pineapple Die.  I've layered them onto a strip of pattern paper from the Beach Babe 6x6 paper pad and a strip of basic black cardstock that was also layered with a white die cut half circle.  I added one die cut pink heart with foam adhesive and a black stamped sentiment that was hand trimmed and added with foam adhesive.  As a finishing touch, some sparkling clear confetti was added.

Aloha Pineapple2

*******************************************************

My second card uses a single pineapple in more traditional colors.  I stamped and die cut the pineapple and set aside.  I created my background by stenciling some polka dots using grey pigment ink over a white top folding notecard.  I simply added some strips of coordinating cardstock and one strip of pattern paper from Beach Babe over the stenciling.  For my sentiment on this card, I decided to use the Congrats Die done in black cardstock and layered it over the pineapple.  I did add a small banner using the phrase "you did it!" and adhered with foam adhesive.  Of course, I had to add a few sparkling clear confetti!

Aloha Pineapple3


Thanks so much for sharing a part of your day with me!


Wednesday, July 26, 2017

Avery Elle/ Tropics

Tropics

Hello!  I am sharing a card that can be seen over on the Avery Elle blog today using Tropics.
I wanted to use this stamp set and do some basic stamping to create my own pattern paper.  In real life, the Sea Glass Pigment Ink from Avery Elle isn't so light but it sure looks that way here!  The outlines of these images are super easy to line up for a seamless look!  I used some Aquamarine and Raspberry Pigment Inks as well for the other leaf and flowers.  For my sentiment, I've used Sentimental Too stamps and coordinating Sentimental Too Elle-ments.

Tropics2

Thanks for sharing a part of your day with me!

Tuesday, July 25, 2017

Avery Elle and Ellen Hutson: G'Day Mate

United We Flourish

Hello there!!  Today I have a fun post to share with you!  Avery Elle has teamed up with our friends at Ellen Hutson for a collaboration stamp and die set called G'Day Mate as part of their United We Flourish Campaign.  


Below is a little bit more about Ellen Hutson's United We Flourish program:

Last November we began celebrating our 10th anniversary with the theme United We Flourish. And what does United We Flourish mean? It means that our company would not be here without the amazing companies we work with, the designers who create stunning projects showcasing the wonderful products being created AND you, our fabulous customers! YOU are such a vital part of our creative community - you inspire & encourage us! Your response to United We Flourish was overwhelming and heart-warming. We heard repeatedly from you that you appreciate how our little company works together with the other manufacturers we carry to bring you their products and education showing how to use those products. To thank you for your constant support and encouragement, we have partnered with some of our friends to offer exclusive limited edition stamp & die sets!!! These sets will be available for a limited time (most likely 3-6 months) after each release, depending on how quickly you snap them up. The theme of these stamps sets are uplifting and fun.

We are thrilled to present the second one to you... G’Day Mate Avery Elle exclusively for Ellen Hutson LLC.

United We Flourish2

This stamp set, G'day Mate, is so unique with its critters from Australia.  I just had to ink up the adorable kangaroo and its joey!  Images were colored with Copics and die cut.  Next, I went about creating my scene using the Picket Fence Elle-ments from Avery Elle.  It's very hard to see in my photo but the sky has sponged clouds in the background.  To frame my entire scene, I used the Double Pierced Rectangles Elle-ments.


If you would like to see more inspiration using this set, make sure to head over to the CLASSroom blog at Ellen Hutson!

Monday, July 24, 2017

Reverse Confetti / Black, White, and Color

The Challenge


Hello!  I have a CAS card to share today using some Reverse Confetti!  When I saw this weeks The Challenge over on Always Playing with Paper, I KNEW I had to play along!  Black/White/Color is one of my favorite challenges!

  
To create my CAS card, I started by stamping the striped scallop border stamp, from Elemental Stripes, repeatedly across a trimmed white panel.  After adding a strip of Midnight cardstock to the bottom, a stamped and die cut butterfly, from Butterfly Dreams, was added pulling the wings up for dimension.  As a last detail, some coordinating enamel dots were added.

The Challenge2


Here's The Challenge graphic if you want to play along too!

Image may contain: text

Friday, July 21, 2017

My Favorite Things / Guest Designer

Celebrate

Hello!  I'm super excited (really I am ecstatic!!!) to be joining My Favorite Things as a Guest Designer on the MFT blog this month!  This past release was just amazing.....in fact, they just keep getting better and better!  

I'm shaking things up to celebrate!!  I was thrilled to see lots of products to create Shaker cards this release so naturally, I wanted to create one!  


mft blog

I started by doing a watercolor background using various colors of Distress Oxide Inks in Wilted Violet, Broken China, and Worn Lipstick. After letting this panel dry, it was die cut using the stitched rectangle in Blueprints 13. To soften this panel and make my balloon shaker stand out, I layered a piece of vellum.
Celebrate3

Next, I went about creating a fun shaker element for this panel. Using the new Balloon Shaker Window & Frame Die-namics, I die cut the center of the balloon into the watercolor panel. I layered the Balloon Window (which was partially blended with Distress Oxide Ink) over the cutout (and vellum) to create my shaker element.
Celebrate463
I added a partially blended Celebrate Die-namics over the balloon shaker. The balloon was embellished with streamers and a string die cuts from this set. A few die-cut glitter stars were added and to finish, my panel was adhered over some Sparkling Clear Confetti to fill the shaker!
Thanks so much for sharing a part of your day with me!

Wednesday, July 19, 2017

Flora & Fauna / Vellum Layering

IMG_4275

Hello crafty friends!  I am here with some inspiration using one of the new Flora & Fauna stamp sets, Butterfly Jar Set.  I have 2 cards to share both using different techniques!

florafaunaclear.com

First, I wanted to show off these beautiful butterflies by white heat embossing the largest butterfly onto some vellum.  I trimmed the vellum panel and layered over a piece of striped pattern paper.  The vellum softens the pattern paper and really makes the butterflies stand out!  For a sentiment, I white heat embossed 'just because' onto thin strips of black cardstock and adhered over the centers of the butterflies with foam adhesive.

IMG_4273

My second card uses a more involved technique.  I've stamped many of the smaller butterflies across an entire watercolor panel with versamark and then white heat embossed.  I love emboss resist and it's a great technique with watercolor!  I've used Distress Inks in Picked Raspberry, Mustard Seed, and Broken China.  These colors were brushed across the panel in strips with a wide brush.  After the panel was dry, I again layered some vellum to soften.  The vellum was pre-stamped in black Staz-On with 'go flourish' from Butterfly Jar Set.  One single butterfly was stamped onto colored cardstock and trimmed out.  One strip of black cardstock was added below the sentiment and the butterfly was adhered to the right.  The entire panel was adhered but only in the center so I could pull up the edges for a fun look.  To finish, I added a few drops of Nuvo Crystal Drops.

IMG_4271 

Thanks so much for sharing a part of your day with me!

Avery Elle / Aloha

Aloha

Hello!  I am sharing a card that can be seen over on the Avery Elle blog today using Aloha.
Aloha!  This stamp set may be little but it's fantastic!  It has just the right images and smaller bold sentiments to go along with it!  

I started my card with a panel of cardstock that I generously blended Broken China Distress Ink Oxide, spritzed with water droplets and blotted dry with a paper towel.  Once dry, I randomly stamped 'aloha' in Versafine Onyx Black Ink for a bold look.  My focal images were black heat embossed and watercolored with my Zig Clean Color Real Brush Markers.  I adhered the images over some gold thread spirals with foam adhesive.  This panel was adhered over a white on white panel using the Waves Elle-ments.  I just love that even though it's done in white, it looks like waves in the background!

Aloha2

Thanks for sharing a part of your day with me!


Related Posts with Thumbnails