Tuesday, March 31, 2020

Reverse Confetti / Somebunny Special

Hello! 
I am here with a card that is sure to put you in the SPRING mood.  We've had some pretty windy days lately so I knew I wanted to use the bunny flying a kite from the Spring Bunnies set.

Somebunny Special 

I created a layered clean and simple card using some of the amazing tag Confetti Cuts from Reverse Confetti.  I started with the Scallop Window Tag out of Piggybank Cardstock and the Grid Stitched Tag (trimmed it down) out of white cardstock.  The layered tag was adhered over a background die cut using the Stitched Burst Cover Panel.  A sentiment strip banner and green strip banner (using Sweet Stripes 6x6 paper pad) were adhered to ground my bunny.  I added my Copic colored bunny with foam adhesive and added a black twine bow.


Somebunny Special2 

Supplies:

Tuesday, March 24, 2020

Avery Elle / Speech Bubbles

Hello!  Amy here with a clean and simple scene card using mainly dies from Avery Elle.  

My card measures 4.25" x 4.25".  I created a scene using several dies:  Leafy Frames Elle-ments and Grand Photo Mat Elle-Ments (retired but an alternative is the Photo Mat Elle-ments).  I trimmed down the photo mat die and layered the Leafy Frames behind it.  

Speech Bubbles

My scene frame was adhered with foam adhesive.  I added the cute Leopard from the Peek-A-Boo Jungle set and a speech bubble.  The new Speech Bubbles set has so many perfect sentiments to use with 2 different speech bubbles!! 

Speech Bubbles2
Grand Photo Mat Elle-ments (retired)
Photo Mat Elle-ments (alternative for the Grand Photo Mat)

Thanks for sharing a part of your day with me!

Monday, March 23, 2020

Spellbinders / Modern Essentials Collection


Hello!  
I have a springy card to share using one of the new Essential Shapes from Spellbinders!
  I paired the new Essential Ovals Etched Dies with an older Die of the Month that is still available and so cute and retro!


Spellbinders

Smile

I started by using the largest oval to pierce my actual note card.  Using some of the other sizes I created layers and dimension with them.  I layered a black die cut Smile using the Die D-Lites Type Smile Etched Die.  After adhering my die cut sentiment, I began placing my various die cut flowers from the Spring Flowers Small Die of the MonthI love the retro look to these flowers and was fun to mix and match these together!  As finishing touches once the flowers were adhered, gems were added to the flower centers.

smile2

Thanks for sharing a part of your day with me!

Friday, March 20, 2020

Crafty Friends Blog Hop featuring Pinkfresh Studio

PFS 

Welcome!  
It's time for the Crafty Friends Blog Hop!  We’re a group of amazing stampers that share similar paths…and we want to share our crafty projects with you!    We’ll be hopping each month featuring a specific company or brand…and this month’s favorite is Pinkfresh Studio!  I have to thank my friend, Caly Person, for the use of this stamp set recently and for her beautiful handwriting skills on my watermark.  Thank you Caly!!!


Check below for a code to use at Pinkfresh Studio for TWO days only!!

The Layered Bouquet stamp set is gorgeous and just simple enough with two layers for the flowers.  I find die cutting the image and then stamping (using my Misti) makes lining up this set effortless.  I stamped my blooms in shades of blue ink and added in some glitter to the highlighted parts.  My bouquet was added to a stitched panel (from a different company) and a black Hello die cut was added .  Simple and easy!

PFS2


********************************************************

Image may contain: text

My talented Crafty Friends blog hop lineup:


Wednesday, March 18, 2020

Erin Lee Creative / March Release / Blog Hop

Sweet Succulents

Welcome!  
I am so excited to help my friend Erin of Erin Lee Creative with her latest release.   The release was actually released early over the weekend!  There is an inspiration blog hop today that is listed below.......Let's have some fun!


I had so much fun with the Sweet Succulents Bundle.  I created some purple succulents as these are the kind I remember my grandma having in her huge iron kettle pot in her front flower bed.

I started with the new Houndstooth Stencil.  Scattered Straw Distress Ink was lightly blended over a panel of cardstock.  I added in my die cut stamped succulents and leaves adding in some dimension with foam adhesive.  The 'congratulations' sentiment is from the new set Small Script.  A few white gems finish my card!

Sweet Succulents2


*********************************
***PRIZES***

There will be 3 (three) random $25 gift certificate winners chosen and posted on Saturday, March 25th.  So be sure to comment!

Join me for the rest of the blog hop--

Amy-->me!


Thanks for sharing a part of your day with me!

Avery Elle / Hot Dog

Hello!  It's Hot Dog week over on the Avery Elle blog!  I have a card using Hot Dog and an older die called Circle Frames Elle-ments.

Hot Dog

I thought I would show off these cute images from Hot Dog all colored up with Copics.  A great way to keep a card clean and simple is to use a "window".  I used the Circle Frames Elle-ments and ink blended some Squeezed Lemonade Distress Ink behind each of the circle openings to really make my images pop.  The Circle Frames Elle-ments panel was trimmed down, edges 1/4" rounded, and adhered to the ink blended note card with foam adhesive.

All my images were added with a double layer of foam adhesive for more dimension.  I added two white heat embossed black sentiment strips across one of the circle windows and finished my card off with a few black gems.

Hot Dog2

Supplies:
Hot Dog
Hot Dog Elle-ments
Circle Frame Elle-ments

Thanks for sharing a part of your day with me!

Wednesday, March 11, 2020

Reverse Confetti / Rainbows

Hello!  
I am up on the Reverse Confetti Blog today sharing a mash-up of an older product with one of the new sentiment sets from the March release.  Go check out the Reverse Confetti blog today for all the details!

Products:  
On the Curve Cover Panel
Reverse Confetti Cardstock
Perfect Timing
Scallop Window Tag


May 11 #2


Thanks for sharing a part of your day with me!

Sunday, March 8, 2020

Reverse Confetti / March Blog Hop

March Blog Hop 

Welcome to the Reverse Confetti March Blog Hop!
  
Make sure to check out the Reverse Confetti blog for all the details of this hop and for a full list of inspiration and information.  Let's celebrate FIFTY releases!!!


I created my card using the distressed circular image from Choose Joy and the Reverse Confetti Inks in Iced Aqua, Lime Green, Piggy Bank, Tangerine, and Buttercup.  I stamped the sentiment in bold black ink to the upper right.  I added some raised embossed lines above and below my circle of rings.

March Blog Hop2


****************************************

Make sure to visit more of the design team for inspiration using Reverse Confetti!


Saturday, March 7, 2020

Reverse Confetti / Countdown to Confetti Day 3

SpringBunnies 

Hello!
It's time for DAY 3 of the March release from Reverse Confetti!  We welcome 6 new stamp sets and 9 new Confetti Cuts!  You are in for such a treat with this month as we are celebrating FIFTY (50) releases!!!

Make sure to check out the Reverse Confetti blog for a list full of inspiration and information on all the new goodies!!

Shop for all your Reverse Confetti HERE!!


Today we share all the CUTE critter stamps!  We have THREE (3) new sets:  Spring Bunnies, Chalk it Up, and School Days.

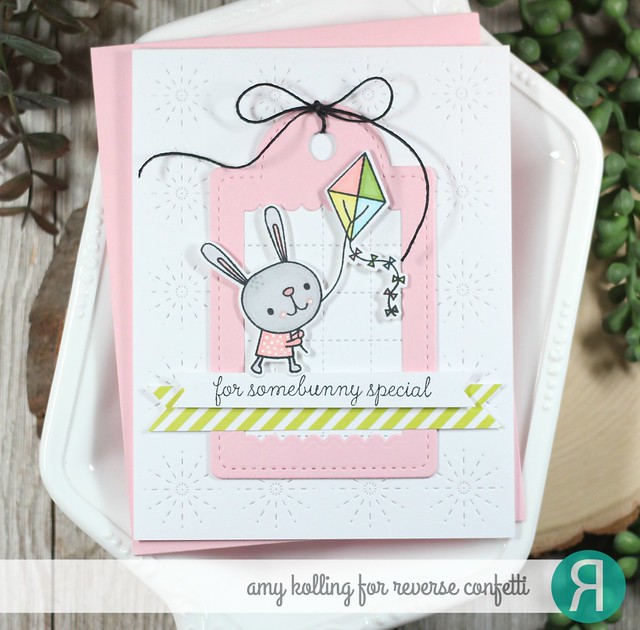
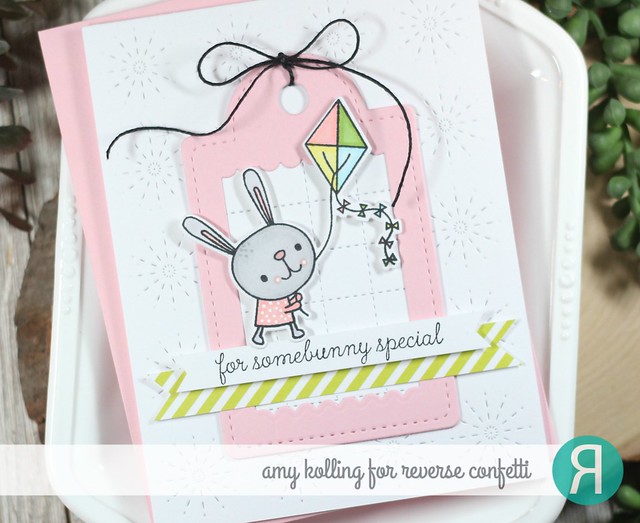
First up, these adorable bunnies!  I created my own background using a light gray ink.  I created a tag using the new Scallop Window Tag.  I added the Happy Easter Confetti Cuts colored ombre using Distress Inks.  To finish, these two bunnies were Copic colored and added with foam adhesive.

SpringBunnies2

*********************************

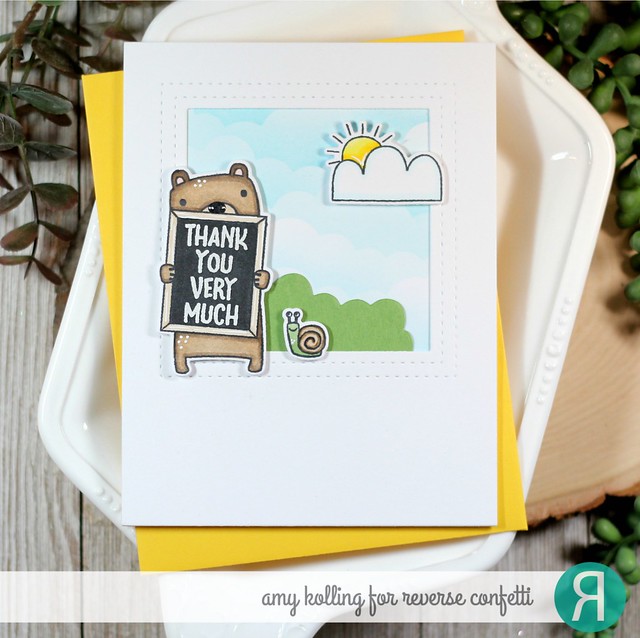
My second card uses the set Chalk it Up.  I Copic colored my bear along with the chalk sign.  I used Copic N10 for the chalkboard and then white heat embossed the sentiment.  I ink blended some clouds in the background using a hand made stencil.  Everything was put together using the new Double Stitch Window Confetti Cuts.

Chalk it Up 

*********************************

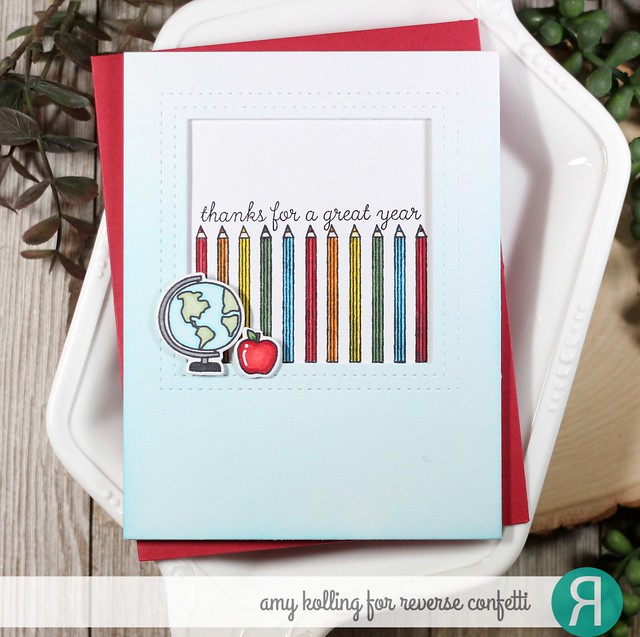
My third card uses School Days.  I again used the Double Stitch Window Confetti Cuts and was able to stamp a row of pencils across the opening using my Misti, moving it 1/4" each time.  The pencils were Copic colored and a sentiment stamped in black above.  To round out the card, I added a stamped, colored and die cut globe and apple.  

School Days


*********************************


Now for the prizes..........there are TWO $15 prizes up for grabs this release:  1 for blog commenters and 1 for Facebook commenters.  So leave those comments and make sure to check the Reverse Confetti Facebook page too!  

Details can be found over on the Reverse Confetti blog for all the prizes!


Friday, March 6, 2020

Reverse Confetti / Countdown to Confetti Day 2

Tulips 

Hello!
It's time for DAY 2 of the March release from Reverse Confetti!  We welcome 6 new stamp sets and 9 new Confetti Cuts!  You are in for such a treat with this month as we are celebrating FIFTY (50) releases!!!

Make sure to check out the Reverse Confetti blog for a list full of inspiration and information on all the new goodies!!

Shop for all your Reverse Confetti HERE!!


I love a white on white card especially paired with a colorful focal point!  I used the Geo Panel Confetti Cuts done on white and layered onto a white note card.  The tulip images from the new set Tulips are amazing and fun to color!  I added some Copic colored tulips to a galvanized tin and wrapped it with some twine.  Just like you would see in farmhouse decor!  Kept it simple with a white sentiment strip to ground my image.

Tulips2


****************************************************


Now for the prizes..........there are TWO $15 prizes up for grabs this release:  1 for blog commenters and 1 for Facebook commenters.  So leave those comments and make sure to check the Reverse Confetti Facebook page too!  

Details can be found over on the Reverse Confetti blog for all the prizes!


Related Posts with Thumbnails