Wednesday, September 30, 2020

Avery Elle / Boo to You

Hello!  

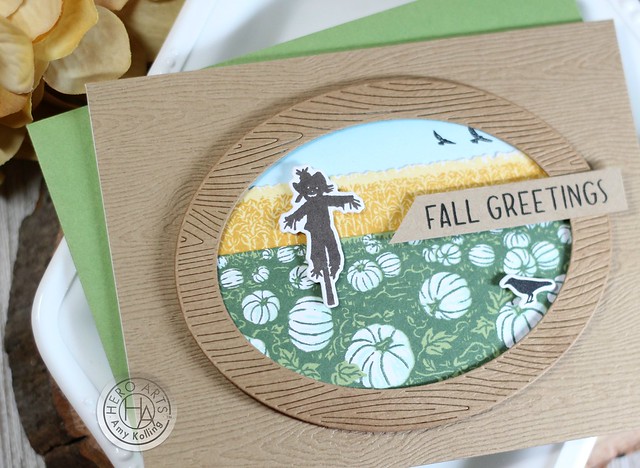
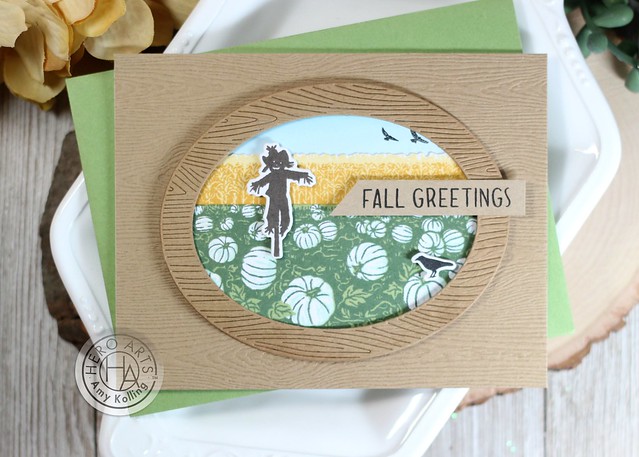
I am here today with a Halloween treat!  I love to make shaped cards and the Boo to You set is adorable and perfect for this!  Let me show you how!

****Shop for your Avery Elle HERE****


The images were Copic colored and die cut using the coordinating Boo to You Elle-ments.  After setting these all aside, I set to work on the shaped portion of my card.  While the pumpkin image can be die cut, it also cuts out the center to create a scene.  Once I cut out my main colored pumpkin image, I used that to trace the image onto white card stock.  My background was ink blended with Black Soot, Chipped Sapphire, Wilted Violet, and Broken China Distress Inks and then trimmed out.  Water was flicked across the panel to create the stars.  The top was scored and a sentiment stamped at the bottom that will only be seen once the card is opened.  


All of my images were die cut twice----the second one being just in white card stock.  The images on the front were adhered with foam adhesive.  I wanted to create a window card but to the make the back part of the window look "clean" (ie. where you don't see all the Copic blending), the extra die cuts were layered face up and adhered to the clear card stock that was layered between the two pumpkins.  


TIP--Use the negative of the die cut to trace the image to create a full scale pumpkin image for the "back" of the card.  Cut out using scissors.  To create the folding portion of the card, simply score a small part of the top of the pumpkin.


Supplies:

Boo to You 

Boo to You Elle-ments


Tuesday, September 29, 2020

Taylored Expressions / Hey There Kit

Hey There Aqua2

Taylored Expressions has a new kit release TODAY!  
The Hey There Kit has so much versatility and can be used all year long!

Kit Contents:
Hey There Stamp & Stencil Combo
Hey There Die
Good Vibes Stamp Set
Envelopes
Envelope Seals


I created several cards with each one using different color schemes for different recipients.


This card uses the sun rays stencil using Blue Raspberry Taylored Expressions Ink over a coordinating color cardstock for a tone on tone look.  The Hey There sentiment was stamped in Pineapple, Blue Raspberry, and Confetti Cake Ink.  To make the sentiment "pop" a coordinating die cut out of yellow cardstock was layered off set behind.  To finish, some clear shimmer spray was spritzed over the entire card.

Hey There Aqua

**************************

Hey There Rainbow

Why not go rainbow?  This took a bit of masking but it was worth it!  Ink colors used:  Strawberry Milkshake, Candy Corn, Lemon Meringue, Lime Zest, Confetti Cake, and Jelly Donut.  Similarly to my first card, the die cut was layered with a black die cut off set for a shadow look.

Hey There Rainbow2

**************************

Hey There Blue


This card was a bit more simple...... colors and less "bling" for a perfect masculine card.  The dotted sunburst stencil was ink blended with Blueberry Ink.  The Hey There sentiment colors used were Sprinkles, Sea Salt, and Pineapple Inks.  This card is headed out to my dad for his birthday.

Hey There Blue2

**************************

Big Hugs
Why not one more card?  I tell you.....this kit is soo good!
Here the sun rays stencil was masked off and only a portion of it was ink blended with Strawberry Milkshake.  To the center, a sentiment from Good Vibes (from the kit) was stamped onto a white die cut circle layered onto a black colored circle with foam adhesive.  To finish, a few tiny gems were added......just because ☺

Big Hugs2

Ok, I hope I've left you inspired and want to create some of your own Hey There cards!  Time for some shopping!


Thursday, September 24, 2020

Avery Elle / Fall Release Blog Hop

O Tiny Tree2

I am so excited because the Fall 2020 Avery Elle Release is finally here!!  We have an amazing blog hop full of inspiration today. 

For a summary of all of the new products that are available for purchase right now check out this section in the store.  Be sure to scroll all the way to the end of this post to read about the fun giveaway we are having.  


O Tiny Tree has some adorable critters that are adorning a tree.  My favorite kind of tree if you ask me!

To a white note card, Broken China Distress Ink was blended very lightly.  The Snow Scene Elle-ments was die cut from cardstock that was ink blended heavier with Broken China Distress Ink.  Glitter was added to the snow in the sky and the snowy bank as well.  All the images were Copic colored and die cut.  Once the glitter snowy hill was adhered, the images were adhered with foam adhesive.

O Tiny Tree

Supplies:

To celebrate our Fall 2020 Release Blog Hop, Avery Elle is giving away a stamp set of their choice to 3 winners.  To enter to win just comment on the Avery Elle post.  There is no purchase necessary and you must be 18 years of age or older to enter.  This giveaway is void where prohibited.  You have until midnight Sunday, June 21st 2020 to enter.  Check out the Avery Elle blog for all the details!

The winner will be announced on the Avery Elle Blog on Tuesday, June 23rd .  All products are available for purchase in the Avery Elle store right now.  You can check them all out here

BLOG HOP


Wednesday, September 23, 2020

Ink to Paper / Sweet Orange Holidays

Amy_Sweet Orange Holidays2

I shared this card last week over on Instagram but thought I'd share it here in case you don't follow me over there!  


This card uses the Sweet Orange Holidays from Ink to Paper along with the Border Bling: Joy Die.  The center portion of the Border Bling Die was masked off and light green ink was blended at the top and bottom.  The sentiment was stamped in black ink to the right.  The oranges were stamped with the layers of different shades of orange ink, die cut, and added with foam adhesive.  

Amy_Sweet Orange Holidays


Thanks for sharing a part of your day with me!

Tuesday, September 15, 2020

Ink to Paper / September Release

Storybook Christmas2

Ink to Paper this month is "beginning to look a lot like Christmas".
  I am very excited to be sharing some projects this month along with the release!  Papertrey Ink (Ink to Paper) has long been a favorite company of mine!


I have two projects to share using the release.  Storybook Christmas is a wonderful set for the holidays and the book lovers out there.  

I started with a light gray cardstock and stamped the sprig image from Sweet Orange Holidays around the bottom half of the perimeter in gray ink.  To a trimmed white panel, blue ink was blended in.  Each of the books were stamped in rainbow colors of ink and die cut using the coordinating dies.  The star "bookends" were gold glitter heat embossed and flags all the books that were added with foam adhesive.

Storybook Christmas

*********************************

My second project uses the new In Stitch: Pumpkin.  I created a piece of home decor that will be perfect for my fall tray.  My frame was painted in white chalk paint and the finished stitched pumpkin was added (with some dimension) to the center.  

Untitled


Stay tuned for more Ink to Paper projects this month!

Saturday, September 12, 2020

Avery Elle / STAMPtember with Simon Says Stamp

Holiday Bells2

I am so thrilled to be sharing in the excitement of STAMPtember with our friends at Simon Says Stamp and Avery Elle!

I think STAMPtember is the most exciting part of the year and I've been counting down the days!! I know so many of you have come to love and collect the exclusive STAMPtember sets, and this year will not disappoint!

Today I am sharing the stamp set created exclusively for this event called Holiday Bells
This set is exclusive to Simon Says Stamp, so it's the only place you will find it, and only while supplies last! Don't wait too long to get yours! 


The Holiday Bells were stamped and hand trimmed out.  The striped bells actually were stamped with the individual stamps in coordinating colors.  I decided to hang each bell with some jute twine and a tiny bow.   

Holiday Bells


***SHOP for this set HERE***


Thursday, September 10, 2020

SugarPea Designs / Thanks Wreath


Fall is definitely in the air here in Kansas!  The temps have dropped from upper 90's to 50's!  Brrr.  
So I thought I'd break out the Buffalo Check and get creating a fall 'thanks' card.

Thanks Wreath

The Buffalo Check Background was inked in gray ink onto a light aqua cardstock and trimmed down.  This panel was adhered to a mat of a dark gray cardstock.  By doing this, it really sets off the gray in the background stamping.

Using the Open Book SugarCut, lots of florals were die cut out of aqua, gray, white, and a Scattered Straw inked paper (I didn't have this color of cardstock in my stash).  Once they were all pieced together, I began arranging my wreath pattern.  They were all picked up with Press 'n Seal to keep them in the arrangement to add liquid glue to each of them.  The wreath was added to the Buffalo Check panel.  To finish, a simple 'Thanks' was die cut and added with vellum as the outline.  Tiny slivers of foam adhesive were placed behind the center and then adhered to the center of the wreath.

Thanks Wreath2 


Tuesday, September 8, 2020

SugarPea Designs / STAMPtember with Simon Says Stamp

Shiver Me Timbers2

I am so thrilled to be sharing in the excitement of STAMPtember with our friends at Simon Says Stamp and SugarPea Designs!

I think STAMPtember is the most exciting part of the year and I've been counting down the days!! I know so many of you have come to love and collect the exclusive STAMPtember sets, and this year will not disappoint!

Today I am sharing the stamp set created exclusively for this event called Shiver Me Timbers. There is also a coordinating die set and you can purchase them as a bundle or separately!
This set is exclusive to Simon Says Stamp, so it's the only place you will find it, and only while supplies last! Don't wait too long to get yours! 


This adorable pirate set is sure to be a hit!  I started with ink blending several strips of color (Stormy Sky, Candied Apple, and Antique Linen Distress Inks) that matched the colors of my cute pirate and fellow monkey!  The images were Copic colored, die cut, and adhered with foam adhesive.  Kept it pretty simple!

Shiver Me Timbers


Hero Arts / September My Monthly Hero Blog Hop / Giveaway

MMHSept2020#2

Hello! 
Welcome to the My Monthly Hero Blog Hop!
  Hero Arts My Monthly Hero Kit will get you ready for FALL!   Quantities are LIMITED for this kit so grab it while you can!

Hero Arts


The main kit and add-ons are fabulous!  The kit is available for a limited time only - once it's gone, it's gone. ****Kits should begin shipping from Hero Arts on Friday, September 11th.****  You can now subscribe to receive the kit monthly and never miss one!  The kit value is over $70......but only costs $34.99.  Once this kit is gone, it's gone!


Kit Contents:
6 x 8 HeroScape Clear Stamp Set
3 x 4 Clear Stamp Set
5 Coordinating Frame Cut Dies
5 Ink Cubes (Grape Slush, Moss, Lemon Drop, Creamsicle, Cup 'O Joe)
6 5.5" x 8.5" Glitter Sheets (Orange, Bronze, Copper)

*********************************************
The HeroScape stamps are amazing and so easy to line up and use.  This month's kit is perfect for making some fall cards quick!

I stamped my various layers with layered ink and added some of additional details (scarecrow and black crow) to my scene.  I wanted this to have a rustic look so I added the Oval Woodgrain Frame from Hero Arts to frame my scene.

MMHSept2020

Here are all the add-on sets available this month too!  I spy a Graveyard HeroScape too!

*********************************************

**GIVEAWAY**

What's a blog hop without a giveaway?  Hero Arts is giving away a $50 gift card to one blog reader - selected from the comments across all of the blogs in the hop. Giveaway closes Sunday, September 13th at 11:59pm Pacific, and the winner will be announced the following week on the Hero Arts Blog.  


Related Posts with Thumbnails