Friday, August 31, 2018

Technique Tuesday / Countdown to Release Day 2

Wendell the Whale

Hello and Welcome!  
Today is Day 2 of the countdown to the Technique Tuesday September release!  
There are fun stamps and dies this month and some to get you started thinking about Christmas planning!

Make sure to check out the Technique Tuesday blog for all the products featured today and full list of inspiration from the rest of the Design Team!  All products will be available for purchase starting on September 1.  


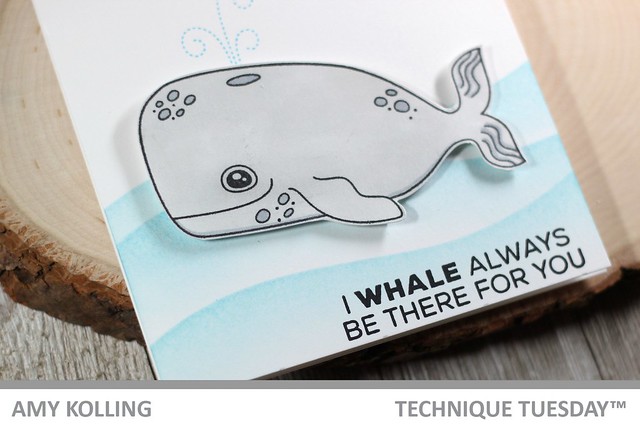
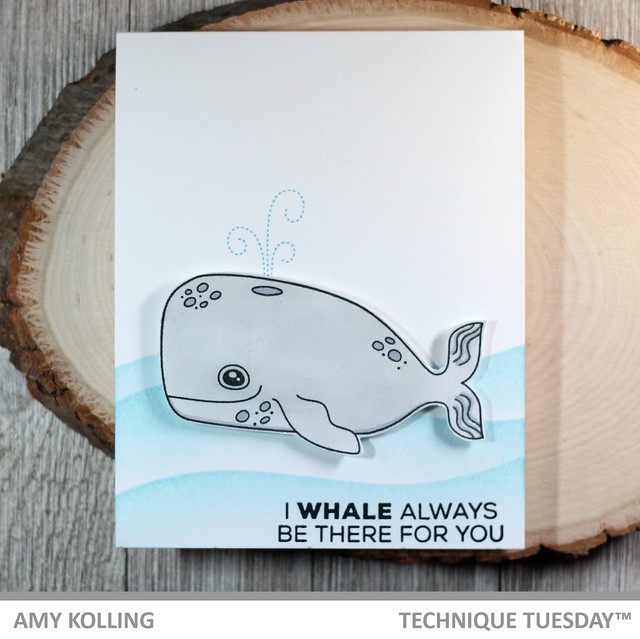
The newest addition to the Animal House stamps is Wendell the Whale!  This image is one that you don't need to add a lot of color.  Here, I've done a light watercolor wash of Hickory Smoke Distress Ink over the whale with some light Copic shading.  I created some waves by ink blending in Broken China ink over a wave stencil.  Before I adhered Wendell to my card front with foam adhesive, I stamped the spray of water in Broken China Distress Ink to match the waves.

Wendell the Whale2


Thursday, August 30, 2018

Lil' Inker Designs BIRTHDAY and SALE!

Warm Welcome 

We are celebrating Lil 'Inker Designs 8th Birthday with a SALE, free stamps w/ purchase, and lots of inspiration!!!  I have been honored to work with Lil' Inker Designs from the beginning.  It's been so much fun to help Laura grow her company over the years.  


I thought it fitting to share some of my favorite products from the Lil' Inker Designs line.......Cover Up Dies.  SERIOUSLY, go check them out and grab some!  


My card features the Warm Welcome stamps and Welcome word die.  Again, one of my favorite sets EVER.  This set is a must have!  I created a stamped wreath (with the help of the Gina K. Designs Wreath Stencil) using dye inks with the solid blooms from this set.  You could just keep adding to the wreath if you want, but i kept it pretty simple except I had to add some coordinating gems!  

Warm Welcome2


Here are the details about the sale happening now!

Let's talk about all of the different ways you're going to be able to save or earn FREE items during our sale which will run August 30th through September 3rd (EST).

First, everything in the store with the exception of our Latest Release is 25% off. No code is needed to get the discount. Just add your items to your cart and let the website calculate your savings!

Second, we have TWO 50% Off Categories for you to shop. Our Tools & Accessories are half off during our sale which is great because this includes all of our awesome paper pads and paper packs in stock. We also have a special 50% Off Sale Category you'll find on our Home Page and it's filled with stamps and dies you can purchase for a tremendously great price!

We also have some very special items you can earn for FREE just for shopping with us during our birthday sale.


Make sure to check out the Lil' Inker Designs Blog for all the details on the sale specifics!!  Happy shopping and Happy Birthday Lil' Inker Designs!

Queen & Co. / Bug Jar Kit

Hello!  I wanted to share some ways to use the Bug Jar Kit from Queen & Co. without the shakers!  I created two cards from this kit but there are so many other ways to use this kit too!  

Queen & Co

I am starting with a super clean and simple card using just the butterflies from the stamp set included in the Bug Jar Kit.  I went with Copic coloring the butterflies in pastel colors of the rainbow and die cut using the coordinating dies.


Because I wanted the butterflies to be the focal point of my card, I added them to a white panel of cardstock which was adhered to a white notecard that was scored to have 3 lines on either side.  I love how this simple texture adds to the card!  To create some shine, I added Glossy Accents to the butterfly bodies.  What's fun about this kits' stamp set is that it includes both whimsical and bold sentiments using fonts.  I stamped one of the sentiments on a hand trimmed banner and added it with foam adhesive.


Supplies:

For my second card, I used the jar dies from Love Jar Kit just as die cuts.  I needed a place to have my ladybugs perch!  I ink blended a light blue background using Tumbled Glass Distress Ink onto the inside of the jar and then stamped the branches.  I added some Copic colored and die cut ladybugs to the scene.  My jar topper was stamped and die cut from Delightful Dots paper pad.


I added my ladybug jar to a notecard that had a cloud sky stenciled in with Tumbled Glass Distress Ink.  The grass was created with some grass dies and pattern paper from Flirty Florals paper pad.  


Supplies:

Technique Tuesday / Countdown to Release Day 1

Things Change

Hello and Welcome!  
Today starts the countdown to the Technique Tuesday September release!  
There are fun stamps and dies this month and some to get you started thinking about Christmas planning!

Make sure to check out the Technique Tuesday blog for all the products featured today and full list of inspiration from the rest of the Design Team!  All products will be available for purchase starting on September 1.  


When I first saw this stamp set called Things Change, all I could see was creating backgrounds.  You may be thinking, "there are only outline label shapes".  Think outside the box and try stamping using the stamp on the REVERSE side, giving a solid impression!

I used dye inks and double stamped my image each time.  After stamping the panel for a background, the panel was trimmed down and mounted onto a notecard.  One additional label was stamped, hand trimmed, and added with foam adhesive to my card.  To finish, I added some matte enamel dots that matched the ink perfectly.

Things Change2

Thanks for sharing a part of your day with me!

Monday, August 27, 2018

Rubeena's Crafting Anniversary Blog Hop!

Hello My Friend

Welcome to Rubeena’s Crafting Anniversary 2-Day Blog Hop!
This hop is epic with more than 60 guests and over $600 in sponsored prizes! Not only are we celebrating four years since Rubeena first discovered cardmaking but also crafting in general. This industry is made up of wonderful individuals who are creative, inspirational, kind, and incredibly supportive! Hop along so you can learn about why we create and how much joy it brings us!


So happy to help my friend Rubeena celebrate this milestone!  If I look back on my own papercrafting journey, it takes me back many, many years!  I did papercrafting for years in the form of scrapbooking and then I found stamping and cardmaking.  My first blog post was October 8, 2007 when I posted about a special The Angel Company was having (The Angel Company was local to me at the time and was similar to Stampin' Up).  Wow!  How far I have come!!  ♥♥

I absolutely love this stamp set from Lil' Inker Designs called Best Mom.  You can create this large bloom in any color and also use the same stamp for leaves.  I layered it over an impressed the Perfectly Plaid Cover Up Die.  I added a black die cut Hello Word Die and a small stamped sentiment from Because.  To finish, I added some sparkling clear confetti from Pretty Pink Posh.

Supplies:

Hello My Friend2 

GIVEAWAYS
In celebration of this anniversary, we have several amazing sponsors. Let’s thank them for their generosity! Winners will be randomly selected from comments left on all the blogs. The winners will be announced by Wednesday, September 5 on this page. Winners will have up to 2 weeks to contact Rubeena at ararerubycrafts@gmail.com to claim their prize before another winner is selected. Rubeena will be announcing her giveaway winners here: http://www.arareruby.com/giveaways/.

Studio Katia - $50 gift card
Hello Bluebird - $50 gift card
Altenew - $50 Gift card
Pinkfresh Studio - $30 gift card
Gina K. Designs - $50 gift card
Clearly Besotted - $35 gift card
Simon Says Stamp - $25 gift card
Spellbinders - Card Kit
Jennifer McGuire - $50 Simon Says Stamp gift card
winnie & walter - $40 gift card
Mama Elephant - $25 gift card
Hero Arts - $25 gift card
Nichol Spohr - Custom-sewn rainbow pencil case filled with brand new Spellbinders' dies
Danielle Flynn - $25 Simon Says Stamp gift card
Picket Fence Studios - four $25 gift cards

BLOG HOP
Here's the blog hop list for today!

Rubeena Ianigro
♥♥Amy Kolling♥♥
Maria Peters (Instagram)

Friday, August 24, 2018

SugarPea Designs / Release Day!


Eucalyptus Wreath

Hello!!
 It's Release Day for the brand new release from SugarPea Designs!  Each day this week, we shared inspiration using the new release.  With several new stamp sets and matching dies.......there's something you are sure to love!  

All the NEW products that will be available for purchase starting tonight, August 24th at 6PM EST in the SPD Store.


One of my favorite sets of this release......Eucalyptus Wreath.  I've paired this with the Grateful Greetings stamps and Grateful SugarCut.  

I gold heat embossed the large wreath onto Bristol Smooth cardstock.  I used this cardstock because I wanted to color in the wreath with Zig Clean Color Real Brush Markers.  This panel was trimmed down and gold Heidi Swapp Color Shine was flicked over the top.  I added this to a panel of coordinating green cardstock that was cut with the Postage Stamp SugarCut.  I added a gold die cut Grateful SugarCut and a coordinating sentiment strip also in gold embossing.  As a final touch, I added Metallic Rose Gold gems from Pretty Pink Posh.


Eucalyptus Wreath2


Would you like to winAll you need to do is leave a comment on the SPD blog posts.  It's really that easy!  Winners during our Product Release will be announced on Monday, August 27.


SugarPea Designs
Amy Kolling
Special Guests:

Thursday, August 23, 2018

SugarPea Designs / Sneak Peek Day 4

Birthday Balloons

Hello!!
 Welcome back to more inspiration for the brand new release from SugarPea Designs!  Each day this week, we will be sharing inspiration using the new release.  With several new stamp sets and matching dies.......there's something you are sure to love!  

I hope you'll join me here over the next 5 days as I share Sweet Peeks for the all the NEW products that will be available for purchase starting this Friday, August 24th at 6PM EST in the SPD Store.


Birthday Balloons has overlay images to make these balloons really lifelike.  I've used all the designs included in this set.  What I did here is actually stamp the solid balloons in colors I wanted and stamped the design overlay with Versamark to which I white heat embossed.  Stamp the balloon strings and add the balloons with varying heights with foam adhesive.  The edge of my panel was die cut with a wavy edge die from Card Front Element Builder.

Birthday Balloons2


Would you like to winAll you need to do is leave a comment on the SPD blog posts.  It's really that easy!  Winners during our Product Release will be announced on Monday, August 27.


SugarPea Designs
Amy Kolling
Special Guests:
Related Posts with Thumbnails