Wednesday, January 31, 2018

Avery Elle / Lava You

Hello! I'm sharing a punny Valentine using the Lava You stamp set!  What I love about this stamp set (besides that it is punny!) is the mini size.  The stamps included can make either an easy one layer card or a more dimensional card using the dies.

Lava You

I have used the solid volanco stamp to "fill in" my volcano instead of using Copics.  But for the lava, I stamped and die cut the lava and popped it up with foam dimension.  This gave just the right amount of pop I was going for.  Because I was making this a more masculine card, I chose a pattern paper from the Everyday Collection 6x6 Paper Pad to adhere to a white notecard.  My cute volcano image was adhered to a Wonky Stitches Die and tied off with Cherry Hemp Twine.

Lava You2

Supplies:

Sunday, January 28, 2018

Spellbinders Blog Hop Winner


Hello!  I wanted to stop in and share the winner from my blog for the Spellbinders Blog Hop.  

Spellbinders

Congrats to Kathy who said:

Amazing how you made a simple red, gray and black card pop with detail. Plus the die can be used for many occasions. Love it!

Kathy (I have emailed you!) ♥♥

Thursday, January 25, 2018

Lil' Inker Designs / Flashback Friday


Hello!  I am up over on the Lil' Inker Designs blog with this month's Flashback Friday card.  I've used lots of previously released goodies for a simple LOVE card!  


Here is a sneak peek of my card........make sure to check out the full card over on the Lil' Inker Designs blogIf you want to shop, CLICK HERE!

Love Today and Always3

Many of the items used on my card are on sale today and through next Friday, February 2nd 2018 or while supplies last. In fact ALMOST ALL of the Valentine's Day items are included in this sale for you (with the exception of our Latest Release Items)!! 

CLICK HERE to be taken to the Sale Page to shop everything on sale through the next week. No code needed. Just add the sale items to your cart and the website will do the rest!  Happy Shopping!

Tuesday, January 23, 2018

SugarPea Designs / FanTASCHEtic

fanTASCHEtic 

Hello!  I have a fanTASCHEtic card to share.  I have been really enjoying stamping my own backgrounds lately for some CAS cards.  And let's face it a CAS card is perfect for those guys!  They don't need all the bling!  ;)


I repeatedly stamped the mustache stamp from Terrific Ties with Versafine Tuxedo Oxyx Black ink.  I die the word YOU out of red cardstock three times and layered them together for just a bit of dimension.  To a black sentiment strip, I white heat embossed the sentiment.  My sentiments were adhered to my notecard with a strip of thick vellum to really make them stand out over the stamped background.

fanTASCHEtic2


Saturday, January 20, 2018

The Ton’s 3rd Anniversary Release Blog Hop

Peony Notes3 

Hello!
I am so excited to help my friend Effie over at The Ton celebrate their THIRD Anniversary!  Every day from January 19-January 26 there will be a mini blog hop with loads of inspiration using their Anniversary Release!

The Ton has 23 new stamps for their Third Anniversary Release which includes up to two free gifts with purchase (Daisy Duet and Peony Notes Bundle A+B+C). For more information on The Ton’s incentive gifts, head over to The Ton’s blog. All new release products are available now!  

Inline image 1

I am starting things off with the Peony Notes A, B, C stamps.  They are GORGEOUS!  The details in the flowers are incredible and they include many bold sentiments along with supporting sentiments!  I could have made cards for hours with this set! 

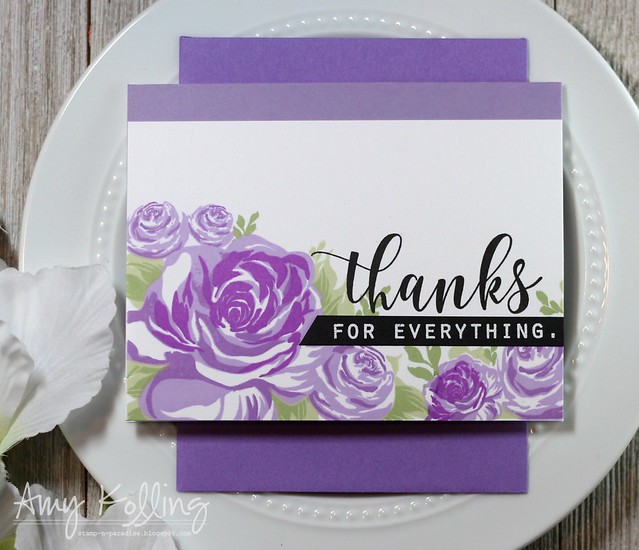
I started with creating the purple Peony card (ya know it's the Pantone color, right?).  I used the Peony border in shades of purple.  The sentiment is also from this set and was stamped in bold Versafine Onyx Black ink.

Peony Notes2

The second card using Peony Notes A, B, C used the Peony border in shades of orange.  After stamping one side of my white cardstock panel, I turned it over and stamped the border on the other edge to fill up my panel.  I love love love this!  The sentiment for this card is from Seriously Amazing and it is seriously AMAZING stamped in Versafine Onyx Black!

Peony Notes

***********************************

Timeless Peonies

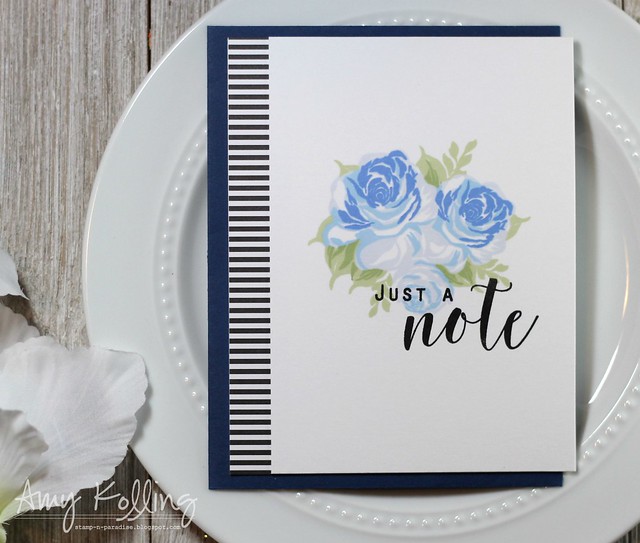
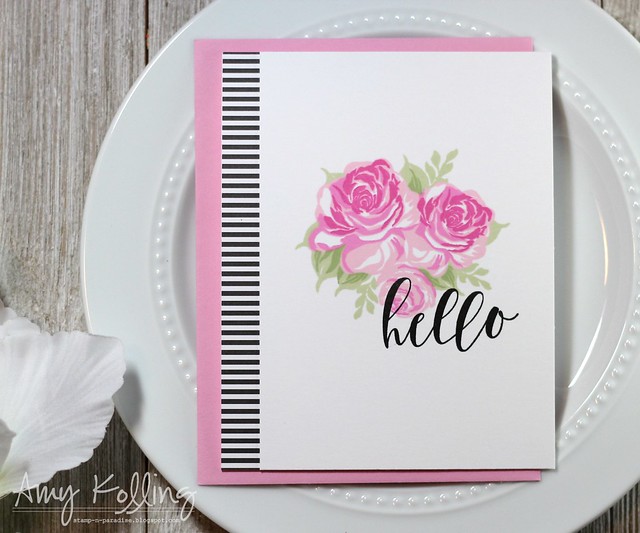
My next cards use the new set Timeless Peonies.  This set comes with a full background stamp where you "fill in" the spaces with the Peonies.  I wanted to create some CAS one layer cards using this set.  

I created a pink version and a blue version.  Both cards were stamped using my Mini Misti.  This tool made making 2 identical cards a breeze!  The simple sentiments come from Peony Notes and again are stamped in Versafine Onyx Black ink.  

Timeless Peonies2

Timeless Peonies3

**GIVEAWAY**

For each day of The Ton’s blog hop festivities (1/19 to 1/26), Effie is giving away a stamp set of choice to a lucky commenter. To qualify, you must leave a comment on each blog stop for the respective giveaway day for which you are entering. The comment period for all giveaways closes on January 28, 5pm EST. 

Here are today's blogs to visit:


Thursday, January 18, 2018

Reverse Confetti / CAS(E) this Sketch!

CAS(E) this Sketch! 

Hello!  I ran across this sketch from one of my favorite challenge blogs.....CAS(E) this Sketch! and I had to play along with some of my Reverse Confetti stamps and dies!


Using Buds 'n Blooms, I stamped and die cut lots of blooms in fun color combos using Reverse Confetti Premium Dye Inks.  I finally liked this combination:  Iced Aqua, Piggy Bank, Flamingo, and Lime Green.  I layered them onto a die cut frame made with the scallop rectangle die from Love Note and inlaid a white Diagonal Stripe Pretty Panel.  My sentiment, from Whole Lotta Thanks, was white heat embossed onto a strip of Midnight Cardstock.

CAS(E) this Sketch!2 


 Here's the fabulous sketch from CAS(E) this Sketch!  


Wednesday, January 17, 2018

Avery Elle / Love is in the Air


Hello! What a fun week ahead!  
Can I say one word?  CREATIVATION.  I am so excited to be attending this year working in the Avery Elle booth!  If you are coming, make sure to stop by for a make 'n take, to say hello, and maybe a selfie!  We have some fabulous new products that we can't wait to show you!


Love is in the Air

I could not wait to use the set today.  Balloons are so trendy right now and seriously, who wouldn't love this big heart balloon from Love is in the Air?  I've stamped the balloon in Raspberry Pigment Ink leaving the center a bit lighter.  After die cutting, I added the white bit to the balloon.  The clouds (flat bottom are my favorite) were stamped with Sea Glass and Aquamarine Pigment Inks.  My sentiment was stamped using New Moon Dye Ink.  

Love is in the Air2


For my main panel, I used the Postage Stamp Elle-ments frame and rectangle.  To the rectangle, I ombre blended Sea Glass Pigment Ink.  I adhered both the frame and panel to my white notecard.  After I adhered the balloon and clouds, I stamped some of the solid hearts in more Raspberry Pigment Ink and added the balloon string.  


Supplies:
Love is in the Air
Love is in the Air Elle-ments
Postage Stamp Elle-ments
Raspberry Pigment Ink
Sea Glass Pigment Ink
Aquamarine Pigment Ink
New Moon Dye Ink


Monday, January 15, 2018

Spellbinders / January 2018 Blog Hop & Giveaway!

You’ve Got Game 

Welcome to the January Spellbinders Blog Hop!  
We are featuring Die D-Lites & Thoughtful Expressions by Marisa Job.  Make sure to scroll below to the full blog hop list and info about the giveaways!  


I had some fun with the new Die D-Lites Love Letter Etched DiesI created a layered background of red and grey cardstock.  I die cut 3 envelopes from the set with white cardstock.  The flaps of two of the envelopes were trimmed off and reattached for some dimension and red die cut hearts (using the middle size heart die) were added to the flap.  On the third envelope, I added the script "paper" die that is included and added one of the tiny hearts to the corner .  I left the die in place (this is so you can emboss but I didn't use this technique) and using a black fine tip pen, I colored in the script.  I stamped my sentiments (Best Hugs from Simon Says Stamp) using Memento Tuxedo Black ink, white heat embossing, and added a few black enamel dots.  

You’ve Got Game

*******************************************

My next card uses Die D-Lites You've Got Game Etched Dies.  I couldn't pass up this set as my son is a big "gamer".  I definitely took this masculine and went with grey, black, and white cardstocks.  I die cut many of these and layered them onto a white notecard.  When I was happy with the layout, I adhered and trimmed the edges.  Nothing else needed.....it's perfect for those "gamers" in your life!

You’ve Got Game

*******************************************

I must mention that the Platinum 6 Die Cutting & Embossing Machine has won me over!  This is like the Lexus of die cutting machines!  I prefer a manual die cutting machine and this one gets an A++ from me!  

Untitled

*******************************************

GIVEAWAYS

To celebrate this release, Spellbinders is giving away a $50 gift certificate to FIVE lucky winners. Please leave a comment on the Spellbinders blog by Sunday, January 28th 11:59 pm EDT for a chance to win. The winners will be announced in the blog hop post on Spellbinders blog the following day.

Now for ANOTHER giveaway?  Yep!

Would you like to win a $25 gift certificate to Spellbinders from MY blog?  Just leave me a comment here and I'd love for you to follow me over on IG (AmyKolling).  Commenting closes Sunday, January 21 at 11:59 CDT.  I will choose a winner and contact them!

♥♥♥ Amy Kolling ♥♥♥


Thursday, January 11, 2018

Pretty Pink Posh / 4th Birthday Celebration!

Pretty Petunias

Welcome to the Pretty Pink Posh 4th Birthday Celebration!!  I am so excited to help my friend Paulina celebrate FOUR years of Pretty Pink Posh of which I was a part of!  Her designs are just the cutest and I will forever be a fan!

There are some fantastic gifts and goodies with this release and blog hop so make sure to scroll to the bottom to see them!

I have two cards to share today so let's get started! 

My first card uses the beautiful Pretty Petunias stamp set and coordinating Pretty Petunias Dies.  I black heat embossed the images, colored with my Zig Clean Color Real Brush Markers, and die cut.  I die cut a panel with the Stitched Notes Die and spritzed Heidi Swapp Gold Color Shine.  This panel was adhered using foam adhesive.  My petunias were arranged and adhered to my panel along with a stacked die cut Hello from the Hello Friends Script Die.

Pretty Petunias2

**********************************

Love Sentiments

Now I switch gears and go all lovey dovey!  Using just the Love Sentiments set, I stamped the hearts onto a panel of blocked paper from Papertrey Ink (I've had this paper forever!) using Catherine Pooler Inks (LOVE LOVE LOVE!).  Once done, I stamped some of the hearts with the stitched outline heart over the top.  The panel was wrapped with a stamped and heat embossed sentiment on vellum.  As a finishing touch, random Pretty Pink Posh coordinating sequins were added to some of the hearts!
  
Love Sentiments2

Remember it's a blog hop!  You need to keep hopping so here's the full hop list to get you started.  Make sure to leave comments as there are prizes for commenting along the way!

Amy Kolling ♥♥♥


Related Posts with Thumbnails