Wednesday, July 31, 2019

Lil' Inker Designs / Cover Up Die: Butterfly


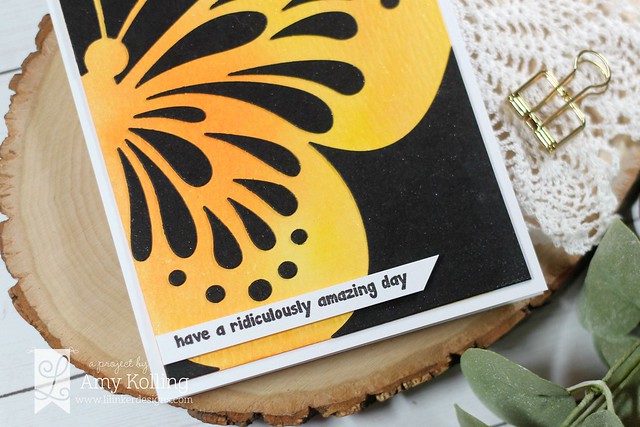
A while back this amazing die from Lil' Inker Designs was released.
  I made a card with it and used the actual die cut leaving the negative for a later project.  Well, this negative was saved using Press 'n Seal wrap so making this card was so easy!!


Amazing day 

I did a watercolor wash of Spiced Marmalade and Mustard Seed Distress Inks onto Tim Holtz watercolor paper.  I added dots of glue to the back of the negative butterfly die cut and adhered over the watercolor panel.  The panel was trimmed down and a spritz of Shimmer Spray applied.  This makes it absolutely gorgeous in real life but hard to capture in a photo.  A simple strip with a fun sentiment was added with foam adhesive.  

Amazing day2

Thanks for sharing a part of your day with me!

Tuesday, July 30, 2019

Avery Elle / Pool Party

Hello!  I am here here with a shaker using Avery Elle's Sea Scene Elle-ments for a fun shaker card!  

Pool Party 

The adorable little girl images on pool floaties were Copic colored and die cut.  I created my shaker card using the Sea Scene Elle-ments, backed it with acetate, and added Avery Elle Coarse Glitter.  I added my shaker to the card, added some die cut clouds from Grand Photo Mat Elle-ments, Copic colored pool images, and stamped my sentiment in black ink.  

Pool Party2 

Supplies:
Coarse Glitter

Monday, July 29, 2019

Sunday, July 28, 2019

Lil' Inker Designs / House & Home

Amy_Build a Home 

Welcome to the Lil' Inker Designs House and Home Release!  
We have two new stamp sets and dies to coordinate.  These new sets can be used for congratulating the new home owner or just to send a friend a card.  The release is now available and can be found HERE!!!


There is an adorable new set where you can build your own house called Build a Home.  My images were Copic colored adding shading and white pigment pen accents to the images.  My images were adhered to a white notecard that was ink blended with Salty Ocean Distress Ink.  The 'home' sentiment was die cut and then stamped with a coordinating sentiment from House and Home.

Amy_Build a Home2


Thanks for sharing a part of your day with me!

Tuesday, July 23, 2019

Miss Ink Stamps / Baaad Day

Baaad Day

Hello!  
I am here to share a card that will certainly cheer someone up after a "Baaad" day! 

The Sunburst Stencil from Miss Ink Stamps is one of my favorites.  Using this stencil with traditional yellows just screams happy.  The stencil was offset over a Squeezed Lemonade Distress Ink background and more Squeezed Lemonade was blended over the top creating the rays.  Leaving the stencil in place, some Dried Marigold Distress Ink was added to the center.  For some grass, I cut some wavy lines in a piece Shabby Shutters Distress Ink blended paper and added the smaller piece with foam adhesive at the bottom.   The cute goat from Punny Farm Goats was Copic colored with N0, N1, N2, N4, etc. and added with foam adhesive.  To keep this simple, a simple sentiment was stamped in VersaFine Clair black ink.


Thanks for spending a part of your day with me!~

Monday, July 22, 2019

Spellbinders / Besties Forever

Besties Forever 

Hello!  Have you seen the adorable Small Die of the Month from Spellbinders for July?  I received it in the mail and had to make this!  

These kits are a great value.  Even better, get both the Small and Large kits for $30 a month!

Besties Forever2

These little animals were so fun to piece together and resemble my own pets!  The dies do not come with a die for the "spot" I added to my pup but it was so easy to add!!  To add details to the images, I used a white pigment pen.  I created a simple scene over an ink blended sky.  

Besties Forever3

Don't miss out on getting this die set!!!  


Wednesday, July 17, 2019

Avery Elle / Layered Rose


Hello!  
I am sharing a Congratulations card using the Layered Rose stamp set from Avery Elle.  I absolutely love these types of stamps and I thought I would share my spin on adding some detail.

Layered Rose2 

While there are four layers to this rose, I only used the last three layers to create my roses omitting the solid first layer.  So for reference, I have marked 1, 2, 3 on the stamps.

Layered Rose

I stamped layer 1 with my lightest ink and then used the next darkest ink for layer 2.  While layer 2 was still in place, I lightly added watermark ink (Versamark) to the edges,  added some Rich Gold Embossing Powder, and heated with my heat tool.  Layer 3 was stamped in Versamark ink and also gold heat embossed.  Looking at my roses, you can see the stray gold heat embossing and this was exactly the look I was going for!  I wanted the color of layer 2 to still show through but add depth with the gold embossing!  I did the same technique with the leaves and layer 2.  

Layered Rose

My hexagon note card was die cut using the Pierced Hexagon Elle-ments.  I don't know about anyone else, but I love a shaped card!  The roses were arranged so that some extended over the edge of the hexagon note card.  This card will still fit in a standard A2 envelope for reference.  As finishing touches, I added a gold embossed sentiment strip (done using the Simple Sentiments Elle-ments) and some gold gems.

Layered Rose3

Supplies:


Monday, July 15, 2019

Reverse Confetti / Stock Your Stash (Oh, Baby!)


SYS Challenge Baby
Hello! I'm here with a card for the current Stock Your Stash Challenge!  
Each month is a new theme and this month is all about Oh, Baby!  


I used the All About Ewe and Spring Pals stamp sets.  It was fun to combine elements from different sets for a darling "Bundle of Joy" card.  I added a strip of pattern paper from Pattern Play to a white note card along with a tiny strip of kraft cardstock.

I colored my images with Copics and die cut using the coordinating dies.  My critters were added to a Grid Stitched Tag Confetti Cuts that was ink blended with Salty Ocean Distress Ink.  To finish my scene, I added some die cut clouds and a sun from the Sun 'n Clouds Confetti Cuts.  For a simple sentiment, I masked off part of the sentiment from Sentimental Sayings and stamped in black ink.

SYS Challenge Baby2


Supplies:
All About Ewe
Spring Pals
Grid Stitched Tag Confetti Cuts
Sun 'n Clouds Confetti Cuts

Wednesday, July 10, 2019

Avery Elle / Peek-A-Boo Scary Pals


Hello!  I'm here sharing a card using the Peek-A-Boo Scary Pals from Avery Elle.

I started my background with die cutting the Dotted Frame Elle-ments out of white cardstock.  With the center rectangle, Distress Inks Seedless Preserves, Salty Ocean, and Peacock Feather was ink blended.  The panel was then spritzed with water and flicks of white acrylic paint was added.

Scary Pals

My critters were Copic colored and die cut.  My frame was added with foam adhesive as well as my critters for dimension.  As final touches, I added tiny dots to the sky as stars and also added some to my images.  

Scary Pals2

Supplies


Tuesday, July 9, 2019

MFT & Friends / July Release / Birthday Sale

Celebration2 

Hello!
  I am joining the My Favorite Things team for this month's BIRTHDAY CELEBRATION for MFT & Friends feature on release day!  MFT always has an amazing release but this one is extra special.  Have you seen it?  Make sure to visit the MFT blog for all the details and the amazing inspiration from the DT and guests!


I couldn't resist these sweet images from the newest Stacey Yacula set called Sending Sweet Celebration Wishes!

I started my card with that background.  I ink blended Squeezed Lemonade and Salty Ocean onto a panel and die cut using one of the Stitched Rectangles Stax.  My images were all Copic colored and die cut using the coordinating dies.  My sentiment was stamped onto a Stitched Sentiment Flag and adhered to the bottom of my panel to ground my images.  For some sparkle, I added some matching gems!

Celebration 

***************************************

It's also My Favorite Things Birthday month!  13 years!!!  There is a special sale going on!  Shop now and did you see there is a special shipping promotion too?


Make sure to check out the MFT blog for all the details of the release and for the full lineup for lots more inspiration!!


Monday, July 8, 2019

Reverse Confetti / July Release Blog Hop

Let's Shellabrate 

Welcome to the Reverse Confetti July Blog Hop!
  I hope you have had the opportunity to check out the fabulous release this week.   Make sure to check out the Reverse Confetti blog for all the details of this hop and for a full list of inspiration and information.


My first card uses another set from illustrator Dawn Machell....Let's Shellabrate!

I started making my scene using the Scallop Stripe Panel Confetti Cuts after I had ink blended some Distress Inks.  I created a sand hill using dots of brown Copics and a white gel pen.  I added my Copic colored images some with foam adhesive for dimension and stamped my sentiment at the bottom.

Let's Shellabrate2

****************************************

My second card uses more of the Bold Blooms and the Circle of Hearts Cover Panel along with the new Fold Over Tag.

Celebrate You

Using Magenta, Flamingo, Peach, and Stormy Reverse Confetti inks, the blooms were stamped and die cut.  The layering images were then stamped with bold black ink.  The blooms were layered onto a Dashed Line Confetti Cuts along with a sentiment flag stamped with a partial sentiment from the new set Sentimental Sayings.  The Circle of Hearts Cover Panel was done in white layered over a panel of Flamingo cardstock and the whole arrangement was adhered to the center.

Celebrate You2

For a fun addition, I created a matching tag using the same stamps, colors of ink, and a pop of polka dots from the new Sun & Sea paper pad.  The tag was done using the new Fold Over Tag.  

Celebrate You3


****************************************


Check out the rest of the Confetti Crew along with some special guests this month for more inspiration!


Related Posts with Thumbnails