Wednesday, March 31, 2021

Avery Elle / Superheroes

Hello!  

I am sharing a fun card for a HERO.  This card could easily be made to give to anyone!  

***Shop for Avery Elle HERE***


Superheroes

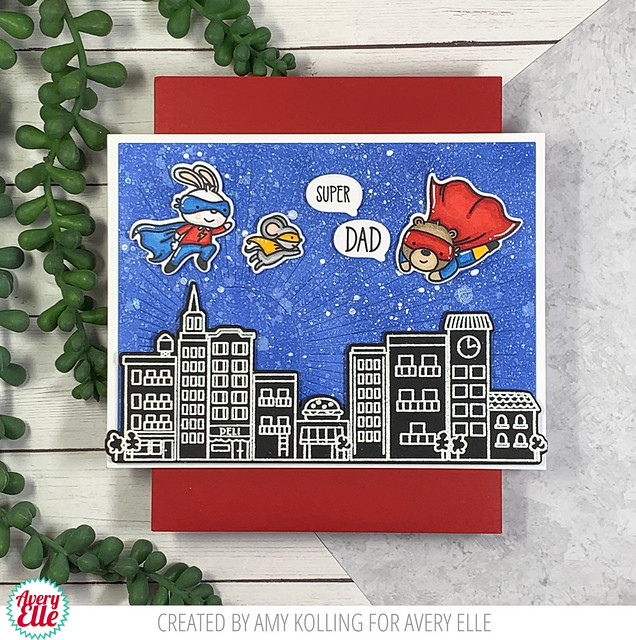
The background was done with ink blending Blueprint Sketch onto a panel of white cardstock.  Once done, the panel was die cut using the Ray Elle-ments and then splattered with water, Clear Shimmer Spray, and white pigment ink.  It's a fun sparkly background in person!  

The building outlines were white heat embossed onto black cardstock and die cut.  The buildings were added with foam adhesive to a landscape oriented card.  Three superheros were Copic colored, die cut, and added to the scene with foam adhesive.  To personalize this for a DAD, the speech bubble die from this set was stamped with words from the Superheroes stamp set.  


Superheroes

Supplies:


Tuesday, March 30, 2021

Reverse Confetti / Alcohol Ink

Hello!  
I have a card using Alcohol Inks and Alcohol Lift Ink.  I've had some new synthetic paper I wanted to play with from Etc. Papers, so I brought out the alcohol inks.  

Alcohol ink 

A panel of synthetic paper was made using Cranberry, Pink Sherbet, Watermelon Alcohol Inks along with alcohol blending solution.  I love these colors together.  Once this panel was dry, using alcohol lift ink from Ranger, the bold, thick Peony image from the Peony stamp set was stamped.  The image was repeatedly stamped and then buffed, lifting the ink.  This makes such a subtle background pattern!  This panel was trimmed down and matted with a white panel.


Using the Peony Confetti Cuts, the leaf grouping image was die cut twice out of vellum.  The vellum images were adhered mid panel to the alcohol background.  To ground my die cut sentiment, a thin strip of white cardstock was adhered across the panel.  The word 'hello', from Thanks and Hello Word Duos Confetti Cuts, was die cut three times and adhered together for dimension.  As a last touch, a few small gems were added to the panel.  

Alcohol ink

Wednesday, March 17, 2021

SugarPea Designs / Mix It Up Challenge #77

Amy_MIU77 (1)

I have a card made for the current Mix It Up Challenge over at SugarPea Designs
 Make sure to check out the challenge photo and/or sketch for this month.


Here is this month’s Mix it Up Challenge!


I decided to use the sketch portion of this month's challenge.  

I've used the Friendship Blooms stamps done in just black and white!  I love how this came out!  I paired the blooms with the Gradient Stripes Stencil done in black ink.

Amy_MIU77_2

You have all month to play along with us, and each week several of our designers will share some fresh inspiration with their take on the challenge. Remember the more times you play along during the month using SugarPea Designs product, the better chance you have of winning a $50 gift certificate to our store!


*********************************************

I thought I would link this black and white card up for the current Color Hues Challenge!


Avery Elle / Look for Rainbows

Hello!!  I am here today sharing a few cards that are rainbow inspired!!  

***Shop for Avery Elle HERE***


This first card uses the mini stamp set called Look for Rainbows.  I couldn't let this image go by without coloring the umbrella in rainbow fashion!!  Images were colored with Copic markers, die cut, and added with foam adhesive to a Quilted Frame Elle-ments done in white cardstock and backed with pattern paper from The Holiday Collection Paper Pad.  The sentiment fit perfectly stamped in the open space in the background.  Die cut raindrops with Glossy Accents finished off the card. 


Stamps:

Look For Rainbows
Look For Rainbows Elle-ments
Quilted Frame Elle-ments
The Holiday Collection Paper Pad


*****************************************


This second card uses the Rainbow Builder stamps along with the adorable smiling sun from Sunshine.  My sun and rainbow was stamped, diecut, and added to the Cloud Mat Elle-ments background.  A double layer die cut Happy Birthday Elle-ments was added in bold black carstock with white pigment pen dots to tie in with the dotted clouds.  To finish, a few clusters of stamped and die cut hearts were added.


Stamps:

Sunshine
Sunshine Elle-ments
Rainbow Builder
Rainbow Builder Elle-ments
Cloud Mat Elle-ments
Happy Birthday Elle-ments


Thursday, March 11, 2021

SugarPea Designs / You Bring Sunshine

I have a fresh spring "pick me up" for that special friend. Spring can't come quick enough for me so pastel colors is what I used!


You Bring Sunshine

The images from Sprout Bloom Grow were Copic colored, die cut, and adhered with several layers for dimension (I used this technique instead of foam adhesive).

Let's talk about the background. Broken China and Peeled Paint Distress Inks were ink blended over a masked panel of Stitched Scalloped Rectangles. I masked off the scallops because I wanted to white scallop border. To the backround, the images were adhered and the sentiment was stamped in black ink. This panel was layered over a pink die cut Stitched Rectangle SugarCut. For some finishing touches, a few gems and some shimmer spray were added.


You Bring Sunshine

Wednesday, March 10, 2021

Avery Elle / Peek-A-Boo Birthday Tag Toppers


I'm sharing a card using a mash up of Avery Elle products!  
It's always fun to break out some older products and mash them up with the new ones!

***Shop for Avery Elle HERE***


Peek-A-Boo Birthday Tag Toppers

I used the Leafy Frames Elle-ments out of two colors of green cardstock and then also added in "extra leafy bunches" behind the frame for a "fuller" look.  I love how it adds dimension.  To the frame, Shabby Shutters Distress Ink was blended over the top.  The background was ink blended with Scattered Straw Distress Ink.

Using the NEW Peek-A-Boo Birthday Tag Toppers, the hippo and lion were die cut several times out of different colors of cardstock and "paper pieced" back together.  A few white details were added with a white pigment pen.  For the sentiment, I used one from Peek-A-Boo Jungle and stamped it on the banner die from the Peek-A-Boo Jungle Elle-ments.  


Peek-A-Boo Birthday Tag Toppers


So I challenge you, to get out those older supplies and use them in a mash up!!

Supplies:

Monday, March 8, 2021

Reverse Confetti / March Release Blog Hop

You2

Welcome to the Reverse Confetti March Blog Hop!

Make sure to check out the Reverse Confetti blog for all the details of this hop and for a full list of inspiration and information.  Let's celebrate this AMAZING release!!!


I have one more card to share using the You Coordinates and a fantastic new cover plate.......Big Flowers Cover Panel.

The Big Flowers Cover Panel was die cut using Midnight cardstock and backed with a layer of vellum.  To the back of this panel, another layer of Midnight cardstock.  The You die cut was layered multiple times with white cardstock for a nice clean look.  A sentiment strip was added over the word You and a simple die cut heart was added for that pop of color on this black and white card.

You


***********************************

Make sure to follow along the Blog Hop for even more inspiration using the newest release!


Reverse Confetti Blog

Amy Kolling

Tricia Barber

Kelly Lunceford

Lisa Henke

Deanne Kuntz

Jenny Colacicco

Kathy Schweinfurth

Cheiron Brandon

Dana Joy

Amy Rohl

Jeanne Jachna

Dilay Nacar

Julee Tilman

Audrey Tokach

Susan Wymer

Tina Smith

Becky Roberts

Candice Fisher

Heather Ruwe

Olga Matyushevskaya

Amy Tsuruta

Olga Moss


Sunday, March 7, 2021

Reverse Confetti / Countdown to Confetti Day 3

Enchanted Garden2

Are you ready for Day 3 of the March release from Reverse Confetti?  We welcome 7 new stamp sets and 10 new Confetti Cuts!  

Make sure to check out the Reverse Confetti blog for a list full of inspiration and information on all the new goodies!!


Today's sets are always my favorite to share........Dawn Machell does an amazing job with these!!
Introducing......Enchanted Garden and Hop into Spring.

This card was started with ink blending several colors of Distress Inks onto a white notecard and the entire card was spritzed with Shimmer Spray.  The adorable images from Enchanted Garden were Copic colored, die cut, and added with dimension.  A few stars were stamped in the background and some gems were added.  The In the Clouds Cover Panel was added with dimension and the sentiment was stamped in bold black ink.


Enchanted Garden


****************************************************

My second card uses Along the Dotted Lines Cover Panel.  This cover panel will be used a ton!!!  This panel was ink blended with Broken China Distress Ink and added to a white notecard.

Hop into Spring

All of the images were Copic colored, die cut, and added with dimension.  The sun and clouds are from a previously released die set called Over the Rainbow.  The cloud was the perfect place to add in my sentiment in the scene!

Hop into Spring2


****************************************************

Now for the prizes..........there are TWO $15 prizes up for grabs this release:  1 for blog commenters and 1 for Facebook commenters.
  So leave those comments and make sure to check the Reverse Confetti Facebook page too!  


Saturday, March 6, 2021

Reverse Confetti / Countdown to Confetti Day 2

Hope2

Are you ready for Day 2 of the March release from Reverse Confetti?  We welcome 7 new stamp sets and 10 new Confetti Cuts!  

Make sure to check out the Reverse Confetti blog for a list full of inspiration and information on all the new goodies!!


Today there are THREE sets debuting........Hope Coordinates, You Coordinates, and Adorned Egg.


I started with a white Center Frame Cover Panel and masked off the center rectangle.  This area was ink blended with Tumbled Glass Distress Ink.  This layer was added to a Piggy Bank cardstock panel.  

The Hope Coordinates Confetti Cuts was die cut with different layers of colored cardstock and the top layer was ink blended with Tumbled Glass Distress Ink to match the background.  A fun unique rainbow die was added using the Over the Rainbow Confetti Cuts.

Hope


****************************************************

My second card uses the adorable spring Easter basket from Adorned Egg.  I created an ink blended background using a die cut Plaid Lines Small Confetti Cuts used as a stencil!  Several Distress Inks were ink blended over this in a light pastel color palette.

Adorned Egg

My images from Adorned Egg were Copic colored, die cut, and added with dimension by die cutting several layers and adhering together (I tried this vs. using foam adhesive).  This panel was added to a white notecard that was scored with a frame around the perimeter.  

Adorned Egg2


****************************************************

Now for the prizes..........there are TWO $15 prizes up for grabs this release:  1 for blog commenters and 1 for Facebook commenters.
  So leave those comments and make sure to check the Reverse Confetti Facebook page too!  

Details can be found over on the Reverse Confetti blog for all the prizes!

Related Posts with Thumbnails