Friday, May 30, 2014

Thinking about you.....


Quick post today to share a card that I made using the In the Garden Additions stamp set from Whimsy Stamps.  Being from Kansas, one of my favorite flowers is the Sunflower.  So a little sun on this day.....to say I'm thinking about you!!  

I started out die cutting my white panel with an angled panel die and cut a coordinating brown mat with the larger die.  I stamped my entire white panel with the sunflowers and heat embossed a sentiment from Coffee Break onto the brown border.  To finish it up, I've added a few brown sequins from Pretty Pink Posh that can be found in the Nature Mix sequin pack.


5.30.14.jog

Thanks for sharing a part of your day with me!

{thinking about you}
Stamps:  In the Garden Additions, Coffee Break (Whimsy Stamps)
Paper:  Kraft, White, Dark Chocolate (PTI)
Ink:  Papaya (AMuse), Chocolate (Fresh Ink), Versamark
Dies:  Tip Top Dies (PTI)
Sequins:  Nature Mix (Pretty Pink Posh)
Misc:  Foam Adhesive, White EP

Thursday, May 29, 2014

Shore do love you!


So have you ever had some unfinished cards left on your desk?  Well, this card has been on my desk for quite a while until I saw the current sketch over at Retro Sketches.

After a bit of altering my pieces and changing some things up, I came up with this card and I love it better than where it was headed!  ha!  Using some Reverse Confetti stamps:  So Stripey and Happy Harbor.  This sketch is perfect for highlighting a particular stamp!!  Then I added in the gold sequins from Pretty Pink Posh as accents to tie the design together!

5.29.14


If you'd like to play along, here's the current sketch from Retro Sketches:


{shore do love you}
Stamps:  Happy Harbor, So Stripey (Reverse Confetti)
Paper:  White (PTI)
Pattern Paper:  Down by the Shore (Fancy Pants)
Ink:  Night of Navy (SU), Pure Poppy (PTI), Slate (AMuse)
Dies:  Love Note, Tag Me (Reverse Confetti)
Sequins:  4mm Gold (Pretty Pink Posh)
Misc:  Foam Adhesive

Wednesday, May 28, 2014

a CASE and Seize the Sketch


Hi friends!  I know it's late but I had to stop and share this card I made using the latest Seize the Sketch.  When I attended the winter CHA in January, I got to meet so many blog friends.  One of them being Lesley Croghan.  We were both Top 5 in the Gallery Idol contest last year and she was so fun to finally meet in person!

Well, this brings me to tonight's post.......I saw a card she made on Instagram and I fell in LOVE, I tell ya!  Serious love.  So much that I had to CASE her card.  Lesley....thank you so much for inspiring me with your gorgeous card!  You can see it HERE or over at the current Seize the Sketch blog post.

Here is my card using all Verve goodness.  Love the Poppy Birthday stamp set and matching dies!  I also used one of my all time favorite dies......the Pennant Trim Die.  Here I've just cut out 4 pennants.....so you can make them as long as you want!  I die cut one and then placed it back in the die sliding it over to just die cut how many I wanted.....this way the "other end" has a finished look too!  The final touch was adding in some sequins from the Pastel Mix by Verve


5.28.14

Thanks so much for sharing a part of your day with me!!!

{Celebrate your Day}
Stamps:  Poppy Birthday (Verve)
Paper:  White, Pure Poppy, Summer Sunrise, Ripe Avocado (PTI)
Ink:  Ripe Avocado (PTI), Onyx Black (Versafine)
Dies:  Poppy Birhday Dies, Pennant Trim Die (Verve)
Misc:  Sequins (Verve), Embossing Folder (Lifestyle Crafts?)

Say Cheese!


 Hello!!  I'm here with a bittersweet post because it's my LAST post as part of the original NAT DT.  Danielle has expanded her team and it's time for my style to go!  I have really enjoyed this team and am so grateful to Danielle for letting me design with her stamps.  

Did you see the fabulous new release of stamps last week?  If not, scroll back through the posts from last week!

I created my card with the new set called Photo Booth.  I just love all the itty bitty images that are included in this set which are perfectly sized to fit in the photo strip stamp from the set.  But here, I've used the little camera stamp to stamp my own background paper.  Just goes to show how you can use all those smaller images in way that really shows them off!

Say Cheese2


Since this is my last post, I wanted to share a few of my favorite NAT cards I've made during my term.  Hope you enjoy and have a great summer!!!

2.26.14

Our Life

Just saying hi

Stop and Go1

Monday, May 26, 2014

Gallery Idol 2014--Round 2


Hi everyone!  I am so excited to share my exciting news........... 
I made the Top 20 in Paper Crafts Gallery Idol 2014 card contest!
I'm so excited for this journey again!  You need to check out all of the talent in this years group!  Amazing!
You can see the Paper Crafts post HERE!  You can vote using the link on my side bar!!!


This contest works just like American Idol and we rely on votes to make it to the next round.  Today starts Round 2.  The theme for Round 2 is all about DIECUTS.  
You can check out all the details on the Contest page HERE.

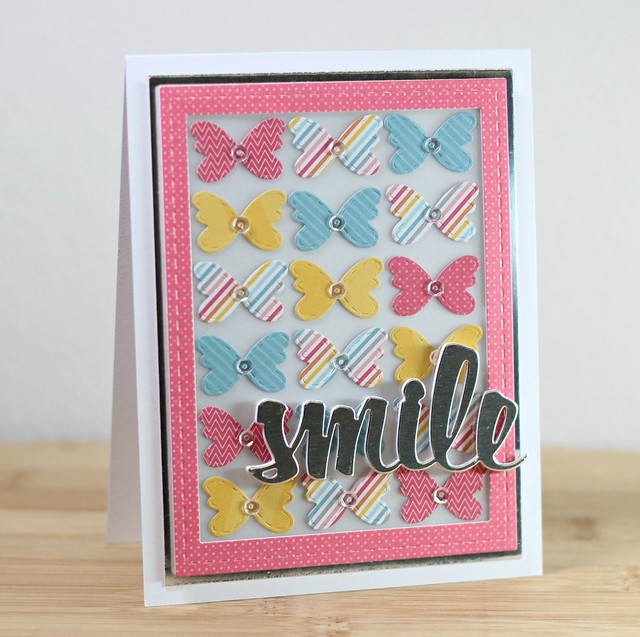
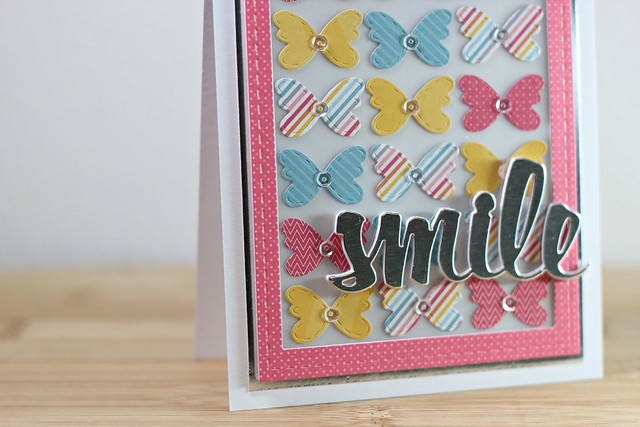
I've used "diecuts" for the focal point, as a frame, and for the sentiment.  This card has LOTS of dimension that was hard to capture with these photos.  

I diecut two Stitched Mats: Rectangles:  one in vellum and one in clear cardstock.   After diecutting all my Stitched Butterflies in various patterns from my FAVORITE 6x6 paper pad this spring, I arranged and adhered them to the vellum.  Adhering some Sparkling Clear sequins to the centers of the butterflies, I let the glue dry on that panel.   With this same stitched rectangle and one size smaller, I diecut a "frame" and backed it with that clear cardstock rectangle panel.  Once the glue was dry, I layered my "frame" over the top of the vellum butterfly panel.  This whole panel was then added with foam adhesive over a silver foil mat.  I was going for a shadowbox idea by using the clear cardstock.

AmyBlog#3

For even more dimension, my sentiment was diecut 5 times with white cardstock and once with silver foil.  After glueing all the diecuts together, the silver foiled sentiment was adhered slightly to the right on my frame.

AmyBlog


And there's my version of using DIECUTS!  I hope I've shared enough to sway your vote! 
You can vote......HERE.

Thanks so much for all the FB posts, texts, and emails about my news!  They all meant so much to me! 

{Smile}
Cardstock:  White, Clear, Vellum (PTI), Silver Foil (DCWV)
Pattern Paper:  Hello Sunshine (Lawn Fawn)
Dies:  Stitched Butterflies, Stitched Mats: Rectangles, Smile (Lil' Inker Designs)
Sequins:  4mm Sparkling Clear (Pretty Pink Posh)
Misc:  Foam Adhesive

Saturday, May 24, 2014

Sweet Birthday Wishes!


When I saw the CAS(E) this Sketch! challenge come up, I wanted to give it a try.  There are SO many possibilites with this sketch!!

I used some Whimsy Stamps for my "circles" by stamping the candy image from Sweet as Candy across my card panel in various yummy colors.  I wanted a relatively flat one(ish) layer card so I die cut the word Sweet from my stamped panel reserving those teeny tiny little pieces from the word.  Using another diecut word Sweet in pink, I inlaid it onto the panel and glued in all the tiny remaining pieces.  

I certainly hope you all aren't tired of the sequins......because they are my favorite and I can't stop using them!!!  Pretty Pink Posh sequins are the best and I can't wait to get more colors!  

5.24.14

Here is the CAS(E) this Sketch! for the week:


{Sweet birthday wishes}
Stamps:  Sweet as Candy and Sweet as Candy Additions (Whimsy Stamps)
Paper:  White, Raspberry Fizz (PTI)
Ink:  Pool, Fuschia, Red Currant (Fresh Ink), Papaya (AMuse), Onyx Black (Versafine)
Dies:  Sweet word die (Whimsy Stamps)
Sequins: Sparkling Clear 4mm (Pretty Pink Posh)
Misc:  

Friday, May 23, 2014

Reverse Confetti Color Challenge......


I couldn't let the Reverse Confetti Color Challenge go by without creating a card with a color scheme like this!  This one is girly and fun!!

I went with using one of the first Reverse Confetti stamp sets:  Inner Rock Star and paired it with one of the newest Confetti Cuts: Oh My Stars.  I layered my elements over the Confetti Cut:  Tag Me.  I finished this off with some sequins from Pretty Pink Posh in Sparkling Clear and Pink Peonies.

5.23.14


Here are the Color Challenge details.........

  • There will be a new Color Challenge posted on the Reverse Confetti blog on the 16th of each month.

  • The color link list will be open from the 16th until noon CST on the 29th. The color challenge graphic will be posted in the sidebar and you will be able to click on it to get to that month’s challenge post with the link list during this time.

  • Reverse Confetti stamps are required to win.  This is a way we get to thank our customers for using our stamps.  Anyone is welcome to play, though!

  • You may enter as many times as you wish.

  • There will be a winner each month and that person will receive a $20 gift certificate to the Reverse Confetti store and claim the title of ‘Fetti Fave. The winner of Color Challenge will be posted on the Reverse Confetti blog on the 30th of this month.

Here is the new color combo for May...
May14ColorChallenge

Thanks so much for sharing a part of your day with me!

{celebrate}
Stamps:  Inner Rock Star (Reverse Confetti)
Paper:  White, Soft Stone, Raspberry Fizz, Orange Zest, Sweet Blush (PTI)
Ink:  Fog (Simon Says Stamp), Onyx Black (Versafine), Raspberry Fizz (PTI), Orange (AMuse)
Dies:  Tag Me, Oh My Stars (Reverse Confetti)
Sequins: Sparkling Clear, Pink Peonies (Pretty Pink Posh)
Misc:  Prisma Glitter, Foam Adhesive

Thursday, May 22, 2014

Neat & Tangled May Release: Clouds


Today is a sad day for me.....this is my last release post as part of the Neat & Tangled DT.  It's time for the new "crew" to take over and I've so enjoyed myself the past 1 1/2 years (almost 2 years actually)!!  I have one more post coming up next week to finish out my term.  


Today we are sharing a new stamp set called Clouds.  This is another fantastic set illustrated by my friend Miriam Prantner.  I adore the patterns on these clouds!!!  Great design work Miriam!!!!

AmyClouds2

That's all for today but make sure to check out the Neat & Tangled blog for full reveal of the amazing DT projects!!

Thanks for sharing a part of your day with me!

Wednesday, May 21, 2014

Neat & Tangled May Release: So Very Blessed


Welcome to the Neat & Tangled May new release!  We have some amazing inspiration from the entire design team!  What do you all think so far??


Today we are sharing a new stamp set called So Very Blessed.  Another fabulous hand drawn sentiment from non-other than Danielle herself!  Her handwriting is AMAZING......lucky me.....I got to see her in action at a retreat last fall as she was sketching away!!!

I started by stamping the image with Memento Tuxedo Black ink.  I decided to watercolor the floral and leaf images with Tim Holtz Distress Inks.  I smooshed the ink pads onto an acrylic block and with a water brush "picked up" some color and brushed it over my image.  I love how there is no right or wrong to watercoloring......and you can color outside the lines with no one saying anything!  LOL

To highlight the sentiment, I did the same watercolor technique using Tumbled Glass Distress Ink outlining the word "Blessed".

AmySoVeryBlessed

That's all for today but make sure to check out the Neat & Tangled blog for full reveal of the DT projects and prizes!!

Thanks for sharing a part of your day with me!

Tuesday, May 20, 2014

Washi Tape and Gallery Idol!!!


I thought since I've thrown my hat in for the Gallery Idol contest this year, that I should show you what I've made and uploaded to the Flickr Gallery.  This years open audition round was creative uses of Washi Tape or Decorative Tape.  


The inspiration for my embellishments on my first card came from a make 'n take I did at Winter CHA in January.  I made some Washi Feathers at the Glitz Design booth and fell in love with how easy they were to make!  So THANK YOU Glitz for inspiring me with this one!

I have no idea what brands of Washi I used but I knew I wanted to use this wide Gold Chevron Washi for one of my feathers and pair it with some vibrant color.  I used the Thanks word die from Simon Says Stamp and die cut it with the Foiled Cardstock Stack from DCWV.  "Thanks" was adhered using Tombo Multi Mono glue in just a few little places so that it would have dimension layered over the feathers.  

WashiFeathers

To tie the whole thing together, my Washi panel was layered onto a Gold Foil panel with foam adhesive.  

WashiFeathers2


My next card uses Washi Tape as a background "paper" behind the Balloon cutout.  These are just fabulous Balloon dies from Simon Says Stamp.  The Happy Birthday die layer just perfect over my vellum topped Washi tape!!!  Sentiment is from Birthday Balloons.  All ink is the Simon Says Stamp Premium Dye Ink.

WashiBackground


Thanks so much for stopping by and enjoying my Washi cards!!  Good luck to everyone that entered!!!!

Neat & Tangled May Release: Sunday School Songs


Welcome to the Neat & Tangled May new release!  We have some amazing inspiration from the entire design team!


Today we are sharing a new stamp set called Sunday School Songs.  I totally remember these songs from my childhood Sunday School!  

I completely went CAS for this card.  I wanted the true meaning of the song to ring out!!!
I stamped the song lyric in Memento Tuxedo Black and very carefully colored in the tiny outlined areas with Copics R27 and R29.  One diecut heart was sprayed with Vanilla Shimmer Smooch Spritz and adhered with foam adhesive.  


AmySundaySchoolSongs

That's all for today but make sure to check out the Neat & Tangled blog for full reveal of the DT projects and prizes!!

Thanks for sharing a part of your day with me!

Monday, May 19, 2014

Neat & Tangled May Release: Photo Booth


Welcome to the Neat & Tangled May new release!  We have some amazing inspiration from the entire design team!


Today we are sharing a new stamp set called Photo Booth.  It's a great set to make filmstrip type embellishments for your cards or layouts.  

I started by inking up the filmstrip image with Versafine Onyx Black ink.  I love how it stamped kind of distressed.  Then I stamped some of the included images in fun colors.  My sentiment was made by stamping the words and trimming.  These were foam mounted at angles for interest.


AmyPhotoBooth

That's all for today but make sure to check out the Neat & Tangled blog for full reveal of the DT projects and prizes!!

Thanks for sharing a part of your day with me!

Saturday, May 17, 2014

Masculine card....


Hi everyone!  Did you enjoy the BIG Blog Hop for Simon Says Stamp yesterday?  I know I did.....so many new products and the Blog Hop showed them off in so many amazing ways!  Made my wish list longer!!  :)  Click HERE and hop along for prizes!!!

I'm here with a card that I think would be a perfect "masculine" graduation card.  I've used the Travel 1 stamp set from Whimsy Stamps along with the coordinating die.  

5.17.14 

I love using this technique to stamp on a diecut and then layer several together and inlay it over the same stamped image on the paper.  It's a fun and easy technique!!!

5.17.14#2 


Thanks for sharing a part of your day with me!

{the greatest Adventure}
Stamps:  Travel 1 (Whimsy Stamps)
Paper:  White, Dark Chocolate (PTI)
Pattern Paper:  Carte Postale (Basic Grey)
Ink:  Dark Chocolate (PTI)
Dies:  Travel dies (Whimsy Stamps)
Misc:  Enamel Dots (MME)

Related Posts with Thumbnails