Tuesday, December 20, 2022

Avery Elle / Bold Thanks

Hello!
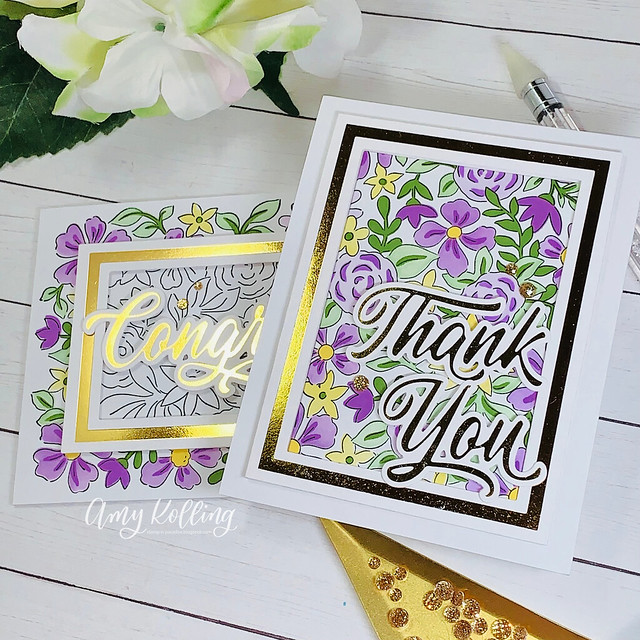
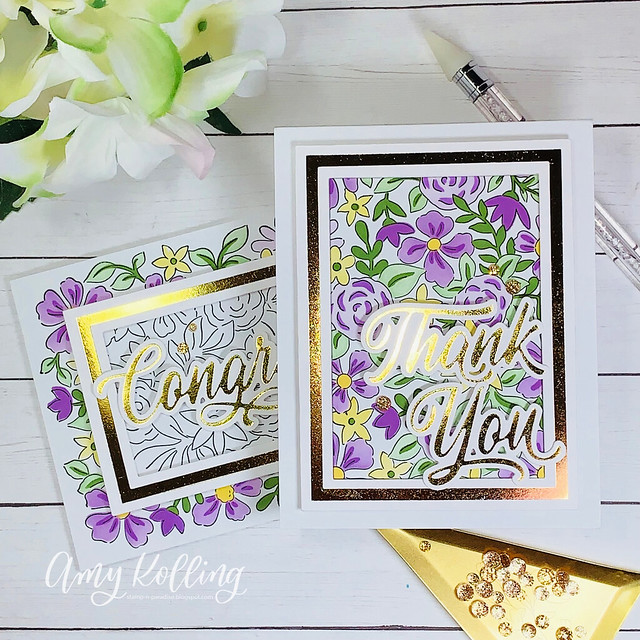
I'm here with a super clean and simple card using the Bold Thanks Elle-ments from the current release.


Bold Thanks2

I saw a fun gift sack from Hallmark this season that had stripes on it in these colors so I went with that as inspiration!  Be on the lookout anywhere for colors or patterns that may spark inspiration!  I used scraps of cardstock in 1/4" strips and adhered them to a white cardstock panel and then die cut the Bold Thanks Elle-ments.  I adhered my striped 'Thank You' off set onto a white die cut 'Thank You' just for a bit of shadow and then added the die cut back into the striped panel on the white notecard.  This gives such a fun look!


Bold Thanks


--Amy ♥

Friday, December 16, 2022

Pinkfresh Studio December 2022 Stamp, Die, Stencil, and Hot Foil Release

Floral Border__AmyKolling2 (1)

Welcome!
It's time for the December Pinkfresh Studio release of stamps, dies, stencils, and hot foil products!  I am so glad to join this group for this release.  There are gorgeous florals that just make me want to move to warmer weather all year round!

For all release information please start from the Pinkfresh Studio Blog.


The Floral Border Collection includes stamps, stencils, dies, and a hot foil plate.  

I've added satin metallic gold foil to the Floral Border Foil Plate for a muted look.  The florals were stenciled with Pinkfresh Studio Inks in shades of pinks, yellows, and greens.  This border was die cut three times, layered for dimension, and added to a notecard.  Keeping this simple, I've added a foiled sentiment from Modern Script Sentiments.  I wanted to add some bling to this but I just couldn't and take away from their beauty. 

Floral Border_AmyKolling (1)

*******************************

My next cards are a duo made with one stenciled panel using Mixed Blooms.  Get creative and use all the parts of a panel you've stenciled!

Mixed Blooms_AmyKolling2 (1)

These cards use a new die/hot foil set called Nested Rectangles.  I hot foiled 2 frames and die cut using the coordinating dies.  The stenciled panel was inked up using Pinkfresh Studio Inks and then a rectangle was die cut from the center of the panel.  This panel was then used for card #2.  Both cards use hot foiled sentiments from Brushed Sentiments.  Each card was embellished with Gold Glitter Drops.

Mixed Blooms_AmyKolling (1)


Pinkfresh Studio will be giving away the full release on the Pinkfresh blog & YouTube channel.

-Pinkfresh Studio will be giving away a total of TEN $25 gift cards along the hop. As per usual with blog hops - the winners will be picked from the comments.


Winners will be chosen and posted on December 27, 2022 on the Pinkfresh Studio GIVEAWAY PAGE. You must check that page & claim your prize within 2 weeks.


You are invited to the Inlinkz link party!

Click here to enter

--Amy ♥

Tuesday, December 13, 2022

Avery Elle / So Fetching

Hello!
I'm here with a quick, clean and simple technique using the set So Fetching from Avery Elle.

So Fetching2

A small stamp set doesn't have to be limiting.  Use those tiny stamps that are included in the set as a background!  The panel was started by scoring every 1/2" down.  This comes in handy when designing the space around your image.  Here I've used the tiny heart stamps to fill in the "sky" above the pup from So Fetching coloring them in with R14, R24, and R29 Copic markers.


So Fetching3

Another tip is to look to other sets for sentiments that may "change up" the smaller set.  For instance here.....the sentiments that are included with So Fetching are small so I looked to the Banner Celebrations set for a sentiment that was larger that would coordinate.  I've white heat embossed the sentiment onto a strip of red cardstock and added the pup from So Fetching with foam adhesive.


So Fetching

SUPPLIES:
So Fetching
So Fetching Elle-ments
Banner Celebrations

--Amy ♥

Tuesday, December 6, 2022

Avery Elle / Love Tags

Hi everyone!  
I'm here sharing some LOVE with these fun Love Tags with coordinating stamps from Avery Elle.

Love Tags2

What better than an adorable card with the dogs from So Fetching!  The scene was done using a red polka dot paper from the Holiday Collection 6x6 Paper Pack along with a thin black cardstock strip to ground the images and sentiment.  The background was splattered with Gansai Tambi Gold.  The sweet dogs were were Copic colored, die cut, and added to the card with foam adhesive.  The sentiment 'love' from the Love Tag Elle-ments was die cut several times and layered for dimension.  To finish, a small supporting sentiment, from Love Tags stamps, was added with foam adhesive.

Love Tags


--Amy ♥

Tuesday, November 29, 2022

Avery Elle / ThermoWeb

Hello! 
We are so excited that we are collaborating with Therm O Web this week.  All week long you will be able to find amazing projects on both the Avery Elle blog and over on the Thermo O Web blog using both of our products.  We hope that you enjoy all of the inspiration and fun!

In addition, we are hosting a fun giveaway this week.  If you follow us on social media and youtube then you get an addition entry for each follow.  The winner will win a $30 gift certificate to Avery Elle and Thermo O Web and will be announced the week of Dec 5th. You can enter using the link below.


I'm here with a project along with some amazing ThermoWeb products!!  


 I used the Double-Sided Foam Transfer Adhesive along with Gold Transfer Sheets.  Using a large die like the XOXO, it was super easy to add the foiled look and bonus....now it's foam backed!  I also foiled a few hearts from the Easy Layers 1 Elle-ments.

The stitched layer was done using the Easy Layers Elle-ments and then spritzed with the Glitter Dust from ThermoWeb.  I LOVE LOVE this product!


I love this adorable rabbit from the Banner Celebrations which was part of the newest release.  Color was added using Copic markers.  Lastly, the sentiment was added with foam adhesive and the foiled hearts were added around the sentiment.


--Amy ♥

Thursday, November 17, 2022

Avery Elle / Winter Release Blog Hop


Welcome to the Winter 2022 Release from Avery Elle!!  
We have an amazing blog hop full of inspiration today and are so glad that you are here. 


For a summary of all of our new products that are available for purchase right now check out this section in our store .  We will be showcasing projects using our new sets starting today and will continue to show them throughout the next few months.


 This new stamp and die set.....Sentimental Occasions will surely be a HUGE hit!  

How cute are these birds from So Tweet??  I was so excited to pair these two sets together AND create my first Valentine card!  The background was made using Broken China Distress Ink blended halfway onto a white panel.  A frame from Pierced Birthday Frame Elle-ments was added with foam adhesive along with the birds "on a wire"!  A few die cut hearts adorned with a glitter pen finished the card.


Let's get to the hop!! 

Avery Elle  
Caryn Davies
Heather Campbell
Yainea
Melania Deasy
Amy Kolling 
Ashley Marcu
Elena Roussakis


--Amy ♥

Monday, November 7, 2022

Avery Elle / Happy Tags Holiday


Hi everyone!
I am here today sharing some holiday tags using the 
Happy Tags and Happy Tags Holiday from Avery Elle.  


I used several images from other Avery Elle sets including Ho-Ho-Holiday and Carolers.  Each tag was made using the Snowy Tags Elle-ments and a little ink blending using Broken China Distress Ink.  The Snowy Tags have the added tag attached from Happy Tags Holiday and a supporting sentiment.  Each of the added tags were die cut from glitter cardstock for that extra sparkle!


Supplies:
Happy Tags
Happy Tags Holiday
Snowy Tags Elle-ments
Ho-Ho-Holiday
Carolers


--Amy ♥

Monday, October 17, 2022

Avery Elle / Ho Ho Holiday


Hi there!
I'm here with the cute Santa and reindeer from Ho-Ho-Holiday!


The Santa, package, reindeer, and present sack were all Copic colored and die cut using the coordinating Ho-Ho-Holiday Elle-ments.  The scene was created using a top folded notecard that was ink blended halfway and white splatters were added to make a snowy scene.  Below the snowy backdrop, a section of striped cardstock (made by cutting 1/4" strips) was added to "ground" the images.  A sentiment was stamped in bold black ink and the images added with foam adhesive.  


Ho-Ho-Holidays
Ho-Ho-Holidays Elle-ments

--Amy ♥

Wednesday, October 12, 2022

Avery Elle / Carolers

Hello!
I'm here with a mini-slim size card using the adorable images from the Carolers from Avery Elle.


Carolers2


TIP:  Do you love to color?  I do, but sometimes images can be non-colored with pops of color in other ways.  The images I've chosen from the Carolers all have striped hats, scarves, hems and collars.  This is a perfect way to add color!  I went with rainbow for LOTS of color!  To give some shading to the images, they were lined with N1 Copic and blended out with the colorless blender.


All the main images were added with foam adhesive to a mini slim card panel that was ink blended with Stormy Sky and Prize Ribbon Distress Oxide Inks and a splattering of white pigment ink for snow.  The snow bank was created using the Slimline Borders Elle-ments and fine glitter added to the edge.


Carolers

Carolers
Carolers Elle-ments
Slimline Borders Elle-ments


--Amy ♥

Wednesday, October 5, 2022

Waffleflower / October New Release Blog Hop

WFC202210-421160 Winter Crystal Die-Amy Kolling-2


Welcome to the Waffle Flower October Release Blog Hop! 

I’m excited to be joining the folks from Waffle Flower to show you all the fun new stuff awaiting you on the Waffle Flower website! Be sure to check out each stop in today’s blog hop for fun, inspiration, and chances to win some of these new release goodies! 

***SHOP WAFFLE FLOWER HERE***

Next on the hop is Galina Filippenko
Make sure to visit the Waffleflower blog for a full blog hop list!


The new release is fabulous!  I have 3 cards to share using products from Waffleflower.


My first card uses the Winter Crystal Die.  I've paired it over a background done in white using the Dashed Rhombus Panel.  The Winter Crystal Die is a set of three.  My card uses the snowflake image done in navy, the next layer in white, and the background in grey.  Shimmer Spray was spritzed over the entire panel and a few Waffleflower Glitter Enamel Dots were added.  I love the sentiment from Sentiment Additions 2.


WFC202210-421160 Winter Crystal Die-Amy Kolling-1


********************************


My next card uses the adorable little skating images from Winter Fun and the Winter Lake Die.  

It was fun to ink blend and paper piece this scene!  These images were Copic colored, die cut, and added across the scene.  Areas of blue were ink blended over the panel.


WFC202210-421130 Winter Lake-AmyK2


********************************


My final card uses the Winter Fun stamp and die set along with the Snowflake Background stencil along a mini slim size card.  

The edges of the layers, which give interest, were scored using a Scor-pal.  The images were lined up using one of the score lines to "ground" them.  Each full stenciled snowflake was embellished with a white pearl.  The sentiment is from one of my favorite sets, Sentiment Additions 2.    


WFC202210-421131 Winter Fun-AmyK2


Giveaways:
For today’s hop, Waffle Flower is giving away $25 gift certificate to THREE lucky winners. You can leave a comment on this blog and along the hop by 11:59pm EST on Monday October 10th, 2022 for your chances to win. Winners will be chosen at random from the comments left on any of the posts in this blog hop and will be announced on the Waffle Flower Blog on 10/12/2022.

Specials:
From now till October 12th, 2022, all orders placed at waffleflower.com will receive a mysterious gift (No code required!).

For those of you who are new to Waffle Flower, they have a Last Chance section on their website that lists many goodies for 25% off until they are gone! This would be a great place to start your collection! And don’t forget to check out their monthly Flash Sales!

--Amy ♥

Tuesday, October 4, 2022

Avery Elle / Happy Owlidays


Welcome!
I have some quick festive holiday tags to share today.  I am always needing some tags for last minute gifts around the holidays.  Avery Elle has a fantastic new tag!


Happy Owlidays2

I thought it would be fun to use the quirky owls from Happy Owlidays along with the Snowy Tags Elle-ments.  All the images were Copic colored and highlights added with a white pigment pen.  Chunky glitter was added around the tags to make the snow glisten.  

The Snowy Tags Elle-ments is a MUST HAVE staple for ANY season!  It comes as two piece die set and the main tag die is pierced!  I love that feature making so useful for other holidays!

Happy Owlidays


--Amy ♥

Thursday, September 22, 2022

STAMPtember and Avery Elle

Welcome to STAMPtember!
Today is the collaboration with Avery Elle!


This whimsical 4x6 stamp set is only available at Simon Says Stamp!


--Amy ♥

Wednesday, September 21, 2022

Picket Fence Studios / Mr. Frosty Limited Edition Kit


Mr. Frosty2

Welcome to the Picket Fence Studios Mr. Frosty has come to town Kit!
So excited to be a part of this limited edition kit release that is now available.


There are so many things included with this kit!  
I have three cards to share today using just the kit contents except for cardstock and some glitter!

My first card features the More Winter Snowflake Dies and some Distress Oxide ink blending for the background.  I don't create slimline cards very often but I should!  I love the sentiments included in the Snowone Else Like You stamp set especially since they have dies!!

Mr. Frosty

************************
My second card uses the main Mr. Frosty stamp from Snowone Else Like You.  After coloring with Copics, Mr. Frosty was die cut and added to a background that was created with the Fancy Christmas Tree Blending Stencils.  Using the red border at the bottom, helps keep Mr. Frosty grounded.  And what's better than a rainbow scarf??  ♥♥

Mr. Frosty3

************************

I adore the large diecut Snowflakes!  They are large enough to be center stage.  Here I've added it to a scored background that was added to a notecard lined with the pearlescent paper included in the kit.  The sentiment was silver heat embossed onto some of the same pearlescent paper!

IMG_7070 (1)


Thanks for sharing a part of your day with me!

--Amy ♥

Tuesday, September 20, 2022

Avery Elle / Peaceful Frame


Hello!
I'm switching gears to HOLIDAY using a new set from Avery Elle!


Peaceful Frame2


Peaceful Frame has great elements to the frame and was so fun to color.  Image was die cut first and then stamped and colored.  Much easier to do it this way and you get a perfectly lined up image too!

I took this design up a notch and created a shaker card using the Pierced Birthday Frame Elle-ments.  I used some iridescent shaker bits to add some sparkle!

Peaceful Frame

--Amy ♥

Sunday, September 18, 2022

STAMPtember and Reverse Confetti


Welcome to STAMPtember!
Today is the collaboration with Reverse Confetti!

This 6x8 stamp set is perfect for mass producing some holiday cards using 'Fa La La Trees' only available at Simon Says Stamp!

SSS RC 22


--Amy ♥

Thursday, September 15, 2022

Reverse Confetti / Countdown to Confetti / Day 3

Poinsettia2

Welcome to Day 3 of the September release from Reverse Confetti!  We welcome 4 new stamp sets, 1 re-released stamp set, 2 HOT FOIL stamps, and 4 new Confetti Cuts!  
Let's get the party started!!    

Make sure to check out the Reverse Confetti blog for a list full of inspiration and information on all the new goodies!!


Today's cards feature the new Poinsettia stamp and coordinating Confetti Cuts along with some other new products!!!

The first card uses the Poinsettia flower image along with some of the sprigs of greenery.  They were white heat embossed onto colored cardstock, die cut, and accented with coordinating ink with a blending brush.  The Poinsettia was layered over several Confetti Cuts........Stitched Note and Frames and the Deco Cover Panel.  The sentiment was made using a combination of the Christmas Hot Foil Combo and the Christmas Card Greetings.  To tie in with the gold sentiment, gold pearls were added throughout the panel.

Poinsettia


*************************************************

Joy to the World2

The second card uses the Joy to the World Confetti Cuts.  It was die cut several times and adhered together for dimension.  The holly berry image, from the Poinsettia set, was Copic colored and die cut.

To make your die cuts go further, add them to the card front (done using the Stitched Burst Cover Panel) and trim.  Saving the leftover pieces, you are able to add them to the card in a frame format!  The layered Joy to the World sentiment was added to the stitched layer and gold gems were added across the panel.

Joy to the World


*************************************************

Now for the prizes..........there are TWO $15 prizes up for grabs this release:  1 for blog commenters and 1 for Facebook commenters.
  So leave those comments and make sure to check the Reverse Confetti Facebook page too!  Details can be found over on the Reverse Confetti blog for all the prizes.


--Amy ♥

Related Posts with Thumbnails