Sunday, March 18, 2012

The Craft's Meow Birthday Bash---Day 2


Hey friends!  So I wanted to send out a great big THANK YOU to everyone for stopping by yesterday for Day 1 of The Craft's Meow newest release for their Birthday Bash! 

Today I bring you yet another fabulous stamp set from Nina Brackett of Nina B Designs called Cherished.  If you like floral and collagy, then this going to entice you!  Such detail in these stamps.......this set also comes with lots of great words to make this as personalized as you need for that special woman in your life.  You know Mother's Day IS right around the corner! 

Again today, I broke out those Distress Inks for my flowers and gave them LOTS of dimension with foam tape on several layers.  My background was embossed with white filigree embossing powder and then Antique Linen ink was sponged over the embossed image for that weathered, vintage look.  Some of you know that this color combo just happens to be my all time favorite!  Today I've used the inspiration challenge for my card.


To continue with The Craft's Meow challenges this week for their Birthday Bash, today is an inspiration challenge for your eye.  You could totally go vintage or earthy or floral!  Let's see what you can do with it!  Check out TCM blog for challenge details and deadlines.


Remember to leave your comment on today's post for your chance to win that days featured stamp set!  All comments need to be left by 9:00pm PDT, Friday, March 23rd on TCM blog.  Tomorrow marks another day.........See you then!


{For my FRIEND}
Stamps:  Cherished (The Craft's Meow)
Paper:  Royal Velvet, Rustic Cream (PTI)
Ink:  Antique Linen, Shabby Shutters, Forest Moss, Gathered Twigs, Milled Lavender, Dusty Concord Distress Inks (Ranger), True Black (PTI), Versamark
Dies:  Ironwork Accents (Spellbinders)
Misc:  White Filigree Embossing Powder, Lace Trim (Wrights), Pearls

Saturday, March 17, 2012

The Craft's Meow Birthday Bash---Day 1


Well today is the day!  Today marks Day 1 of the festivities around here for The Craft's Meow Birthday Bash and their new release!  Can I get a woot woot?  Alright, first up did you see the newest designers for TCM??  Please welcome:  Karen Baker (stamp illustrator), Amy (Aimes) Wanford, Jennifer Cuthbertson, and Jackie Rockwell.  These ladies are way talented and I get to be among them for the month as a March Guest!

Today I get to show you a project using 2 new sets designed by Nina Brackett of Nina B Designs called Beautiful Spring and Mother and Father.  I LOVE creating cards like todays!  You know why?  I love to add embellishments and layers.  These types of sets are just my style....literally.  I could NOT wait to get my hands on this stamp set to use my most favorite technique on:  Emboss Resist.  **I did a photo tutorial on it last week and you can find it HERE.  It was also a featured technique last week over on the Moxie Fab World Facebook page!**  I've used the sketch below for my card today.


The Craft's Meow, in celebration of their Birthday during this week, is having daily challenges!  Today's challenge is to use the following sketch by Amy Tsuruta.  For complete rules on the challenge(s), please check out TCM blog for details.  There will also be prizes daily so leave those comments for your chance to win that days featured stamp sets!  The deadline to leave those comments is 9:00pm PDT, Friday, March 23rd.


Please stop by again tomorrow for more from The Craft's Meow Birthday Bash!!!
 
{MOTHER}
Stamps:  Beautiful Spring, Mother and Father (The Craft's Meow)
Paper:  SS White (PTI)
Ink:  Shabby Shutters, Peeled Paint, Worn Lipstick, Tattered Rose, Spun Sugar, Scattered Straw, Mustard Seed, Antique Linen Distress Inks (Ranger), Versamark
Dies:  Flags and Tags (Lil' Inker Designs)
Misc:  Vintage Wallpaper Embossing Folder (SU), Janome Sew Mini, White Filigree Embossing Powder, Foam Tape, Pearls

Friday, March 16, 2012

Some "guest" news!

Hi everyone!  I'm so excited to finally be able to share some "guest" news I have!  I have been asked to Guest Design for the craft's meow this month!  How awesome is that??  I have been a quiet stalker of their stamps ever since I won their release last summer during the July Blog Hop!  I can not tell you how thankful I am to Lisa for extending this opportunity to me.  I have had so much fun with this release and have enjoyed working alongside Lisa's talented design team!


And guess what??  This is The Craft's Meow 1st Birthday Bash!  I couldn't have asked for a better month to design with.  Just wait until you see the stamps releasing this month!  Squeeee!  The designs are just......well, you will just have to come back here tomorrow for Day 1 of the Birthday posts!  Thank you for letting me share my news today............it's the only place that people really understand my excitement over this news!  LOL 


Have a great Friday!  See you tomorrow for a Birthday Celebration!


Monday, March 12, 2012

Happy Monday!

Hi everyone!  I have some fun **NEW** things to bring you here on the blog in the next 2 weeks like some new Lil' Inker Designs and Market Street Stamps.  So stay tuned......I've been working feverishly behind the scenes and you won't want to miss it!  I also have some other "fun" posts to share too so you will just have to come back to see what's happening here!

Just a quick card to share that I made a while back.  Perfect for that guy turning "50" years young!  Using my Chevron stamp set from PTI, this was a cinch to stamp.


Chevrons


Thanks so much for stopping by today!  Have a great start to your week!
{Who's turning.....}
All supplies PTI unless stated.
Stamps:  BB: Chevron Stripes
Paper:  Soft Stone, True Black, SS White
Ink:  True Black
Dies:  Number Dies, Mat Stack 3 (circular portion die cut off)
Misc:  Foam Tape (3M)

Wednesday, March 7, 2012

Paint the Town with Market Street Stamps


Hi everyone!  Today a new Paint the Town color challenge has been issued over at
You have almost 2 weeks to get your card linked up for your chance at a sweet prize!!

Here are the gorgeous colors for March:


I had a little fun with this one.......using the EXCLUSIVE stamp from the February Market Fresh Kit that you can find HERE.  Isn't this Doily stamp just gorgeous??  Seriously, it's one of my favorite doily images yet.  (and I have quite a few doily images.......hehe)  This kit has so many goodies and gorgeous papers that you can make lots of scrapbook pages and cards from.  It's a great value and like I mentioned, you will receive this Doily stamp in your kit!


AmyPainttheTownMarch2012


I wanted to show you just exactly how I used this one stamp to achieve the look of 2 stamps.  It is reverse masking and it really isn't that hard to do.  I first stamped my doily in Navy.  Then take copy paper and punch a 1 3/4" circle.  This serves as your mask.  Simply lay this mask over the area you want to stamp and just stamp!  Here is a photo to show you.


Remove the mask from your focal image and this is what you are left with.  As you can see, I still got a little bit of the inner circle around my mask but never fear!  I always try to "fix" a mistake before starting over!  So, in my completed card, I simply die cut a banner and stamped a sentiment and it fits perfectly over my "mistake".  No one knows right??  :)


Thanks so much for stopping by today.  I always enjoy your comments and hearing what you've been up to!
Have a great Wednesday!

{Congratulations}
Stamps:  Doily (Market Fresh Kit:  Market Street Stamps), Celebrate Cake (Market Street Stamps)
Paper:  Soft Stone, Vintage Cream (PTI), Night of Navy (SU)
Ink:  Night of Navy (SU), Ocean Tides (PTI)
Dies:  Flags and Tags Dies (Lil' Inker Designs), Linen Impression Plate (PTI)
Misc:  Navy button, Foam Tape, Oyster Baubles

Tuesday, March 6, 2012

You brighten my day!!!

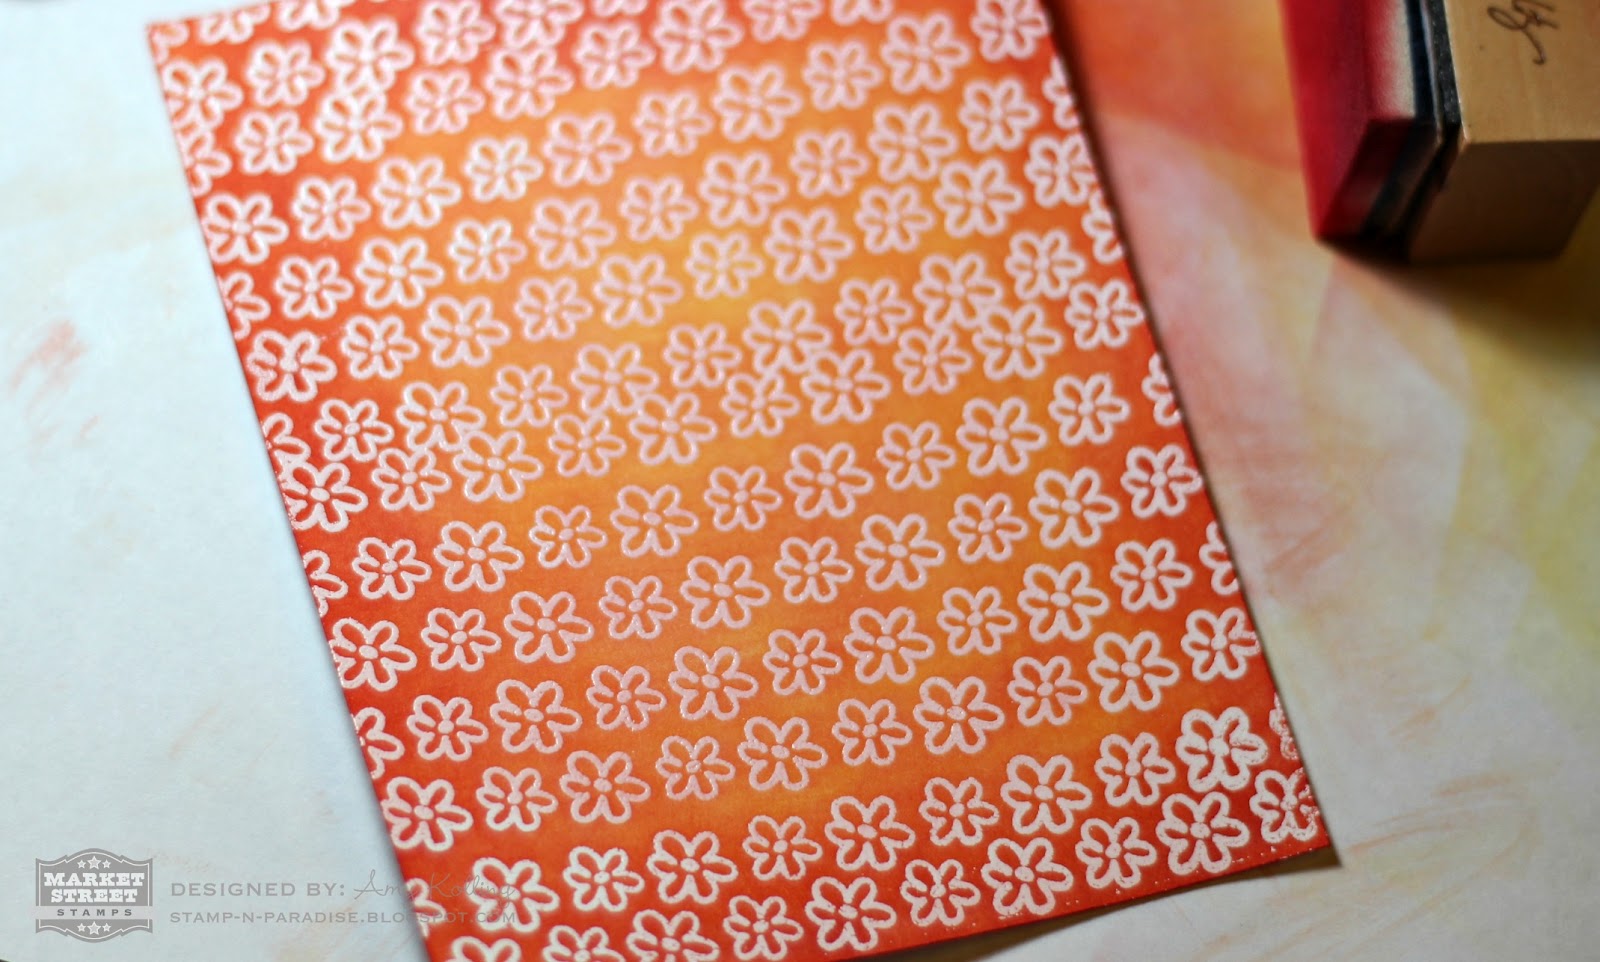
Hi everyone! I'm here today with a fun, bright card for you using one of my favorite techniques:  Emboss Resist.  I absolutely love this technique!!  I'll take you through my steps at achieving this look.
My card uses stamps from Market Street Stamps.


Here is a photo of supplies you will need along with your heat tool.


You can start by using an embossing buddy to help remove any static from your cardstock but I did not use mine here.  Ink up your image of choice with Versamark and begin stamping your pattern.  It will be a bit hard to see.  Once you are finished stamping, sprinkle on white embossing powder over entire image and tape off the excess.  Heat image.  Here is what mine looks like just before embossing:


Now comes the fun part!  You get to be an artist!  I've used Mustard Seed, Spiced Marmalade, and Barn Door Distress Inks to sponge on the ink working in a circular motion starting OFF your paper and working ONTO your paper.  This is important and will give you better blending results.  Here is Mustard Seed first.


Then Spiced Marmalade.


And finally Barn Door.


You just keep adding ink until you like the color.  You can make it darker or lighter just depends on what you like.  The final step is to use a paper towel to buff over the embossed images.  The embossed images will "resist" the sponged ink you've applied and really pop off the paper!!!

I also wanted to mention that I did use the "rock 'n roll" technique for stamping my sun.  I simply started by inking up with Mustard Seed first and then rolling the stamp in the Orange Marmalade. 

Well, that's it for me today.  I hope you give this a try if you have any Distress Inks in your stash.  They are so much fun to work with!!
{You brighten my day}
Stamps:  Ain't No Sunshine (Market Street Stamps)
Paper:  SS White, Pure Poppy (PTI)
Ink:  Mustard Seed, Spiced Marmalade, Barn Door Distress Inks (Tim Holtz), True Black (PTI)
Dies:  Mat Stack 4 Die (PTI)
Misc:  Buttons (PTI), 1/4" Silk Ribbon (PTI), Foam Tape

Friday, March 2, 2012

Lil' Inker Designs and CPS 254


Hello friends!  I am here today to share a card for the CPS sketch this week that is sponsored by Lil' Inker Designs!  I am very proud to be a member of this awesome DT and to work with Laura!
There is still plenty of time to get your chance at a $20 store gift certificate with this sketch!  Here is the sketch I've used:


I've combined several Lil' Inker Designs products here along with some new My Mind's Eye Miss Caroline:  All Dolled Up papers.  I used the Fringe Flower Die to make my flower out of paper!  To make my flower larger, I die cut 2 strips of paper, folded, added some glitter to the edges, and then rolled up and fluffed!  The frame and sentiment is from the Flags and Tags stamp and die set!  I just swoon every time when I see the sentiments with that gorgeous font!!!

AmyCPS

I'll leave you with the product graphics to get your creative juices flowing!  Have a wonderful Friday!


{Wish Big}
Stamps:  Flags and Tags (Lil' Inker Designs)
Paper:  Berry Sorbet (PTI), Miss Caroline: All Dolled Up (My Mind's Eye)
Ink:  Kraft, True Black (PTI)
Dies:  Flags and Tags (Lil' Inker Designs), Fringe Flower (Lil' Inker Designs)
Misc:  Prisma Glitter, Pearl gem
Related Posts with Thumbnails