
Hi everyone! I have a quick little tutorial for you today!
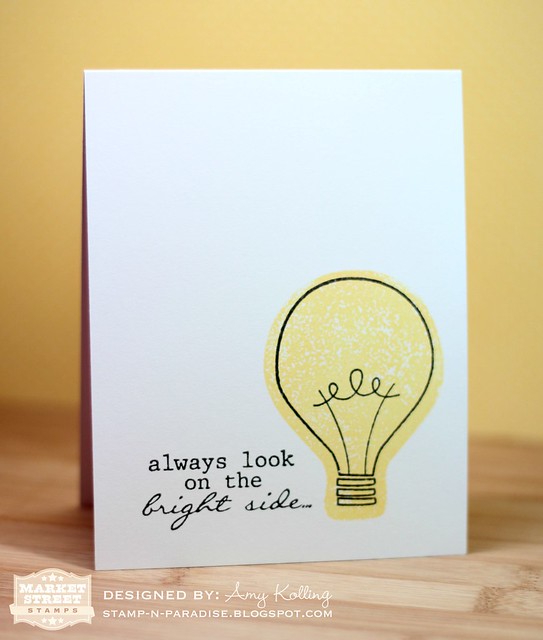
When you look at your clear stamps, do you really look at them? What I mean is....do you think about turning them over and stamping with the "WRONG" side? Well, I wanted to share just how you can do this! I used this technique on THIS Market Street Stamps card that was chosen for the Top 20 of the Paper Crafts Gallery Idol contest this summer!
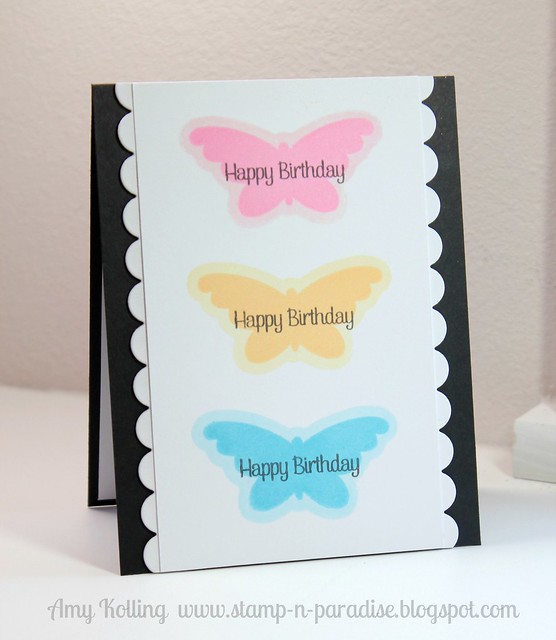
Firstly, you need to choose a clear stamp that has an outline that is the same as the image. To clarify, look at the back of the stamp to see if it would make the perfect outline for the actual stamp itself. I chose to work with the Two Step Butterfly stamp that is only $5 and available in the MSS store. The butterfly I used is the SOLID image (top image in the photo). Here are my supplies:

Let's see, I do believe some neon is in.....now I don't have neon inks but I think this represents neon in what I remember wearing back "when" those neon shoestrings and tops were "in"! LOL So here, I've chosen inks that have a lighter shade and a coordinating darker shade.
Your first step is to place a small piece of double sided tape on one side of your clear block and place your stamp on the block so the back side is out. Yes go ahead.....do it. Ink up your lighter shade of color and stamp your image. Clean your stamp and remove to now place on the other side of your block. Now place your stamp the "normal" way on the block and ink up with the darker coordinating shade of color. Now, centering the actual stamp is soo easy because you have the outline there as a guide! When done, it gives the most perfect outline to your image!

Here are all 3 butterflies stamped first with the back of the stamp and then again with the normal side of the stamp.

Now for the finished card.........I love the results and it makes for very mailable card since there is no layering!
So I challenge you to go look through your stamps and see what stamp(s) you have that may work for this technique because it is FUN! Thank you all for stopping by today.....have a great one!

{Happy Birthday}
Stamps: Two Step Butterfly, Simple Salutations (Market Street Stamps)
Paper: SS White, True Black (PTI)
Ink: Shell, Bubblegum, Sky, Ocean, Lemon Whip, Papaya (AMuse), True Black (PTI)
Dies: Small Scallop Border (PTI)


16 comments:
What a genius idea - can't wait to look at which of my stamps this will work with - TFS :-D
Thanks for the tip! I'm already thinking what stamps I can use. Great card, too.
Brilliant Amy!
Great tip, Amy! Thanks for sharing:)
Fabulous! I've always fancied trying this technique out but then I forget about it! Thanks for the reminder and fab tutorial! :)
Hugs!
x
Great tutorial! Thanks so much, Amy!
Such a fun and easy technique Amy! I haven't done this for a while. Thanks for the reminder. Your card is adorable. Hope you are well.
I think that I've refreshed your blog about 100 times. I'm having trouble with the images loading, but I've seen enough of this post to know that your card is ever so pretty! LOVE the soft pastels with the bold black base! And that technique is one I just don't take advantage of enough. TFS!
So pretty Amy! Guess I need to look more. I love those ink pads .. I have heard of them but never seen them. Thanks Amy for the tutorial.
Fabulous tutorial Amy...I never would have thought to do that!!
What a cute card! I love the colors you used!
What a great idea! Thanks for the tutorial.
I love it too!!
This is fabulous...
colors...
layout...
just love it all!
Perfect as always! :)
Love it! The butterfly card is so beautiful!!
Amy, this is an awesome technique~ I thought that you colored that light bulb, now I have to try this!! I am too lazy for coloring. This looks sooo much better! AWESOME card with the butterflies!
Great tutorial!! I love how this looks on the butterflies! Such a fun technique that this no-color girl needs to remember!! :) Your butterfly card is beautiful!
Post a Comment