Saturday, August 31, 2019

Sunny Studio / Guest Designer

Hello!  Happy Saturday!  
I am so excited to share some cards as a guest over on the Sunny Studio blog.  The last release was full of amazing things including a multi-stamp sunflower set!  I am over the moon in love!!!

I would love for you to check out the Sunny Studio blog for all the details on my cards but here is a sneak peek of what I had fun creating!

Sunflower Fields2

Sunny Studio

Tuesday, August 27, 2019

SugarPea Designs / Mix It Up Challenge #58

Hello!  Welcome to FALL!  (I am not ready as I am a summer girl--ha!)  If YOU are ready, there is still time to play along with the current Mix It Up Challenge over at SugarPea Designs!

MIUchallenge 

To create this super simple card, I die cut many of the leaves from the With Love Tag in coordinating colors of cardstock.  The leaves were layered over some overlapping die cut hexagons using the Stacked Honeycombs SugarCut.  To finish, I added a layered Hello SugarCut!


Make sure to visit the SPD blog for details on the challenge!

Avery Elle / Peek-A-Boo Pals: Spooktacular


Hello!  I am sharing the starts of fall and my favorite holiday--HALLOWEEN!  The newest addition to the Peek-A-Boo Pals lineup, Spooktacular, includes some new characters!

Spooktacular

The Hatch Mat Elle-ments has always been a favorite of mine and thought it would be a cute way to have these new characters "hang out"!  A panel was ink blended with Seedless Preserves and Dried Marigold Distress Inks and die cut using the Hatch Mat Elle-ments.

My characters were Copic colored and die cut.  They were added to the ink blended panel with foam adhesive tucking them into the cut layers.  One simple sentiment and some tiny black stars were stamped to finish the design.

Spooktacular2

Supplies:

Thursday, August 22, 2019

Avery Elle / Fall Release Blog Hop

Santa Bear
Ho Ho Ho!  Welcome to the Fall Release for Avery Elle Stamps!  This release has some ADORABLE new sets and some additions to some older favorites too!  The Release is avaialble now and you can shop HERE!  


Santa Bear has some darling images that are all about telling Santa what you want for Christmas.  My images were Copic colored and die cut using the coordinating Santa Bear Elle-ments.  They were layered over the new Snow Scene Elle-ments and the NEW Holiday Paper Collection Paper Pad!  Where the snow die cuts out, I added in some Avery Elle Glitter.  To finish this off, I added a sentiment strip that was white heat embossed with the Pure White Fine Embossing Powder

Santa Bear2 .

SUPPLIES:

****************************

To celebrate our Fall 2019 Release Blog Hop, Avery Elle is giving away a stamp set of their choice to 3 winners.  To enter to win just comment on this post.  There is no purchase necessary and you must be 18 years of age or older to enter.  This giveaway is void where prohibited.  You can also do options 2, 3 and 4 of the following to increase your chances of winning. You have until midnight Sunday, August 25th to enter.  The winner will be announced on the Avery Elle Blog on Monday, August 26th .  All products are available for purchase in the Avery Elle store right now.  You can check them all out here

To enter to win you can do 1, 2, 3, or all 4 of the following to increase your chances:


  1. Comment here on the Avery Elle Blog
  2. Follow / Tweet us on Twitter (we are @averyellestamps )
  3. Follow / Share us on Facebook (we are www.facebook.com/AveryElle ) .
  4. Follow / Comment on Instagram (we are https://www.instagram.com/averyellestamps/)

Here is the Fall Release Blog Hop list:

Tuesday, August 20, 2019

Reverse Confetti / You're the Best

Hello!  I'm here sharing a card using one of my favorite tried and true techniques---emboss resist.  The hardest cards for me to tackle are masculine and sympathy.  This technique could be used for both depending on the sentiment strip you use!

You're the Best 

Using a panel of Premier Polar White Cardstock, I stamped the leaf sprig from Bold Blooms with Versamark Ink all over the panel and clear heat embossed.  I then ink blended Forest Moss, Crushed Olive, and Pine Needles Distress Ink over the panel of embossed leaves.  Once done, I wiped the panel down with a dry paper towel to buff off the embossed leaves.  

You're the Best2

The panel was trimmed to make clean edges.  To keep this simple (whether this is for a sympathy card or masculine), a simple sentiment (from Sentimental Sayings) was white heat embossed onto a vellum strip and wrapped around the panel.

You're the Best3

Supplies:

Wednesday, August 14, 2019

Avery Elle / CelebRAYtion


Hello!  I am here today with a card using the CelebRAYtion set from Avery Elle.  This stamp set can be used to create a card for anyone!

CelebRAYtion

I started out by Copic coloring my smiling shark friend and adding in darker dots for dimension.  I die cut my shark and rock/seaweed elements with the coordinating CelebRAYtion Elle-ments.  I assembled my card using the wave from Summer Scene Elle-ments that was distressed with a bit of Distress Ink splatter.  The wave was adhered to a white notecard that was ink blended with Squeezed Lemonade Distress Ink.  I added my shark and other elements with foam adhesive along with a white heat embossed sentiment using the Simple Sentiments Elle-ments.

CelebRAYtion2

Supplies:

Tuesday, August 13, 2019

SugarPea Designs / Have a Lovely Day

Hello!  
I am here with a card using the gorgeous florals from Meadow Motifs.  Definitely a beautiful set that can be used for any type of card--this one is just to send to a friend!  Happy mail will make anyone's day!

Have a lovely day

I stamped the florals in black Copic friendly ink and blended in shades of orange and green Copics.  They were die cut using the Meadow Motifs SugarCuts dies.  For my background, I ink blended Tumbled Glass Distress Ink over the Wave Stencil very lightly.  Layered over the background, was circle frames using the Zig Zag Stiched Circles SugarCuts made out of white cardstock.  The florals were added over the top with foam adhesive.  A simple white heat embossed sentiment (from Everyday Sentiments) on black cardstock was added as well.  A few sparkling clear sequins for some sparkle finish the card!

Have a lovely day2 

Supplies:


Friday, August 9, 2019

Miss Ink Stamps / New stencil release!

Graduated Lines Stencil

Hello!
  It's still release week and I am sharing more new stencils from Miss Ink Stamps!  


Sometimes a birthday card can be simple and it's just fine.  That's where my mind was going with this one using the new Graduated Lines Stencil.  I LOVE stripes and these soft colors.  Using Cracked Pistachio, Abandoned Coral, and Fossilized Amber Distress Inks, I lightly inked blended these across the stencil.  Keeping that simple theme, I added 4 sentiment strips to the lower right that were stamped with one of my favorite sets, Everyday Sentiments.  I finished the card with a sprinkling of coordinating gems.

Graduated Lines Stencil2

Thursday, August 8, 2019

Reverse Confetti / August Blog Hop

Stitched Rainbow Rays 

Welcome to the Reverse Confetti August Blog Hop!
  
Make sure to check out the Reverse Confetti blog for all the details of this hop and for a full list of inspiration and information.


This month's blog hop features ABC projects!  Anything But a Card (ABC)

Stitching is so popular on papercrafts lately, so I thought I would incorporate some stitching onto one of my FAVORITE stitched dies from Reverse Confetti......Stitched Rays Cover Panel Confetti Cut.  I started with a white panel die cut with the Stitched Rays Cover Panel and using rainbow colors of thread, I stitched rainbow rays!!  For my sentiment, I used the Hello Square Confetti Cuts die cut from Midnight Cardstock, trimmed out just the 'hello', and added it over my stitched panel with liquid glue.

To finish, I popped my panel into a frame that was painted with acrylic paint.  This is a perfect addition to my craft room!!!

Stitched Rainbow Rays


****************************************

Make sure to visit more of the design team for inspiration using Reverse Confetti!


Tuesday, August 6, 2019

Miss Ink Stamps / New stencil release!

Waves Stencil
Hello!  It's stencil release week from Miss Ink Stamps!  We are releasing FOUR new stencils.......Graduated Lines, Scallop, Chevron, and Wave.


I was on total vacation mode when I made this one!  Give me a beach and warm temps year round!  

Using the Wave Stencil, I ink blended Salty Ocean (fitting, right? ☺) onto a white panel.  I hand trimmed a beach and added "sand" with my Copics and white pigment pen.  Using a standard circle die, I added a sun that peeks out from behind my palm tree from Unstoppable.  My scene was spotlighted by adding in a raised panel that was die cut using a standard circle die.

Waves Stencil2

Monday, August 5, 2019

Hero Arts / My Monthly Hero August Blog Hop / Giveaway

Middle Ages

Hello! 
Welcome to the My Monthly Hero Blog Hop!  Hero Arts My Monthly Hero Kit is so full of stamps and dies to create a medieval themed card!   I barely scratched the surface of my ideas for this kit; however, I have a few cards to share.....let's go see them!  

The main kit and add-ons are fabulous!  The kit is available for a limited time only - once it's gone, it's gone. Kits begin shipping from Hero Arts on Monday, August 12th.  You can now subscribe to receive the kit monthly and never miss one!  The kit value is over $70......but only costs $34.99.  Once this kit is gone, it's gone!


This kit includes:
6 x 8 Clear stamp set
17 Coordinating Frame Cuts
1 Fancy Castle Die
2 5.5" x 8.5" sheets of Mirri Matte Lava Purple Paper
2 5.5 x 8.5" sheets of Parchment Paper
3 Glimmer Ink Pots (Gold, Purple, Red)
Dragon Scale Sequins

*****************************************
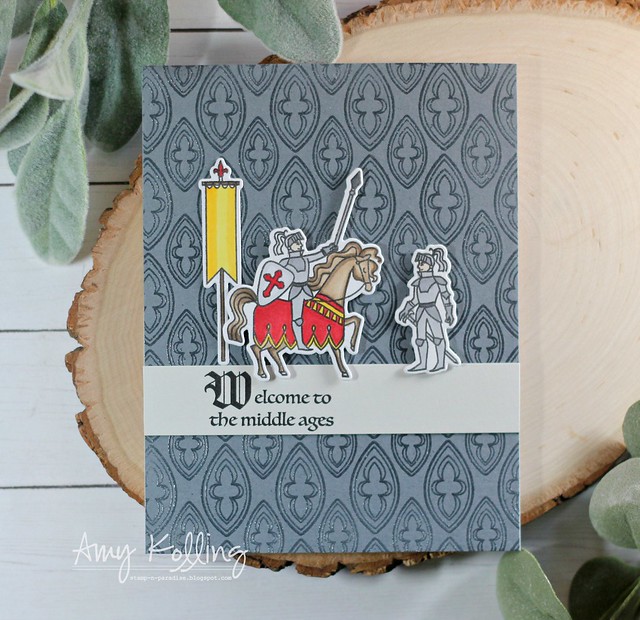
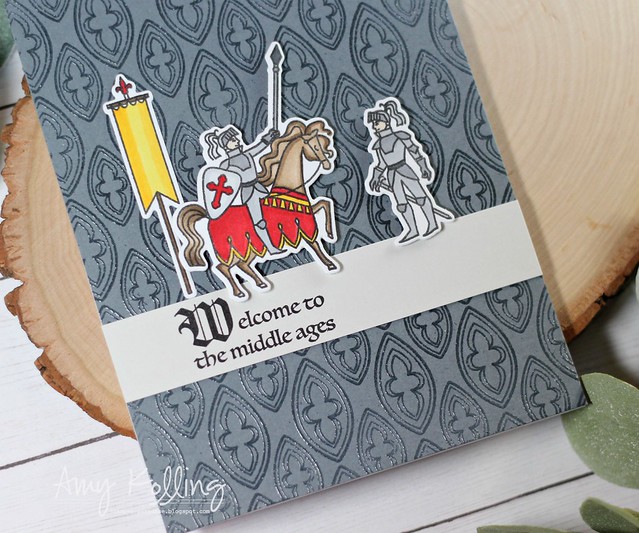
My first card shows off stamps and dies from the main kit.  I started with the Deco in the City background stamp and clear heat embossed it on gray cardstock.  Gives it a shiny finish!  I Copic colored my images and die cut with the coordinating dies.  I added a simple gray sentiment strip stamped with "Welcome to the Middle Ages"!  

Middle Ages2

*****************************************

Follow your dreams

My second card uses an add on stamp set called As You Wish.  I totally fell in love with the carriage and went with the Disney theme Cinderella.  

My background was done using the Rose Bush Cover Plate out of white cardstock.  I adhered it to a white note card and spritzed it with gold shimmer spray and sparkle shimmer spray.  My images were Copic colored and die cut using the coordinating dies.  I added my images with foam adhesive over a simple sentiment strip.

Follow your dreams2


*****************************************

*****************************************

**GIVEAWAY**

What's a blog hop without a giveaway?  We are giving away one kit to one blog reader - selected from the comments across all of the blogs in the hop. Giveaway closes Sunday, August 11th 7 at 11:59pm Pacific, and the winner will be announced the following week on the Hero Arts Blog.  Hero Arts will reimburse if the winner already bought the kit!

**BLOG HOP**


Friday, August 2, 2019

Miss Ink Stamps /Congratulations

Congratulations 
Hello! 
 Stencils have become a favorite staple in my craft room lately.  With the recent release of many new awesome stencils from Miss Ink Stamps, I am having fun experimenting with colors and designs.


This card would be perfect for a wedding card.  Using the Halftone Diamonds Stencil, I ink blended some gray dye ink in an ombre fashion, darker where I wanted my flowers.  The florals were Copic colored and hand trimmed out.  A simple white heat embossed sentiment strip on black cardstock along with some silver gems were added to finish.

Congratulations2 


Thursday, August 1, 2019

Spellbinders / August Large Die of the Month

Just a Note

Hello!  I don't know about anyone else but even though this is the time of year my kids go back to school, I secretly can't wait to shop for their school supplies!  This just means I can throw in some things for me 😁

Spellbinders
Spellbinders has an awesome new Large Die of the Month for August.......it can make a clipboard, scissors, No.2 pencil, pen, etc.  Such a fun die for those of us "office supply" lovers!


Just a Note2

I kept this very clean and simple just for the fact I wanted to be able to send this off soon.  
The base die cuts around 3 sides and so this makes it easy to make a shaped card!  I positioned the clip part just above so this card will fit perfectly in an A2 envelope!  To make the clip stay up at an angle, I placed some foam adhesive in layers in between the clip pieces.  I pieced together two No.2 pencils out of traditional colors of cardstock and added them to my paper.  A simple sentiment (from School Friends by Pretty Pink Posh) was stamped in the right lower corner.  

Just a Note3

Each month Spellbinders offers many different subscription memberships....


Related Posts with Thumbnails